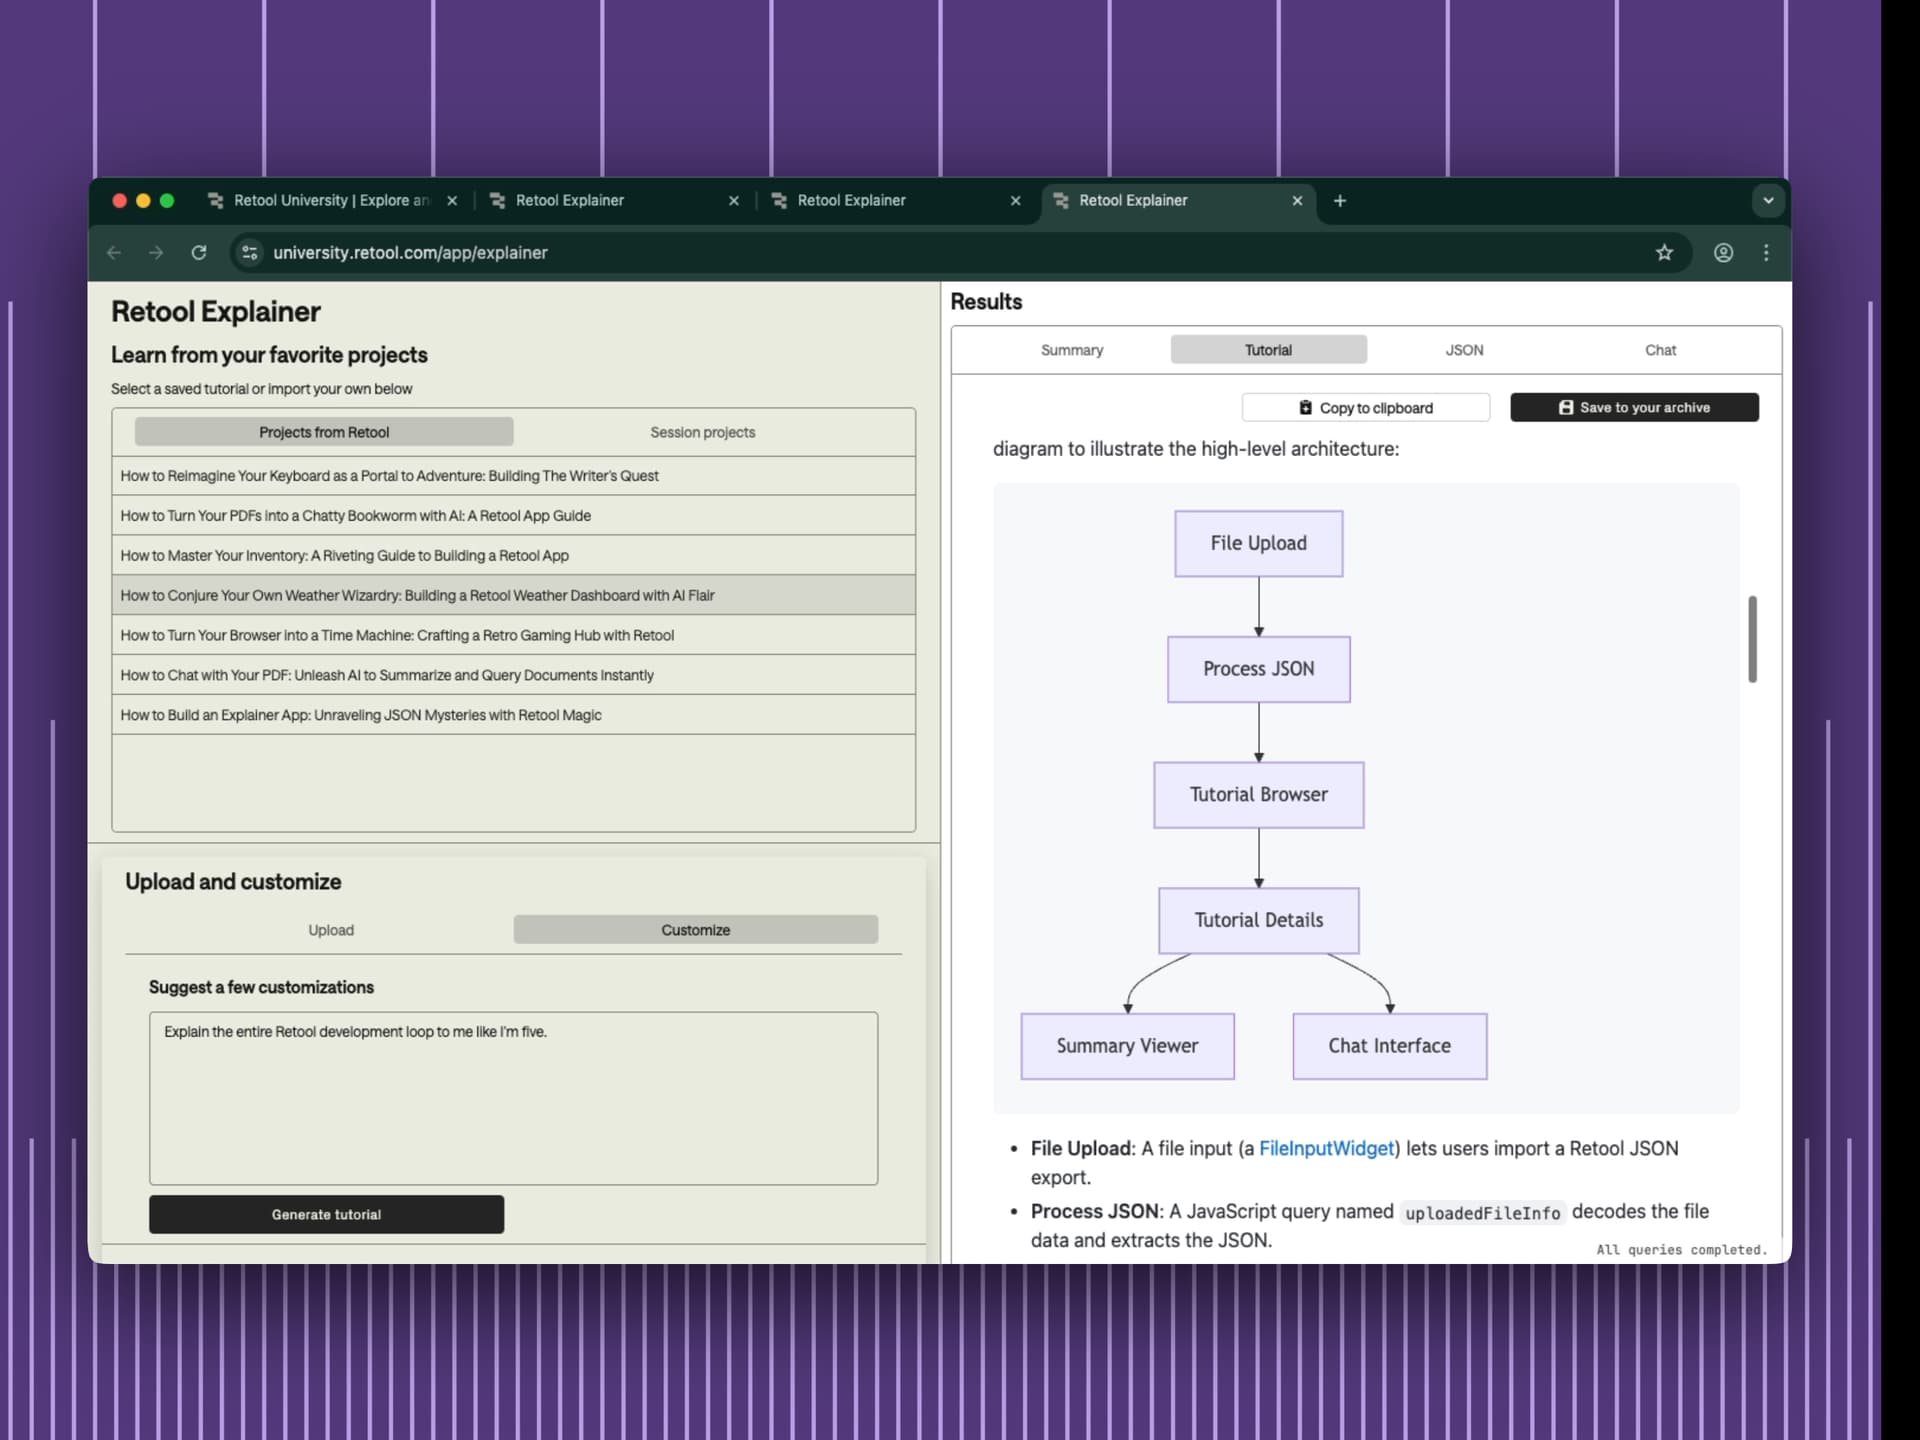
I wanted to share a favorite tutorial below that Retool Explainer generated. You can find tutorials like this in the explainer, or generate them yourself from your own projects.
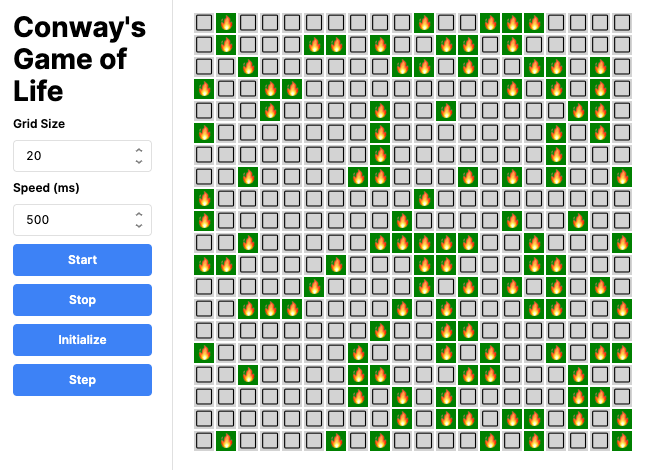
This tutorial instructs you to make an implementation of Conway's Game of Life, right in Retool.
I like to read these to better understand how our own documentation or materials may be improved to make things clearer, like "maintaining state" -- which the tutorial confusingly confuses with components instead of Javascript variable resources.
How did the explainer do? What are some gotchas you see? Can you build the app?
Cheers,
@episod
Below is a comprehensive tutorial that explains how to build an entire stateful app in Retool—from scratch—to simulate Conway’s Game of Life. This guide walks you through creating resources, writing queries in JavaScript, laying out the UI, wiring components to go along with the queries, and even suggests ways to extend and customize your app. We’ll also include all the code snippets, explain every piece of logic, and detail how the Retool development loop (resource → query → component → triggers → iterate & test) plays a role throughout your development process. Let’s dive in! 
Conway’s Game of Life in Retool: Step-by-Step Tutorial
Whether you’re completely new to Retool or have some experience building stateful web apps, this guide will walk you through building a Conway’s Game of Life simulation. The app is built entirely within Retool’s web-based UI using built-in state management, JavaScript queries, and a variety of UI components.
Below is an overview diagram of the app’s structure:
flowchart TD
    A["State Resources"] --> B["Initialization Query"]
    B --> C["Next Gen Query"]
    C --> D["Render Query"]
    D --> E["UI Components"]
    E --> F["Control Buttons"]
In this diagram:
- A represents Retool State components such as
gridState, isRunning, speedState, and gridSize.
- B is the
initGrid query that builds the initial random grid.
- C is the
nextGen query that computes the next generation in the grid.
- D is the
renderGrid query that builds HTML for the grid.
- E are the UI components (text, number inputs, container, etc.) and F represents buttons like
Initialize, Start, Step, Pause, and Restart.
Prerequisites
Before you begin, ensure that you have:
- Signed up for a Retool account.
- Installed the Retool CLI if you prefer working locally.
- Basic familiarity with JavaScript since our queries are written in JavaScript.
- An appetite for tinkering with UI components and state management!
Step 1: Set Up State Resources and Queries
In Retool, the developer loop begins with resource creation. Although this app does not require an external database resource, it leverages internal state and JavaScript queries to create and simulate the grid.
1.1 Create State Components
Create the following State components by dragging a State from the component menu:
-
gridState — This will hold a 2D array representing the simulation grid.
Default Value Code:
[]
-
isRunning — This state tracks whether the simulation is running (true or false).
Default Value Code:
false
-
speedState — Controls the interval between each simulation step, in milliseconds.
Default Value Code:
500
-
gridSize — Determines the number of rows and columns.
Default Value Code:
20
These states let you manage the app-level data. They’re your “resource” step in our loop.
1.2 Create the Initialization Query (initGrid)
We start by creating a JavaScript query named initGrid. This query generates a random grid based on the grid size.
How to create a JavaScript query:
- In the Retool IDE, click on Create → Query.
- Choose JavaScript as the query type.
- Name the query
initGrid.
Code for initGrid:
// Retrieve the grid size from the `gridSize` state and parse it as an integer.
// Default to 20 if the value cannot be parsed.
const size = parseInt(gridSize.value, 10) || 20;
const newGrid = [];

// Loop to create the grid.
for (let r = 0; r < size; r++) {
  const row = [];
  for (let c = 0; c < size; c++) {
    // Randomly set about 30% of cells to "alive" (true).
    row.push(Math.random() < 0.3 ? true : false);
  }
  newGrid.push(row);
}

// Return the grid so it can be stored in state.
return newGrid;
Explanation:
This query creates a 2D array, where each cell is randomly true (alive) or false (dead) with a 30% chance of being alive.
Next in our loop:
After creating the query, use the initGrid query as the basis for setting the gridState by attaching an event trigger on success. In the Events section of your query, add a success event that sets the value of the gridState state to {{ initGrid.data }}.
Step 2: Create the Simulation Logic Query (nextGen)
This query computes the next generation of cells following Conway’s rules.
Steps:
- Create another JavaScript query and name it
nextGen.
- The query will use the current grid stored in
gridState to compute the new state.
Code for nextGen:
// Retrieve the current grid from state.
const oldGrid = gridState.value || [];

// Determine the number of rows.
const numRows = oldGrid.length;
if (!numRows) {
  return oldGrid; // If grid is empty, return it
}

const numCols = oldGrid[0].length;
const newGrid = [];

// Loop through each cell of the grid.
for (let r = 0; r < numRows; r++) {
  newGrid[r] = [];
  for (let c = 0; c < numCols; c++) {
    let neighbors = 0;
    // Check all eight neighbors.
    for (let rr = -1; rr <= 1; rr++) {
      for (let cc = -1; cc <= 1; cc++) {
        if (rr === 0 && cc === 0) continue;
        const nr = r + rr;
        const nc = c + cc;
        if (nr >= 0 && nr < numRows && nc >= 0 && nc < numCols) {
          neighbors += oldGrid[nr][nc] ? 1 : 0;
        }
      }
    }
    const cell = oldGrid[r][c];
    // Apply Conway's rules:
    if (cell && (neighbors === 2 || neighbors === 3)) {
      newGrid[r][c] = true;
    } else if (!cell && neighbors === 3) {
      newGrid[r][c] = true;
    } else {
      newGrid[r][c] = false;
    }
  }
}

// Return the new grid.
return newGrid;
Explanation:
This query loops through each cell, counts its alive neighbors, and applies the Game of Life rules: survival if 2 or 3 neighbors exist for a live cell, birth when exactly 3 dead neighbors surround a cell, and death otherwise.
Attaching the Query:
Wire an event on success so that once nextGen finishes computing, it updates the gridState with {{ nextGen.data }} and also triggers the UI re-render (we’ll cover that next).
Step 3: Render the Grid in the UI (renderGrid)
Let’s create the visual representation.
3.1 Create a JavaScript Query for Rendering
This query builds an HTML string that displays cells as small divs. For fun, live cells will be styled in green with a “fire” icon, while dead cells are in light gray with a “cross” icon.
- Create another JavaScript query named
renderGrid.
- Set its type to JavaScript.
Code for renderGrid:
const grid = gridState.value || [];

// Check if grid data exists; if not, display a simple message.
if (!Array.isArray(grid) || !grid.length) {
  return "<div>No grid data</div>";
}

let htmlOut = '<div style="display:flex;flex-direction:column;">';
for (let r = 0; r < grid.length; r++) {
  htmlOut += '<div style="display:flex;flex-direction:row;">';
  for (let c = 0; c < grid[r].length; c++) {
    const alive = grid[r][c];
    const bg = alive ? "green" : "lightgray";
    // Unicode icons can be changed to any of your preference.
    const icon = alive ? "🔥" : "❌";
    htmlOut += `<div style='width:20px;height:20px;background:${bg};margin:1px;display:flex;align-items:center;justify-content:center;'>${icon}</div>`;
  }
  htmlOut += "</div>";
}
htmlOut += "</div>";
return htmlOut;
Explanation:
This query builds a row-and-column layout using inline styles. Change the icons or colors as you wish! In this step, we’ve taken our stateful grid and produced HTML that visually represents the simulation.
3.2 Display the Rendered Grid in a UI Component
With this, every time your grid state updates, running renderGrid will update the view.
Step 4: Add Control Buttons and Wire Them Up
We now create UI components that let users interact with the simulation. We’ll use buttons for these actions. This is the “component” step in the development loop.
4.1 Initialize Button (initializeButton)
- Component: Button
- Text: "Initialize"
- On Click:
- Fire
initGrid query.
- Additionally, reset any running state (
isRunning set to false).
Button Code Details (see properties in Retool’s button settings):
// When clicked (in the button’s event handler), trigger:
initGrid.trigger();
// And as a side effect, set isRunning state to false:
isRunning.setValue(false);
4.2 Start Button (startButton)
- Component: Button
- Text: "Start"
- On Click:
- Set
isRunning state to true.
- Trigger a loop of simulation steps. (Implementation: the
nextGen query is auto-triggered after a successful state update if isRunning is true—this is framed in the query event configuration.)
Button snippet (example inside Retool's event handler):
// Set the running state to true
isRunning.setValue(true);
// Trigger the next simulation step via nextGen query:
nextGen.trigger();
4.3 Pause Button (pauseButton)
- Component: Button
- Text: "Pause"
- On Click:
- Set
isRunning state to false to stop auto-triggering updates.
isRunning.setValue(false);
4.4 Restart Button (restartButton)
- Component: Button
- Text: "Restart"
- On Click:
- Reinitialize the grid using
initGrid, resetting the simulation.
initGrid.trigger();
isRunning.setValue(false);
4.5 Step Button (stepButton)
A button for stepping through one generation at a time (helpful for debugging and visualization).
- Component: Button
- Text: "Step"
- On Click:
- Trigger the
nextGen query once.
nextGen.trigger();
4.6 Speed Input (speedInput)
- Component: Number Input
- Label: "Speed (ms)"
- Default Value: Bind to
speedState.value
- Event: On change, update
speedState
speedState.setValue(speedInput.value);
4.7 Grid Size Input (gridSizeInput)
- Component: Number Input
- Label: "Grid Size"
- Default Value: Bind to
gridSize.value
- Event: On change, update
gridSize
gridSize.setValue(gridSizeInput.value);
Wiring the loop:
For any simulation step that relies on the nextGen query, attach an event on success to update the gridState, and then trigger renderGrid to update the UI. Optionally, if isRunning remains true after a step, trigger nextGen again after a delay specified by speedState.value. To implement this auto-loop, you can add an event on the nextGen query under the success events:
// In the nextGen query "Success" event:
if (isRunning.value) {
  // Wait for the desired speed interval then trigger next generation.
  setTimeout(() => {
    nextGen.trigger();
  }, speedState.value);
}
Tip: You can configure the above code in the events section of your query in Retool.
Step 5: Validate Your App and Test
After wiring up your states, queries, and components:
-
Test each query individually:
- Run
initGrid and confirm the returned grid is an array of arrays with Boolean values.
- Run
nextGen after setting up a sample grid in gridState and verify the next generation is computed correctly.
- Run
renderGrid and confirm the resulting HTML is rendering properly in the preview.
-
Test UI flows:
- Click the Initialize button and check that the grid updates in the UI.
- Press Start to begin the auto-simulation loop.
- Use Pause, Restart, and Step to verify correct control of simulation.
-
Modify state values:
- Change the speed using the number input and see immediate impact on update frequency.
- Adjust the grid size and reinitialize.
Make sure you save your app and use Retool’s version control features if available.
13 Ways to Customize Your Conway’s Game of Life App
- Color Themes: Let users choose different colors for live and dead cells.
- Custom Icons: Replace the default emojis with custom images or SVGs.
- Grid Size Control: Add an advanced slider to dynamically adjust grid size.
- Simulation Speed: Allow users to choose presets (slow, normal, fast) or use fine-grained control.
- Persistence: Save the grid to a database or local storage so that users can resume later.
- Interactive Cell Toggling: Enable users to click cells and change their state manually.
- Pattern Saver: Let users design and save custom patterns (like gliders, oscillators) into a library.
- Reset Options: Offer different reset behaviors (random, blank, preconfigured patterns).
- Analytics Dashboard: Integrate charts to visualize simulation statistics (e.g., population over time).
- Multi-User Collaboration: Use Retool’s multiplayer features to let several users interact with the simulation in real time.
- Mobile-Responsive Layout: Customize CSS and components to create a seamless mobile experience.
- Save Graphical Snapshots: Allow exporting the grid as an image using an external API.
- Retool AI Integration: Use Retool AI to suggest improvements or automatically generate descriptive tooltips for the simulation controls.
Using Retool AI for Further Enhancement
Imagine a feature where Retool AI analyzes user interaction data from your simulation and recommends optimizations. You can integrate AI to:
- Automatically update simulation parameters based on historical user behavior.
- Generate documentation or contextual on-screen tips.
- Recommend new patterns based on discovered trends in the simulation.
The integration is as simple as adding an AI query that feeds parameters to your simulation and then updating your UI with dynamic suggestions. The possibilities are endless!
Conclusion
In this tutorial, we built a stateful Conway’s Game of Life simulation application using Retool. We followed the Retool development loop by first setting up states (resources), creating JavaScript queries (initGrid, nextGen, renderGrid), and wiring them to UI components (buttons, inputs, HTML display). We even explored over a dozen ways to customize and extend the app further.
By understanding both Retool’s platform features and the logic behind Conway’s Game of Life, you now have a solid foundation for building more complex interactive apps on Retool. Happy building, and remember: every cell counts in this game of life! 
For more details and best practices, check out:
Enjoy your journey into the world of Retool!