Retool is a low-code platform that allows you to build custom applications and interfaces. Most people know Retool for its capabilities and user-friendly interface, as it empowers not only developers but non-technical users as well to create customized applications with efficiency. From streamlining internal processes to building robust enterprise-grade solutions, Retool offers a practical toolkit for organizations aiming to optimize their operations. This functionality can be further enhanced if we consider connecting Retool applications with external API services, to access useful/essential data or other useful functionality.
Thinking along these lines, in this tutorial we will explore the integration possibilities with APIs for standard data and common functionality that can be added to any Retool application to make it leaner and more efficient. Some examples of such APIs are:
- Email validation API
- Currency conversion API
- Image resizing API
- Thumbnail generation API
- Link Preview API
- And many others - see here.
Below we will try to provide step-by-step instructions on how to set up an API resource, configure authentication and headers if required, test the API resource, and build your Retool app using any of the APIs. For this tutorial, we will focus on ApyHub APIs. ApyHub is a platform with powerful yet simple-to-use APIs that provide standard data & essential functionalities, helping developers save time and boost efficiency.
By the end of this tutorial, you'll have a fully functional Retool app that interacts seamlessly with the ApyHub API, enabling you to create dynamic and data-driven applications. Let's go!
Steps
Step 1: Set up a Retool account
If you haven't already, sign up for a Retool account at https://retool.com/signup. Once you have your account ready, log in to Retool.
Step 2: Create an ApyHub Account:
Set up your account through the ApyHub Signup Page.
Step 3: Create a Sample App.
For the purposes of this tutorial, we will create a simple/sample application. In Retool, that's fairly simple. After logging in, click on the Create New button to create a new Retool app. Give your app a name (Eg. my-new-application) and click on Create App.

Step 4: Create a new Resource Service
In Retool, a resource is a collection of settings that you customize to connect Retool with a data source. Each data source you want to use with Retool requires its own resource. For any external service, there must be a Resource Service Component.
In any case, for utility API services, we will always use the REST API option when creating a new resource.
For example, let's create the Resource for two utility services:
-
Email Validation Utility: This service allows you to verify whether the email domain provided can receive emails. In addition to this check, it can also check that the emails are not disposable ones.
-
Country Utility: Country details service lets you query and find details about a specific country like Country Code, Flag Emoji, Telephone Code, etc.
In your newly created Retool app, click on the "+" button on the left-bottom Code panel. Select the Resource Query. Select the Resource as RESTQuery (restapi) option from the list of available resource types.

Step 5: Configure the REST API resource service
In the resource configuration screen, we need to provide the necessary details to connect to the API. Here's what we'll need:
- Action Type
- Base URL
- Headers
- Body Parameters
- Resource Service Name
1. Action Type: The action type in an API call refers to the type of operation or action that the client wants to perform on the server. It specifies the intention behind the request and determines how the server should handle and process the request. There are two methods:
- POST: This method is used to send data to the server to create or modify a resource.
- GET: This method is used to retrieve or fetch data from the server.
2. Base URL: A base URL refers to the root endpoint of an API service. The base URL typically includes the protocol, the domain name or IP address, and the endpoint.
You can find the Base URL on the documentation page of every utility API.
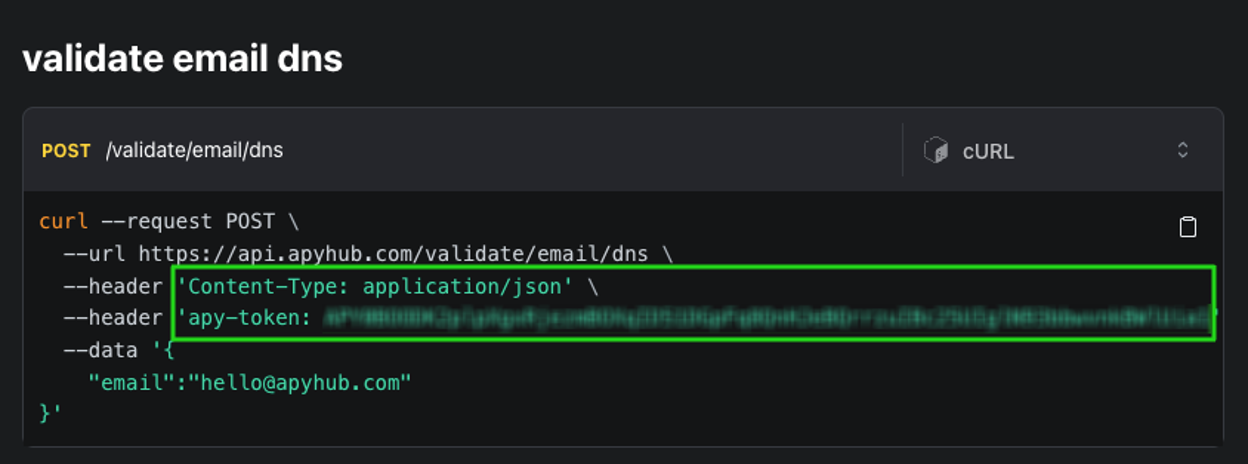
For example, go to the Documentation Page of Email Validation Utility. Here we see the base URL is https://api.apyhub.com/validate/email/dns and the action type is POST.
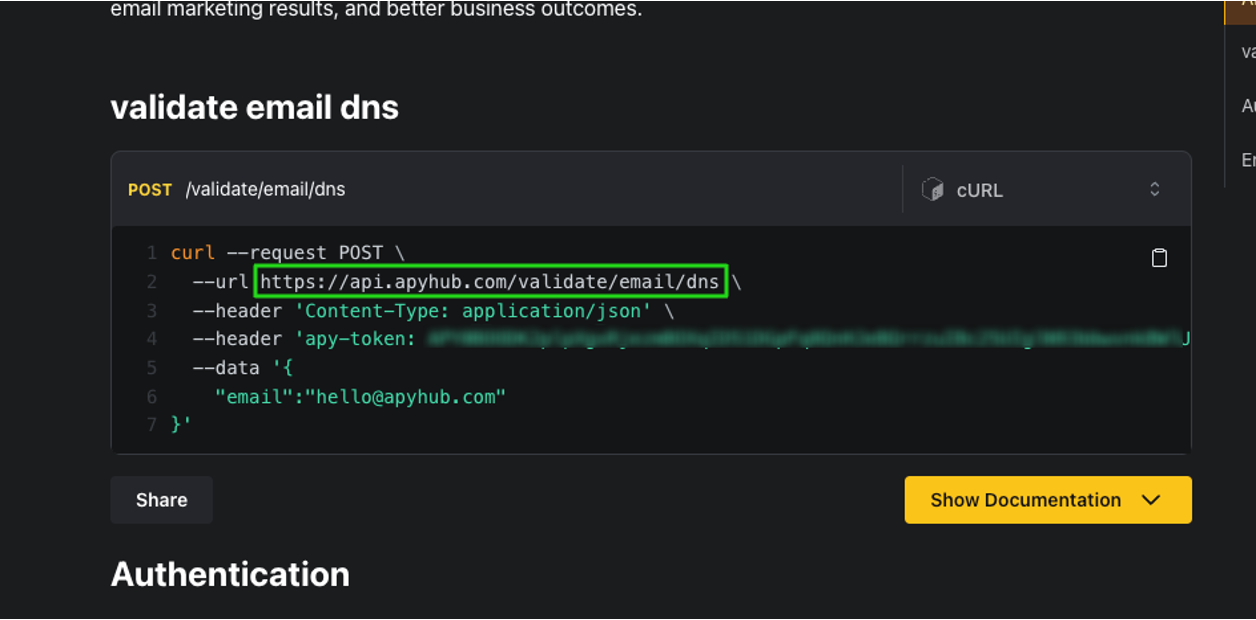
Copy the --url and paste it into the URL Input field of Resource Service.
![]()
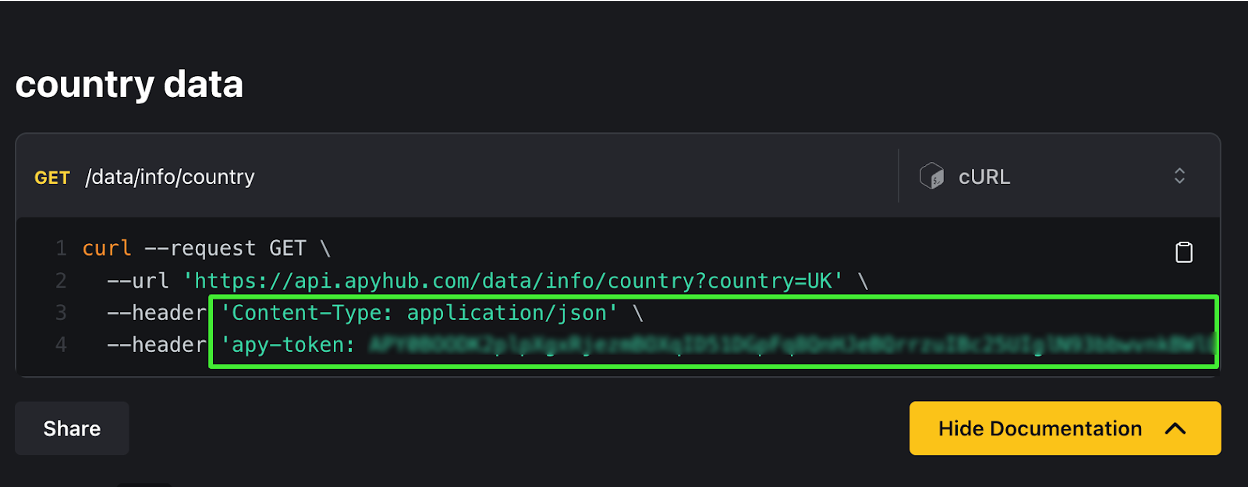
Similarly, Go to the Documentation Page of Country Utility. Here we see the base URL is https://api.apyhub.com/data/info/country and the action type is the GET.
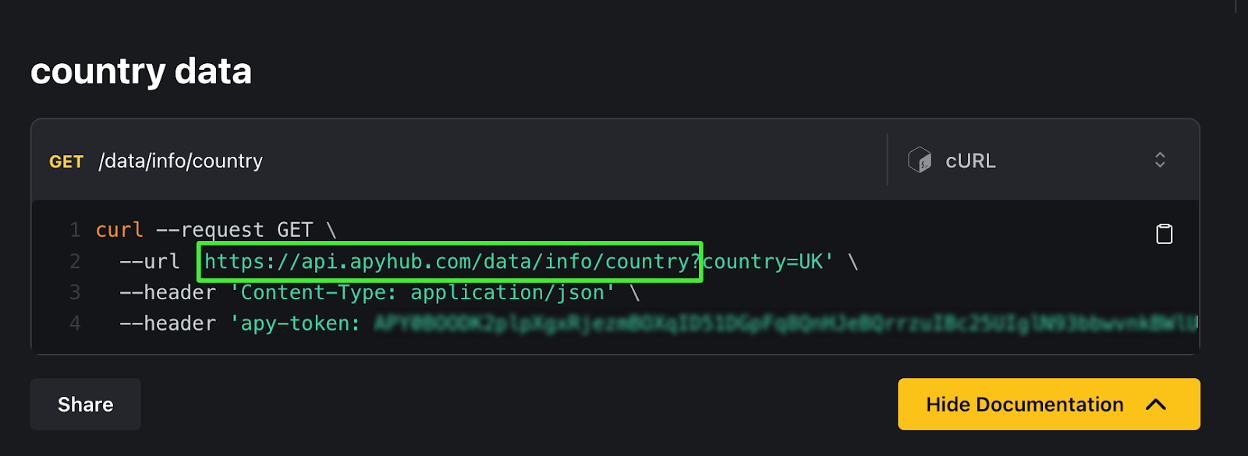
Copy the --url and paste it into the URL Input field of Resource Service.
![]()
3. URL Parameters: URL parameters are a way to pass data to an API endpoint through the URL. They are appended to the URL after a question mark (?) and separated by ampersands (&). They provide additional information or filters for the API request, enabling customization and targeted data retrieval.
The decision to include or exclude URL parameters is determined by the API's design and the specific requirements of the API endpoint.
For example, in the Email Validation Utility, we don't need URL Parameters. However, if you have looked at the Country Utility, there is a Country Name Acronym that needs to be provided as a URL Parameter.
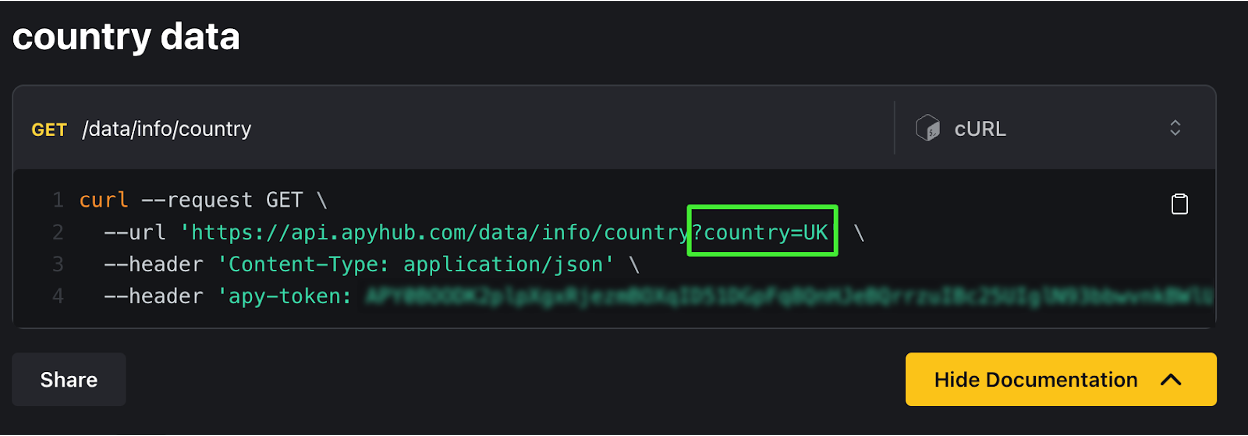
Add the country as the URL Parameter field of Resource Service.

4. Headers: Headers are used to send additional information along with the request. Headers contain metadata about the request or the desired response, and they can provide details such as the content type, authentication credentials, or custom.
For example, to make a successful API call to the Email Validation DNS, we are providing two values as headers to a user:
-
Content-Type: This specifies the format of the data being sent or received, such as JSON, XML, or form data. In our case, it is
application/JSON. -
Apy-Token: This specifies a credential provided by the server that identifies and authorizes the client making the request. This is unique and confidential to every user. [DO NOT SHARE THIS TOKEN WITH ANYONE]
For example,
APY*******************************g.
Note: The headers will be the same for both utility services.
Copy your –header Secret Apy Token and paste it into the header input field on Resource Service.

5. Body: The body refers to the data or payload that is sent in the request to the server. It contains the information or parameters required to perform a specific operation or modify data on the server.
When making an API call using a no-code tool, the body typically consists of structured data in a specific format, such as JSON (JavaScript Object Notation) or XML (eXtensible Markup Language). The body can include various fields and values, depending on the API's requirements.
We don't need Body Parameters for the Country Utility. However, for the Email Validation utility, we are going to send the email address as data in the body parameter in the form of JSON.
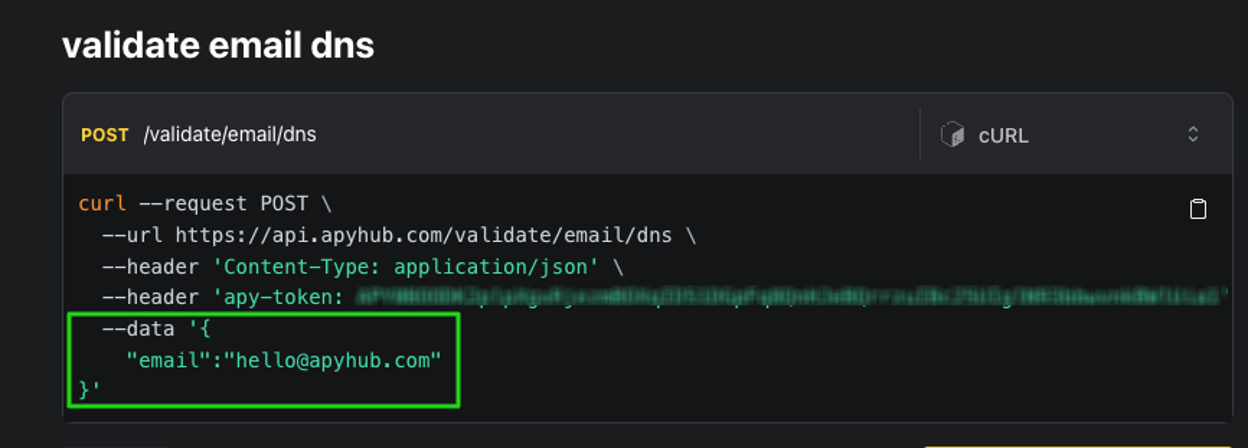
As we are collecting emails to send from the Email Input Field. We need to provide a reference ID for the value of the field. For example, emailInput.value

Next is assigning a name to Resource Service.
6. Resource Name: It’s the descriptive name which represents the task it will perform.
![]()
![]()
Once you add all the details in the respective field, Assign a Resource Name to both the Resource Services.
- emailValidationService
- countryDetailService
Click on Save.
Once all fields are completed, the resource service will look like this.
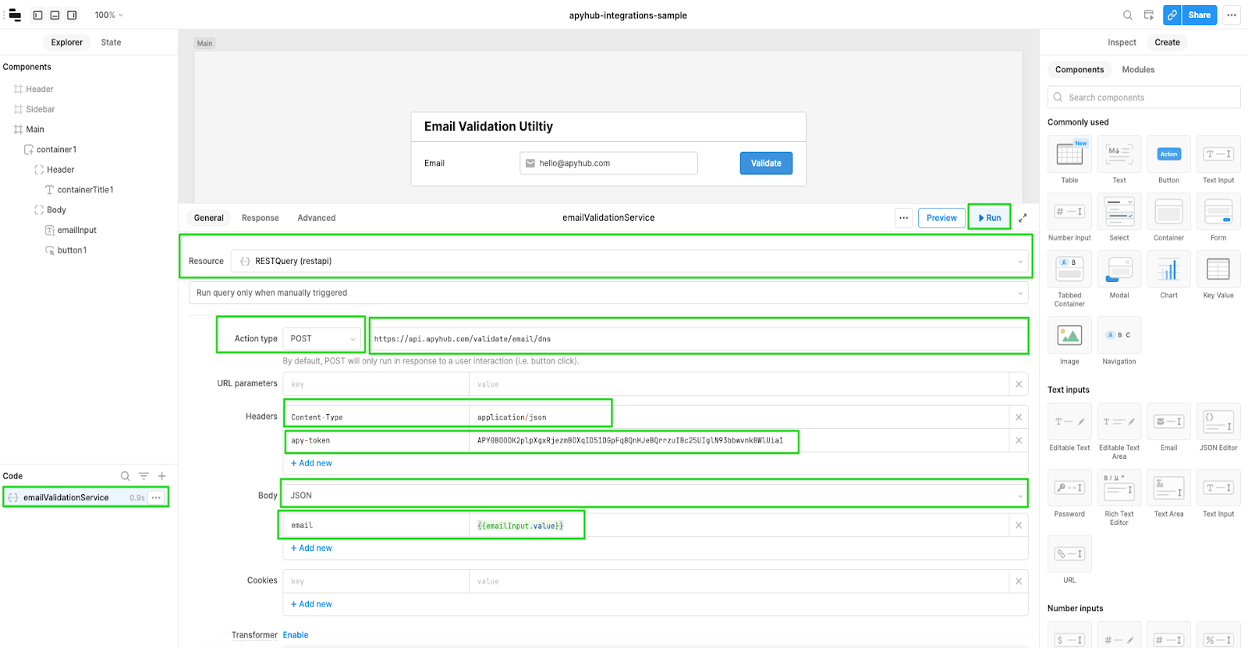
Illustration of the input field in emailValidationService Resource Service

Illustration of the input field in countryDetailService Resource Service
Step 6: Test the API Resource Service
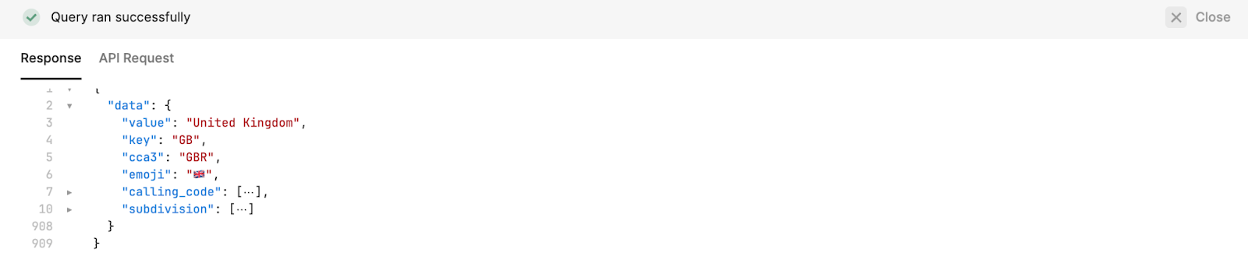
To ensure that your API resource is set up correctly, you can test it by making a simple API request.
Click on the Preview button to execute the API request. You should see the response from the ApyHub API displayed in the response panel below.

API Response of emailValidationService
API Response of countryDetailService
Step 7: Build your Retool app.
Now that you have successfully set up the ApyHub API resource, you can start building your Retool app using the API. You can create queries, display data in tables or charts, and build interactive interfaces using the data retrieved from the ApyHub API.
To add components to your app, drag and drop the desired features from the right-hand side panel onto the canvas. Configure the component properties, including the data source, to use the ApyHub API resource you created.
To test the functionality, We have used basic components.
- Container - To host Input components.
- Email Input Field – To collect input from the user.
- Button Input - To trigger the query Resource Query for Email Validation.
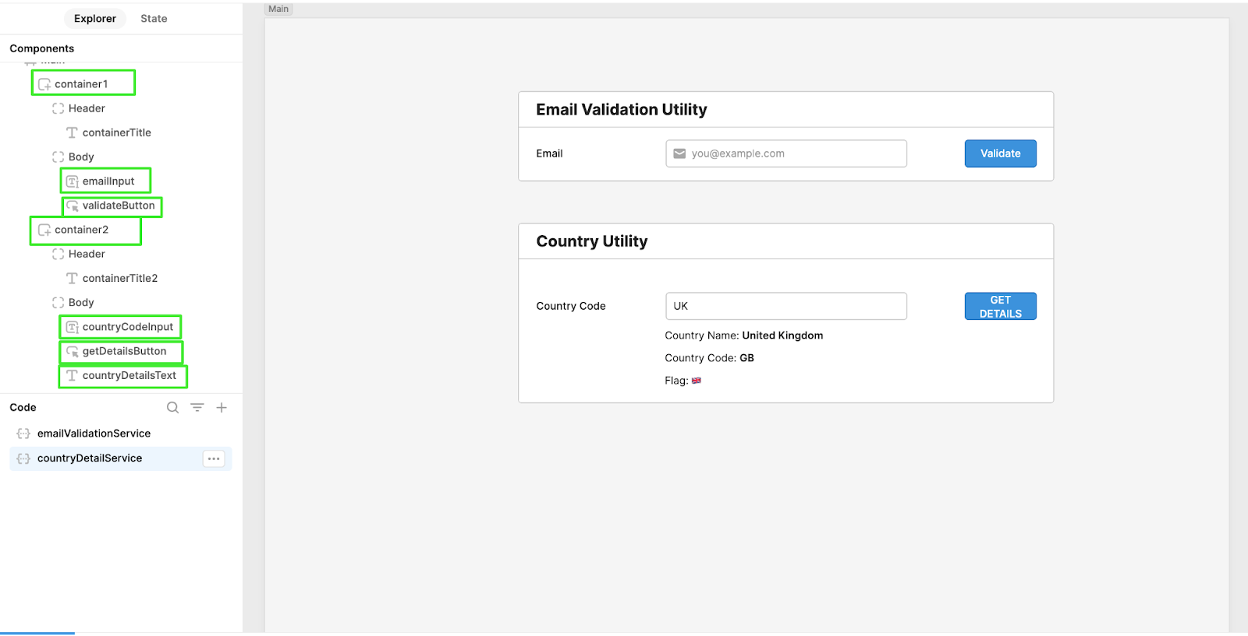
Finally, In emailValidationService Resource Service, Change the email parameter reference from static to Email Field Input Value.

And in countryDetailService Resource Service, Change the URL Parmeter reference from static to Country Abbreviation Input Field Value.
![]()
Additionally, if the email is correct, we want to show a notification like "Email Validated Successfully" when the user clicks on the Validate Button. Here's how we can do that.
Again, in the email validation service, create an Event Handler for Success. Click the "+" button.
Choose:
- Action: Show Notification
-
Title: Email Validation Successful

-
Only run when:
{{email.validation.data.data}}(True)
Click on Save and Run to check the notification.

Step 8: Publish and deploy your Retool app
Once you have built your Retool app and are satisfied with its functionality, you can publish and deploy it. Follow these steps:
- Click on the Publish button in the top-right corner of the Retool editor.
- Follow the instructions to choose a domain name, configure access controls if needed, and publish your app.
- After publishing, you can share the app with others or embed it in your website or application.
Note: If you need to integrate multiple utility services, you will have to create multiple resource services as well. However, the process for creating these resources will be the same as outlined in Steps 3 to Step 5.
That's it! You've successfully added the ApyHub API in Retool using the REST API Resource Service and built an app using the API.
You can now sign up and start with your brand-new application! Feel free to reach out if you'd like to learn more about extending Retool's capabilities, and we will be glad to help and support you!
Also if you have or work for a startup, sign up here for our exclusive program!