Building an Application Tracking System using Retool and ApyHub APIs

An Application Tracking System (ATS) is a crucial tool for streamlining the hiring process by managing and tracking job applications. In this tutorial, we will guide you through building your own ATS using Retool. We will then show how we can use ApyHub to convert the candidate CVs to PDFs. Retool is a powerful development platform that allows you to build custom internal tools, while ApyHub provides simple APIs for any functionality. By combining these two tools, you can create a robust and scalable ATS tailored to your organization's needs.
What does this Application Do?
- Add the job applications to the database.
- Convert the CV from Word to PDF
Prerequisites:
- Basic understanding of web development concepts.
- Familiarity with JavaScript and API concepts.
- Access to Retool and ApyHub accounts.
Modules:
- ATS Frontend - Candidate Form
- ATS Backend - HR Portal
PART 1 - ATS: Candidate Form
Step 1: For existing Retool users: Sign in to retool. If you don't have a retool account yet, you should first create one before continuing.
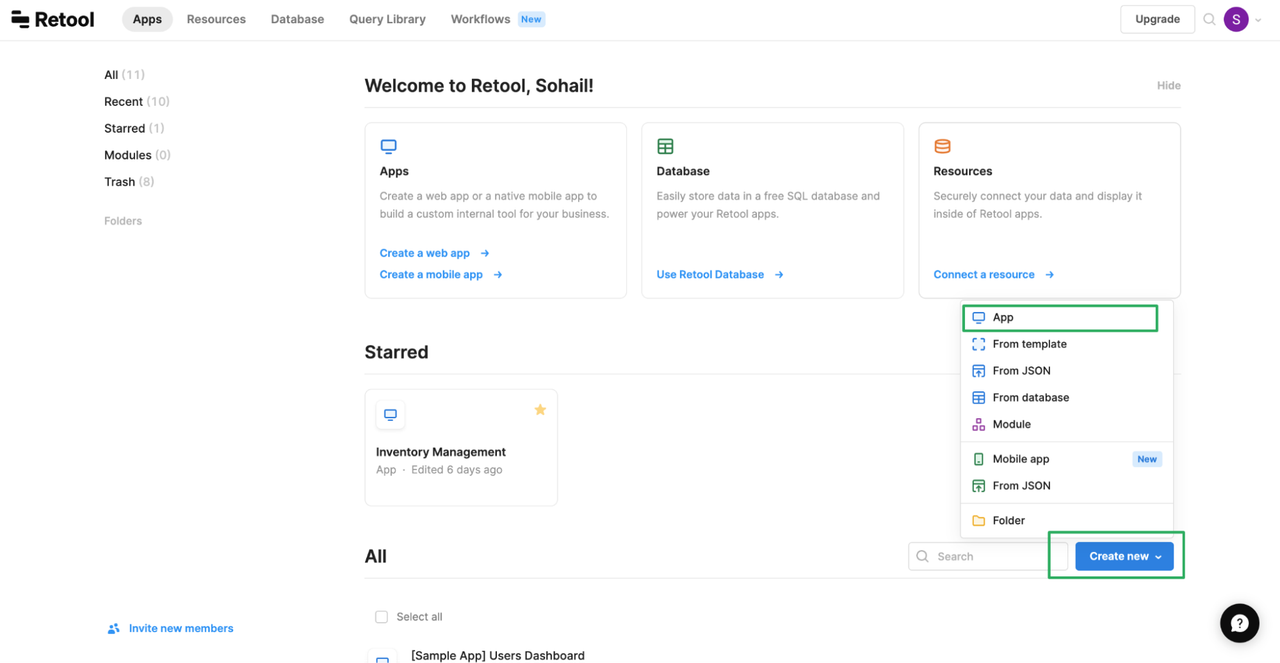
Step 2: Once you're in the Retool dashboard, locate and click on the Create New button. This button is typically located in the top-right corner of the screen and is represented by a plus (+) icon.
A drop-down menu will appear. Click on the App option from the menu. A Dialog box will appear to ask for the name of an app. For reference, you can assign the name ATS Candidate Portal and click Create App.
This option allows you to start with a blank canvas and build your web app from scratch. Retool will redirect you to the app builder interface. Here, we will start designing and building by adding components and configuring their functionality.
Step 3: Now we initiate with building the front-end part of your candidate, would be able to send his details through the form and that see how we can create this form in the tune.
We need details from a Candidate who will submit all the necessary information for HR to evaluate his profile. Below are the fields which we will add in the form.
- First Name
- Last Name
- Phone
- Address
- City
- Province
- Pincode
- Resume
- Years of Experience.
On the right, select the Form Input, and drag it to the canvas.
Now, Let’s add the input field in the form for all required credentials.
- For First Name, Drag the Text Input from Component Directory and drop inside the form.
Add the label as First Name and change the id to candidateFirstName. - For Last Name, Drag the Text Input from Component Directory and drop inside the form.
Add the label as Last Name and change the id to candidateLastName. - For Email, Drag the Email Input from Component Directory and drop inside the form.
Add the label as Email and change the id to candidateEmail. - For Phone, Drag the Number Input from Component Directory and drop inside the form.
Add the label as Phone and change the id to candidatePhone. - For Address, Drag the Text Input from Component Directory and drop it inside the form.
Add the label as Address and change the id to candidateAddress. - For City, Drag the Text Input from Component Directory and drop it inside the form.
Add the label as City and change the id to candidateCity. - For Country, Drag the Text Input from Component Directory and drop it inside the form.
Add the label as Country and change the id to candidateCountry. - For Pincode, Drag the Number Input from Component Directory and drop it inside the form.
Add the label as Pin Code and change the id to candidatePincode. - For Resume, Search file in Component Directory on the search bar. Drag the File Input from Component Directory and drop it inside the form.
Add the label as Resume and change the id to candidateResume. - For LinkedIn, Drag the URL Input from Component Directory and drop it inside the form.
Add the label as LinkedIn and change the id to candidateLinkedin. - For Years of Experience, Drag the Number Input from Component Directory and drop it inside the form.
Add the label as Years of Experience and change the id to candidateYoe.
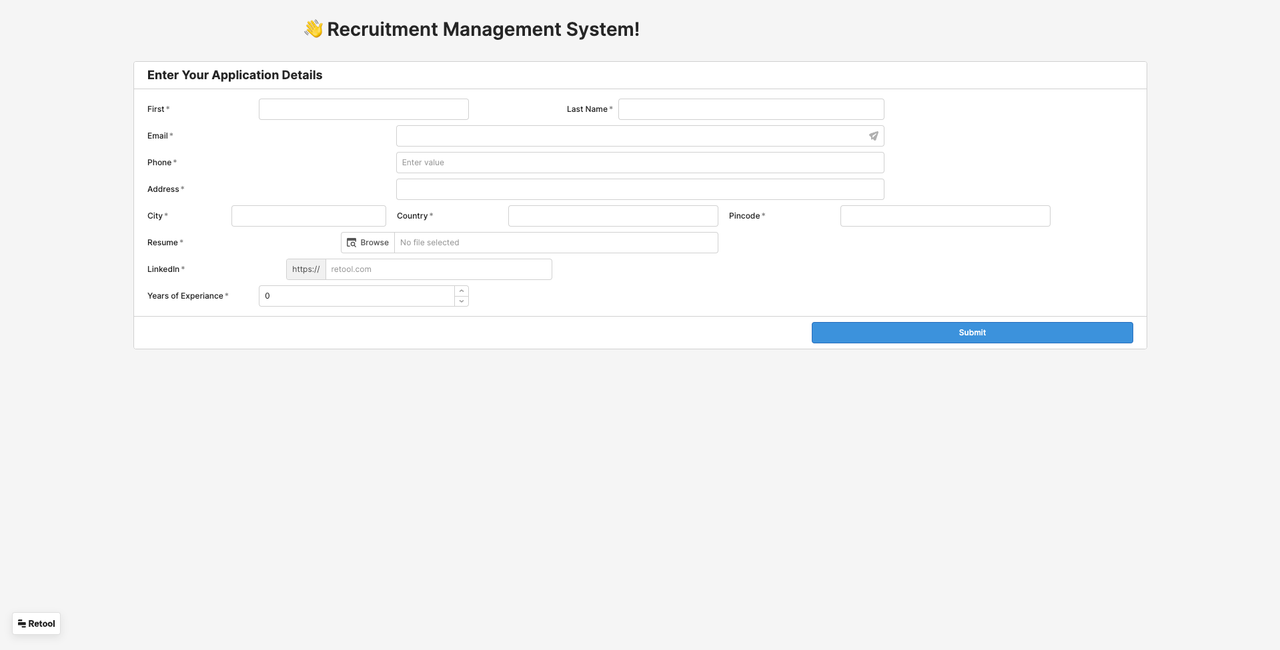
Once you will add all the fields, your UI will look like this.
Step 4: We have successfully created the Candidate Form. Now, It’s time to create a database to store all the details of candidates and aim to display the candidate details to HR for evaluation Purposes. However, before proceeding, we need to establish a database to store these details.
Let's begin! Retool offers a built-in database feature that allows us to create a table with the necessary columns.
Here’s how can you do that:
- To create the database in Retool, locate the Retool logo button at the top left corner.
- Click on the Retool logo button, and a drop-down menu will appear.
- From the drop-down menu, select the Database option
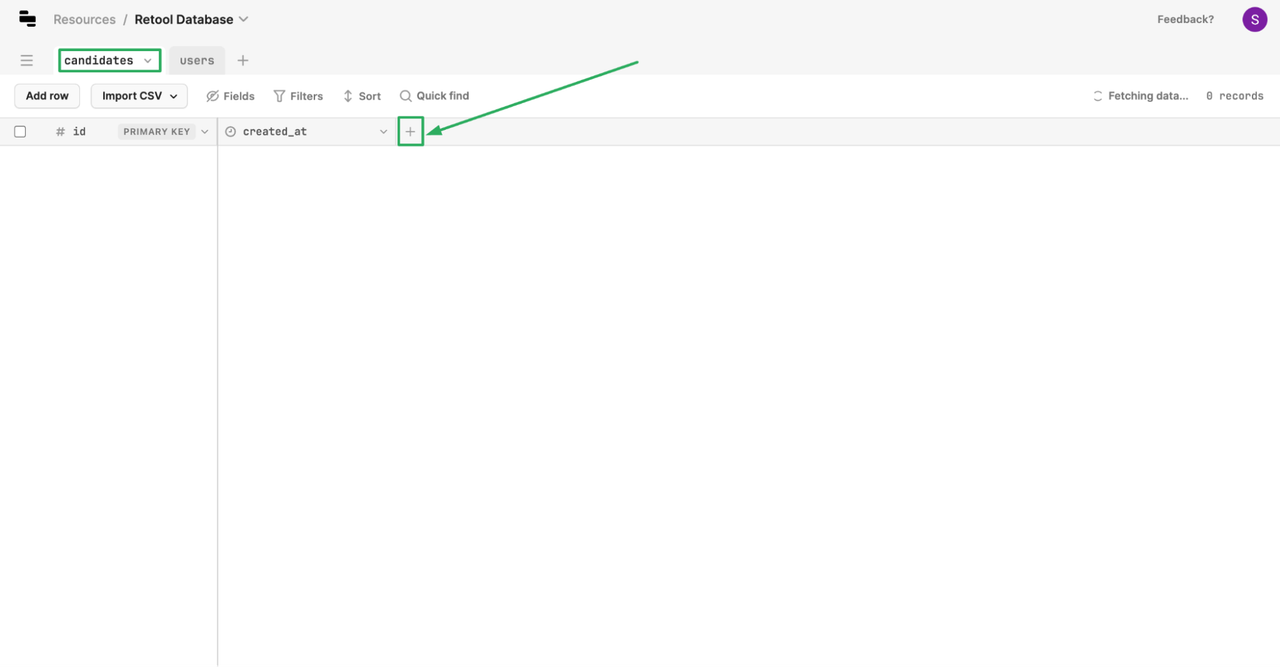
You will see the sample users table. Now, we will create our inventory table by clicking on the + button.
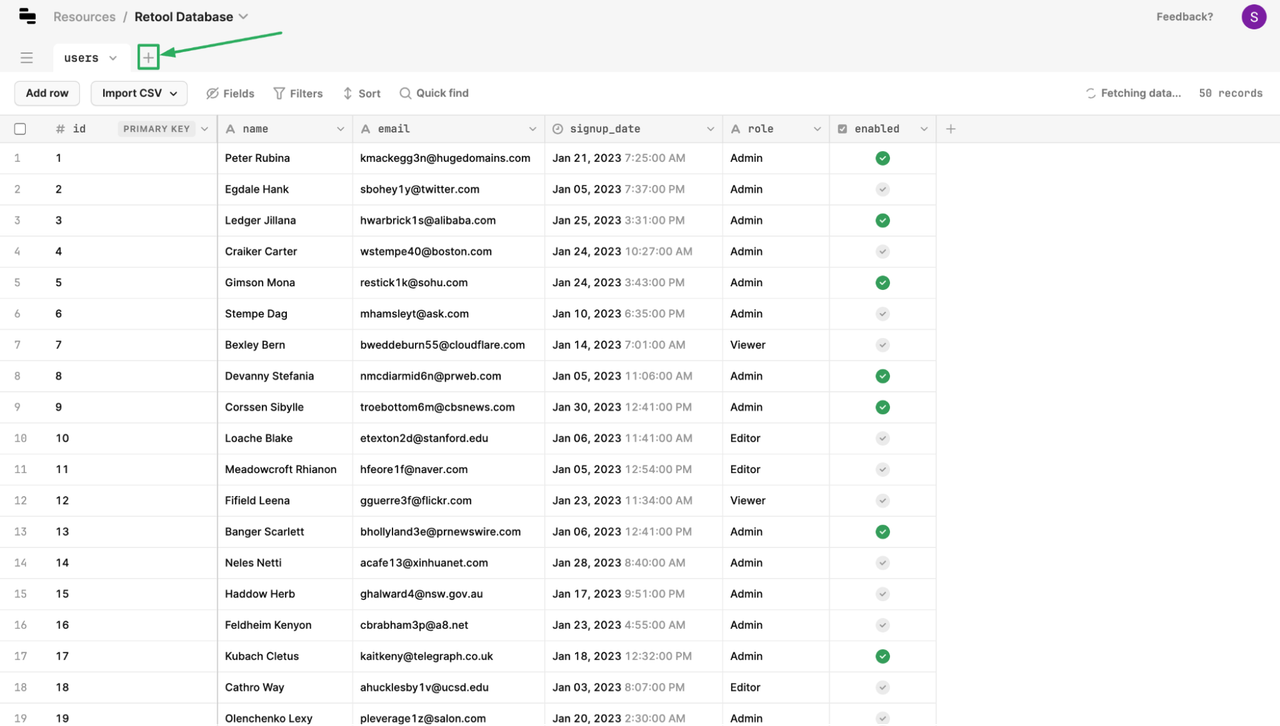
A popup window New Table will appear, allowing you to name the table. Enter the name candidates and make sure to check the option for including the created_at column.
Let’s remember our goal. We want to add functionality to add store all the candidate details in our database and retrieve all the detail from HR Side.
In order to do that, we will need 12 columns in our table i.e.
- first_name
- last_name
- phone
- address
- city
- country
- pincode
- resume
- linkedIn_url
- status
- years_of_experiance
- applied_on
We have two ways to create these columns.
Option 1: Add the columns manually, one by one.
By clicking on the +, A pop-up window to add select the column type. Adding columns to the inventory table is as easy as following these steps.
- For Column First Name, Add Field Name as first_name and choose Field Type as Text. Click Save.
- For Column Last Name, Add Field Name as last_name and choose Field Type as Text. Click Save.
- For Column Email, Add Field Name as email and choose Field Type as Text. Click Save.
- For Column Phone, Add Field Name as phone and Field Type as Number. Number Type as an integer. Integer type as int(8) ****Click Save.
- For Address, Add Field Name as address and choose Field Type as Text. Click Save.
- For City, Add Field Name as city and choose Field Type as Text. Click Save.
- For Country, Add Field Name as a country and choose Field Type as Text. Click Save.
- For Pincode, Add Field Name as pincode and choose Field Type as Number. Number Type as an integer. ****Click Save.
- For the Resume, Add the Field Name as resume and choose Field Type as Text. Click Save.
- For LinkedIn, Add the Field Name as a country and choose Field Type as Text. Click Save.
- For Applied on, choose Field Type as Date. Click Save
- For Years of Experience, Add Field Name as years_of_experiance and choose Field Type as Number. Number Type as an integer. ****Click Save.
Option 2: Import
Use the CSV file to import the table schema into the database. This file will automatically generate and populate the table with the sample values.
Now, we need to build the functionality for converting resumes from Docx to PDF Format. For that, we will use ApyHub Word to PDF Utility.
Why?
Retool has a different file-handling logic. Once you select the file in the file input field, Retool converts the selected file into base64 encoding format.
In order to do that we will need an API key so we can call an API for authentication and authorisation purposes, ensuring secure and controlled access to the API's functionalities and data.
Here is how we can generate an API Key in ApyHub:
Note : If you don't have one, create an account on ApyHub: https://apyhub.com/auth/signup
Step 6: Now that we have an account, log in to ApyHub. Click on the API Keys Button in the left navigation bar -> Select the option to create a new API key-> Assign the name to API Key ( Eg. retool-ats-app) -> You can Download the token or Copy the token that is generated. Done!
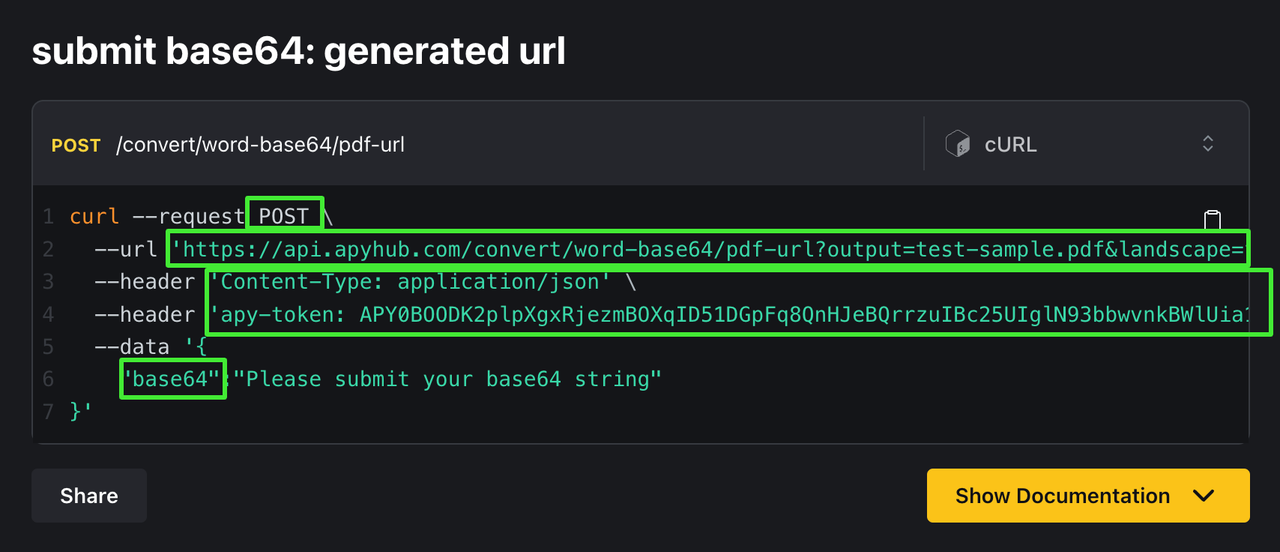
Step 7: Now we need to set up a Resource Service in Retool that allows us to connect to an ApyHub currency conversion service. For that, we have a requirement for URL (Endpoint), Headers and Body which you can find by clicking on this ApyHub Word Document to PDF Files.
You can find the ![]() symbol in the Code Section in the bottom left. Click on it and Select “Resource Query” and choose “RESTQuery (restapi)”.
symbol in the Code Section in the bottom left. Click on it and Select “Resource Query” and choose “RESTQuery (restapi)”.
Action Type:
| Action Type | POST | https://api.apyhub.com/convert/word-base64/pdf-url |
|---|
URL Parameters:
| output | {{candidateFirstName.value}}.pdf |
|---|---|
| landscape | false |
Header:
| Content-Type | application/json |
|---|---|
| apy-token | PLEASE-ENTER-YOUR-SECRET-TOKEN-HERE |
Body: Choose JSON from the drop-down.
| base64 | {{candidateResume.value[0]}} |
|---|
Click on Save and provide a name to this service as wordToPdf.
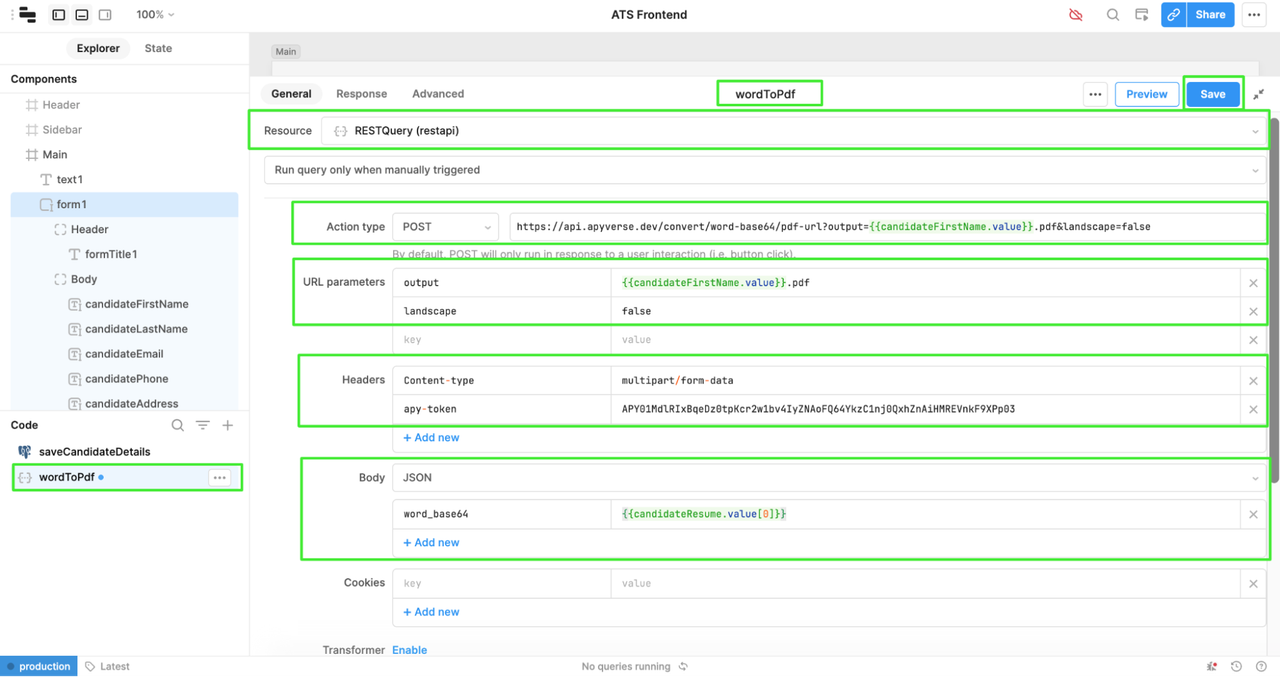
Note: We request you assign it a suitable name as we will rely on this name to retrieve the data using the service. We will refer to this service as wordTopdf in the tutorial.
Step 8: To test the API we have to provide a dummy resume file. For a while, In the resume input field, you can select a sample resume docx from your local system and Click on Run to test the API.

Once successfully called, You will able to see “Query Ran Successfully" and below that the response in JSON as data : [ link to resume pdf link ].
Yay... We have successfully added the conversion functionality.
Note: If you encounter any errors, please review the preceding steps and ensure that you have inputted the correct values.
Step 9: Let’s store this value in the database using a query service. Now we need to set up a Resource Service in Retool that allows us to map the value from input to respective database columns.
You can find the ![]() symbol in the Code Section in the bottom left. Click on it and Select “Resource Query” and choose the following values..
symbol in the Code Section in the bottom left. Click on it and Select “Resource Query” and choose the following values..
- Resource: Retool Database.
- GUI Mode: Run Query Only when manually Triggered.
- Select Table: candidates
- Action Type: Insert a Record.
- Changeset: Key-Value Pairs ( Key is Column Name, Values is the value from Input field id)
| Key | Values |
|---|---|
| {{candidateEmail.value}} | |
| first_name | {{candidateFirstName.value}} |
| last_name | {{candidateLastName.value}} |
| resume | {{candidateResume.value}} |
| linkedin_url | {{candidateLinkedIn.value}} |
| pincode | {{ candidatePincode.value }} |
| country | {{ candidateCountry.value }} |
| address | {{ candidateAddress.value }} |
| status | APPLIED |
| phone | {{candidatePhone.value}} |
| city | {{candidateCity.value}} |
| years_of_experiance | {{{candidateYoe.value}} |
After carefully mapping the value, click on Save.
Step 10: Now, we have mapped the value from Form Input to store in Database. We want the candidate to submit the detail which he entered with the button. In Retool, We can achieve this by triggering a query on the button. Let’s do this.
Click on the Submit Button and select Inspect option in the right panel.
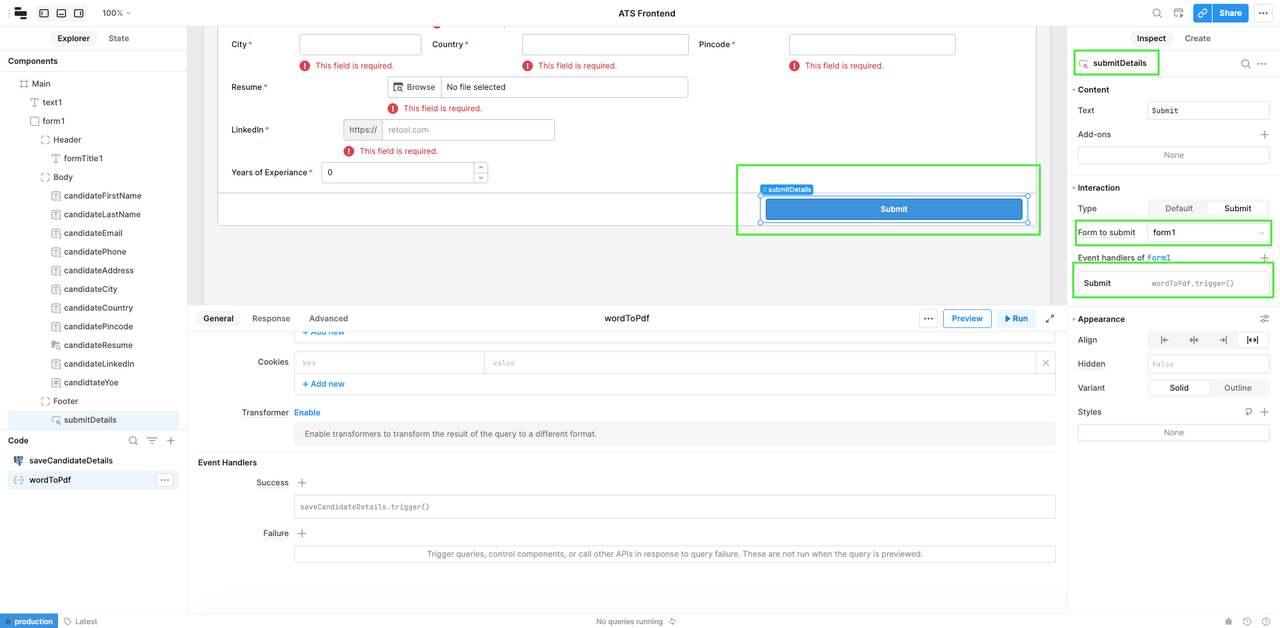
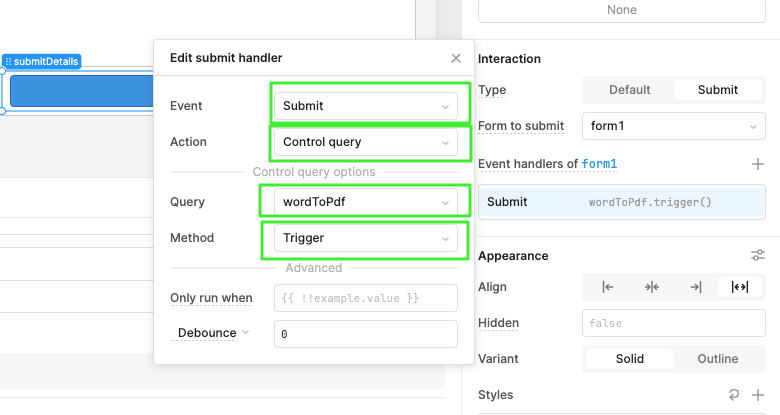
Click on the + Button and add the Submit handler with the following conditions.
- Event: Submit
- Action: Control Query
- Query: wordToPdf ( The resource query for file conversion )
- Method: Trigger
You must get a question about, why are we triggering the wordToPdf Resource Service instead of saveCandidateDetails. Because to first, we want to convert the Resume Doc File into PDF which our wordToPdf Resource Service will do and save the URL of the PDF file into our database. Let’s stitch this trigger query.

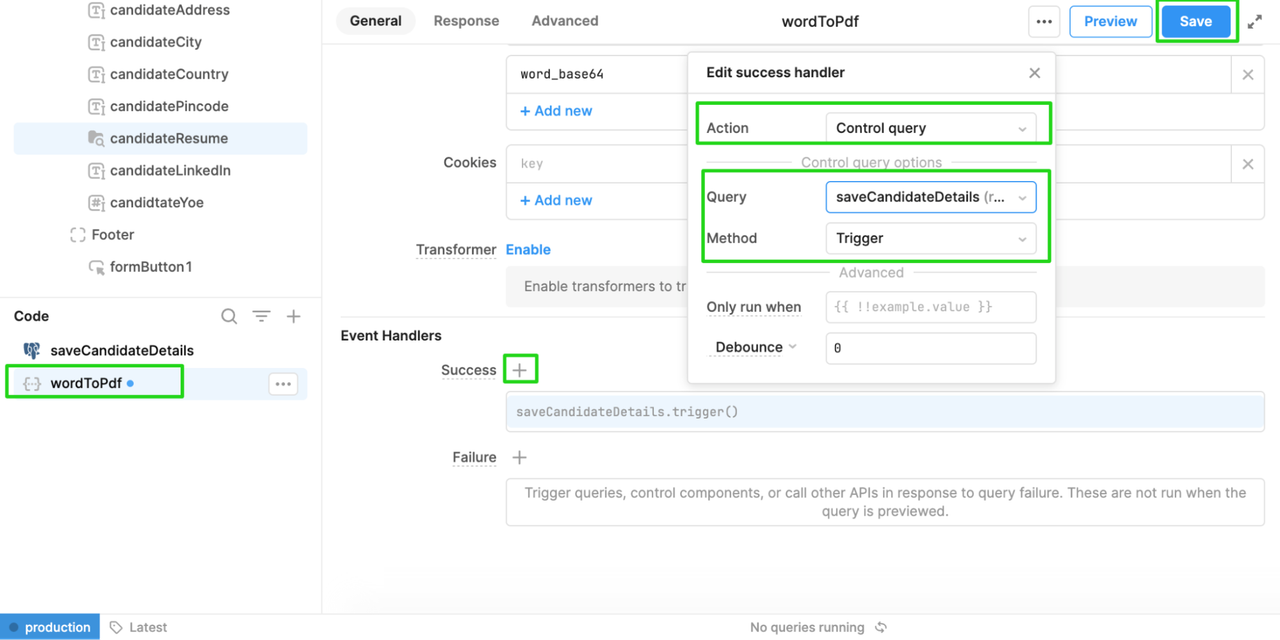
Step 11: We will go back to wordToPDF Resource Query. In Event Handlers, Click on the + Button and add the Submit handler with the following conditions.
- Action: Control Query
- Query: saveCandidateDetails
- Method: Trigger
Click on Save
Finally, when details are successfully added to the database, We want to show the notification to the candidate that the details have been submitted to HR.
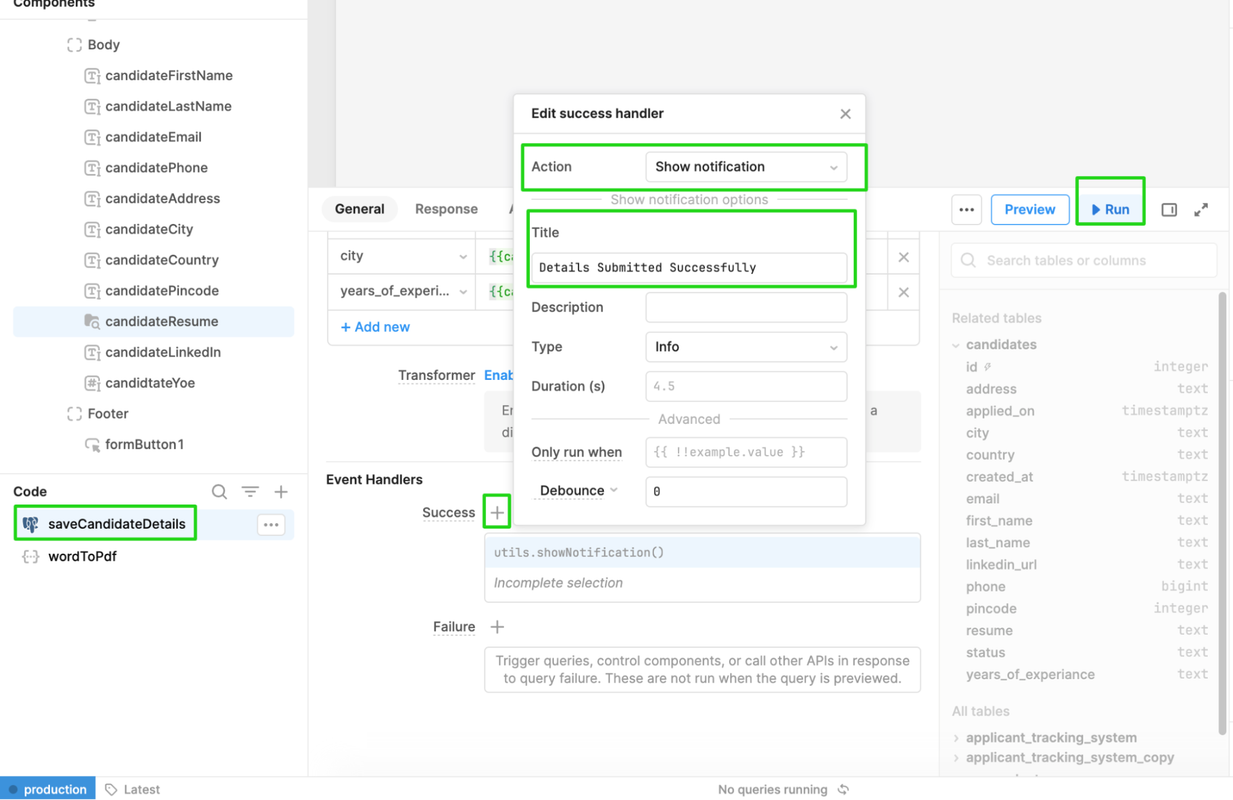
Step 12: Now, We will go back to wordToPDF Resource Query. In Event Handlers, Click on the + Button and add the Submit handler with the following conditions.
- Action: Show Notification
- Title: Details Submitted Successfully
- Type: Info
- Duration: 4.5 Seconds
That’s it!!! Husshhhh.
Congratulations on successfully completing the first module of the Application Tracking System App. Remember to hydrate yourself before we proceed with building the second module for HR.
PART 2 - ATS : HR Portal
In Part 2, We will build the User Interface which takes all the candidate details from the database and show them to HR for evaluation purposes.
The following function will be performed.
- View Details of the Candidate including Name, Email, Years of Experience and LinkedIn URL.
- Download the Resume of the Candidate
- Change the Status of the Candidate.
During this phase, our focus will be on constructing the second module for the Application Tracking System specifically designed for Human Resource Managers.
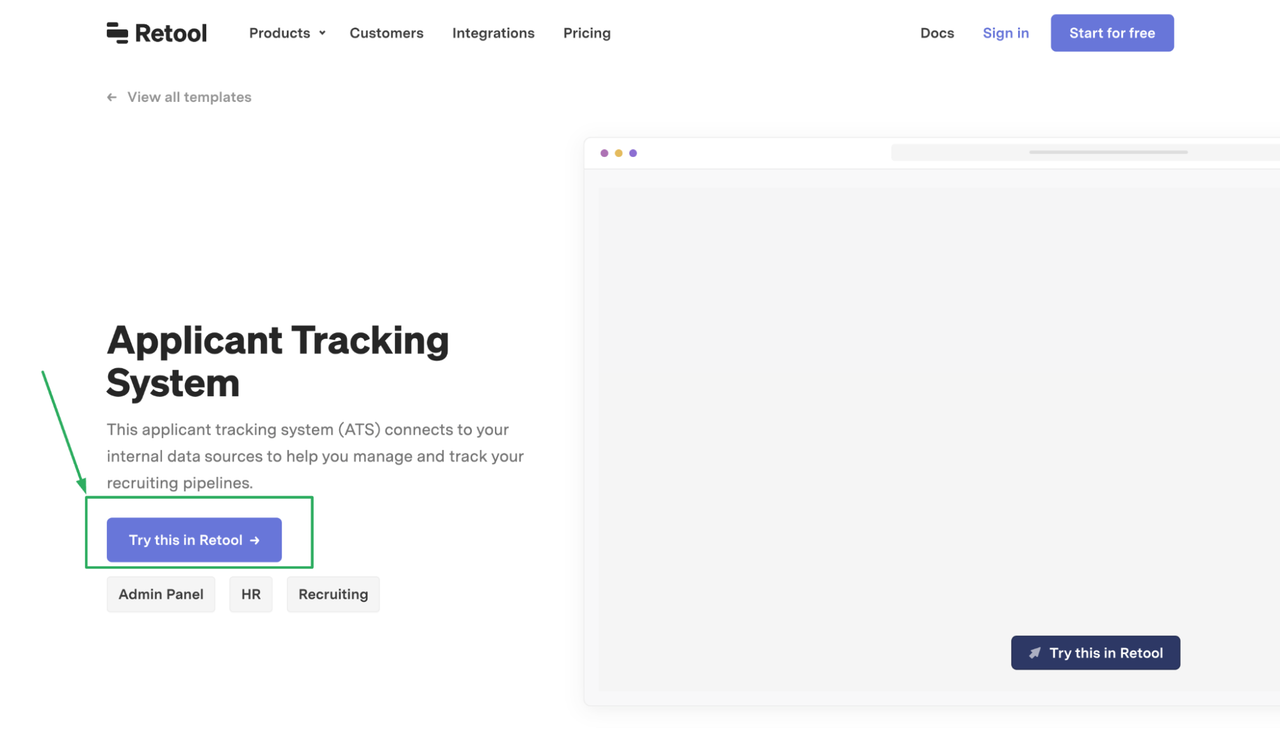
Step 1: Fortunately, there is no need for us to develop the app from the ground up, as Retool offers a pre-existing template. Let's proceed by cloning that template.
Go to Templates. Search for the Application Tracking System Then, click on the Try this in Retool button.
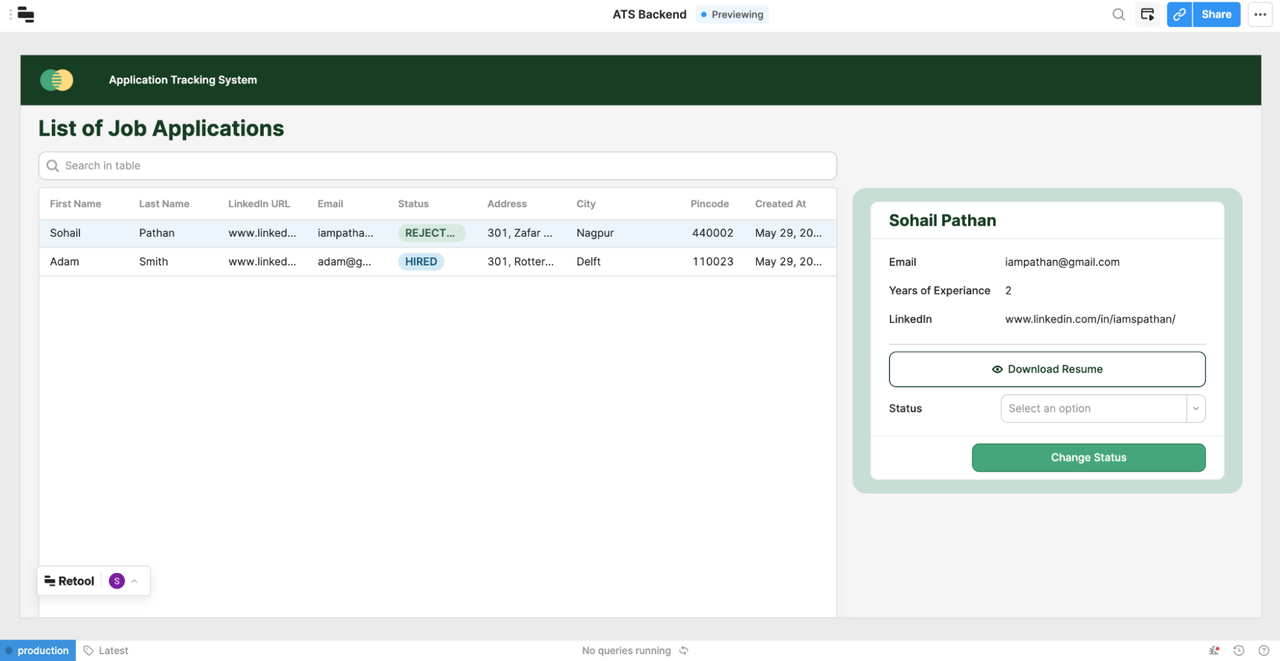
Once you have created the application successfully, click on Toggle to Preview Mode to Run your application. You can also walk through, it before modifying the app.
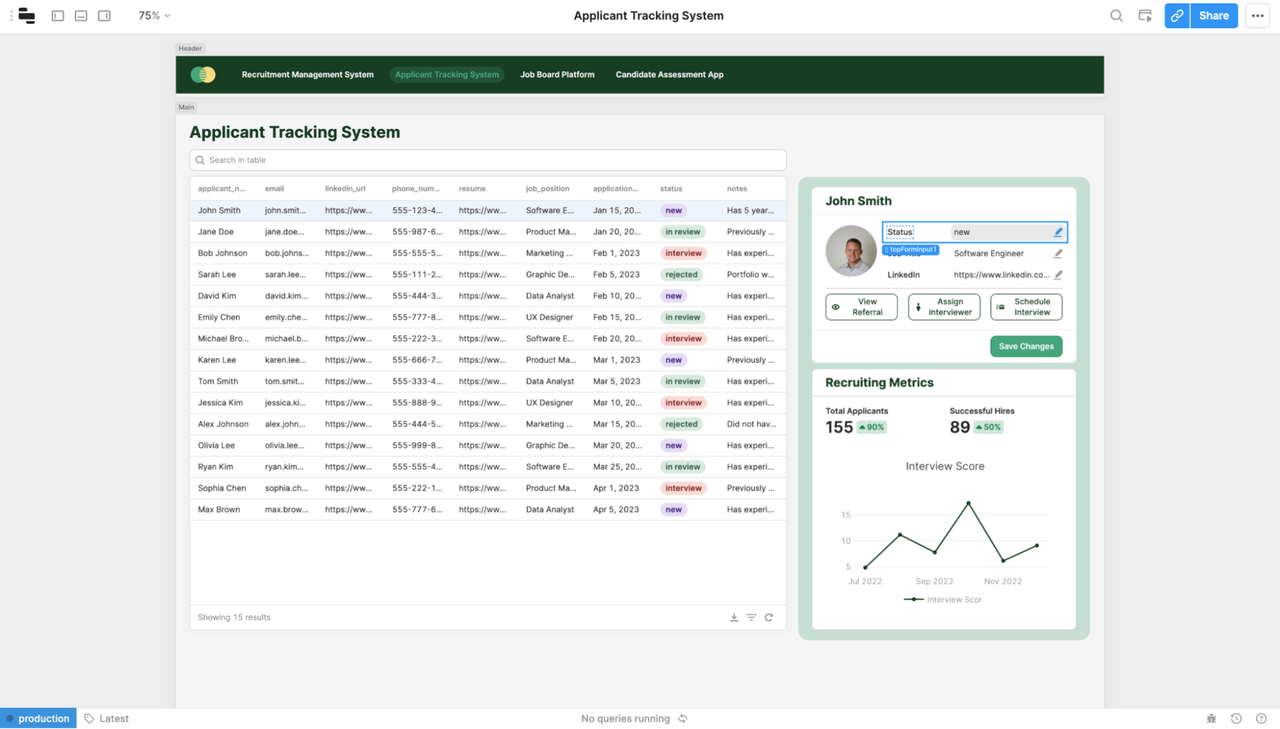
The App will look like this with pre-existing dummy data.
Step 3: We will go back to the functionality that we want to achieve. Where HR Can look at the profile details and change the status.
In order to achieve our objective, it is necessary to eliminate any unwanted elements and make modifications to the existing ones. Let's proceed with these actions.
Header, We only need Application Tracking System so we can remove the rest of the module.
![]()

Step 4: Similarly Container 2, We will remove Circular Image Input, Assign Interviewer Button and Schedule Interview Button.
To delete the UI component, simply perform a right-click on it, triggering a dropdown menu to appear. Proceed by selecting the Delete option, resulting in the removal of the component. Do this step for all 3 UI components.
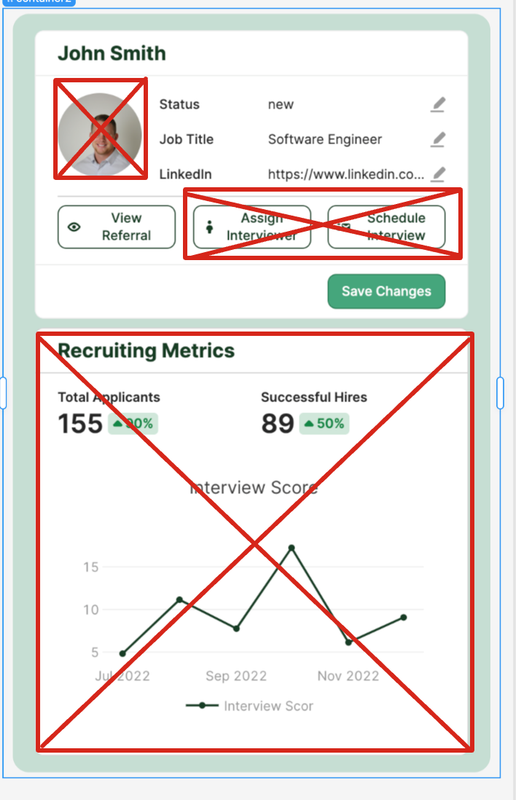 ](
](Step 5: Now, We want to show the below details to Human Resource Manager for evaluating applications purpose.
- Name
- LinkedIn Profile
- Resume ( Download Button )
- Years of Experience.
- Allow to download resumes/CVs and modify the application status to options such as Shortlisted, Interviewed, Rejected, or Hired.
Step 6: Let’s modify the UI elements.
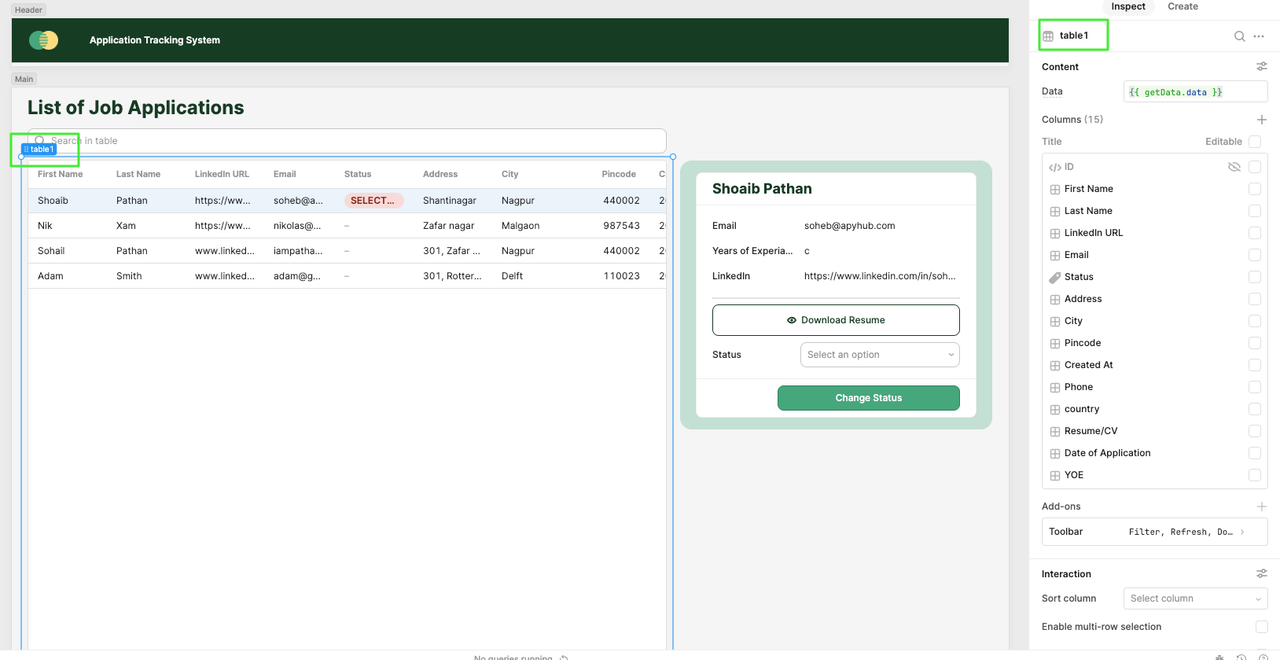
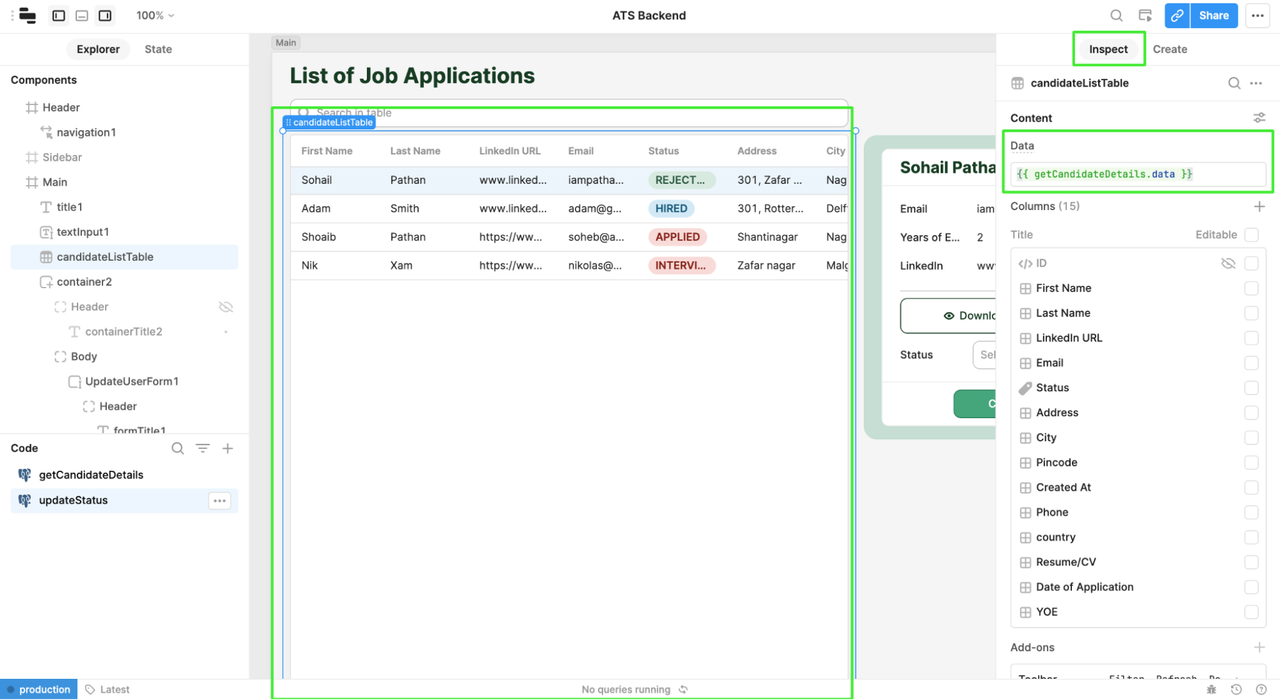
- Rename the Candidate Table.
- Click on table1 Element. In Inspect panel, Change the following properties.
- Rename the element id as candidateListTable and click enter.
- Click on table1 Element. In Inspect panel, Change the following properties.
-
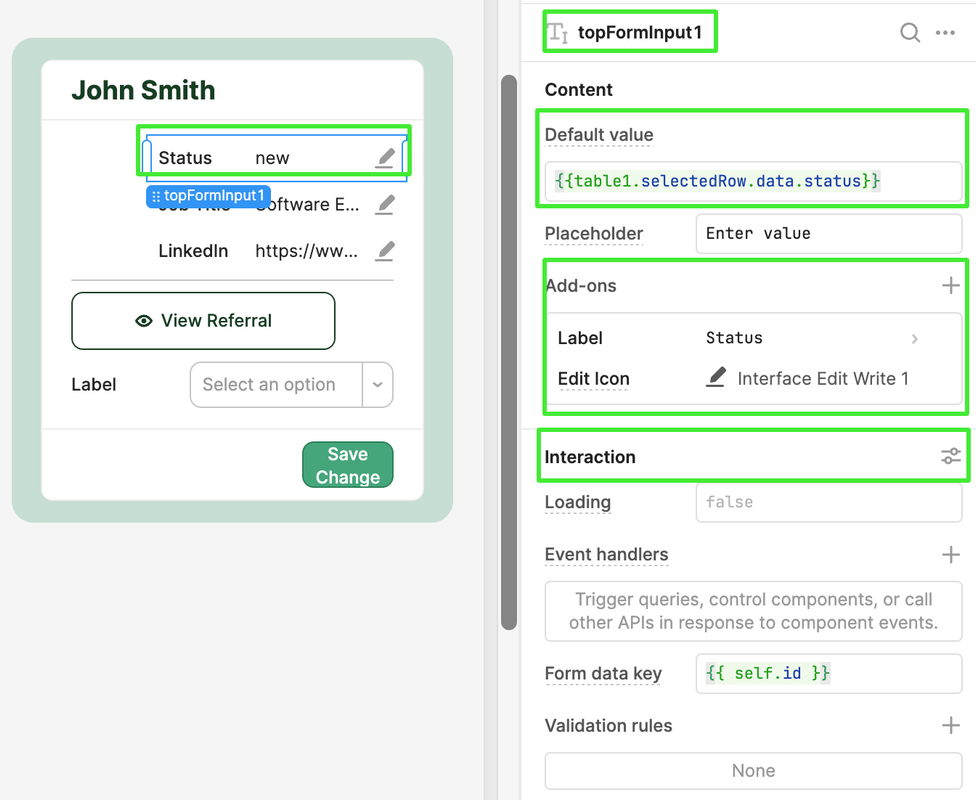
Change the Status Text Input to Email Text Input.
- Click on the topFormInput Element. In Inspect Panel, Change the following properties:
- Rename the element id as candidateEmail
- Default Value: {{candidateListTable.selectedRow.data.email}}
- Label: Replace to Email from Status
- Edit Icon: Remove it by clicking the x icon. ( This field will be read-only )
- Make the Read-only: True ( Go to Interaction Section, Click the setting icon button on the
right, and write true )
- Click on the topFormInput Element. In Inspect Panel, Change the following properties:
-
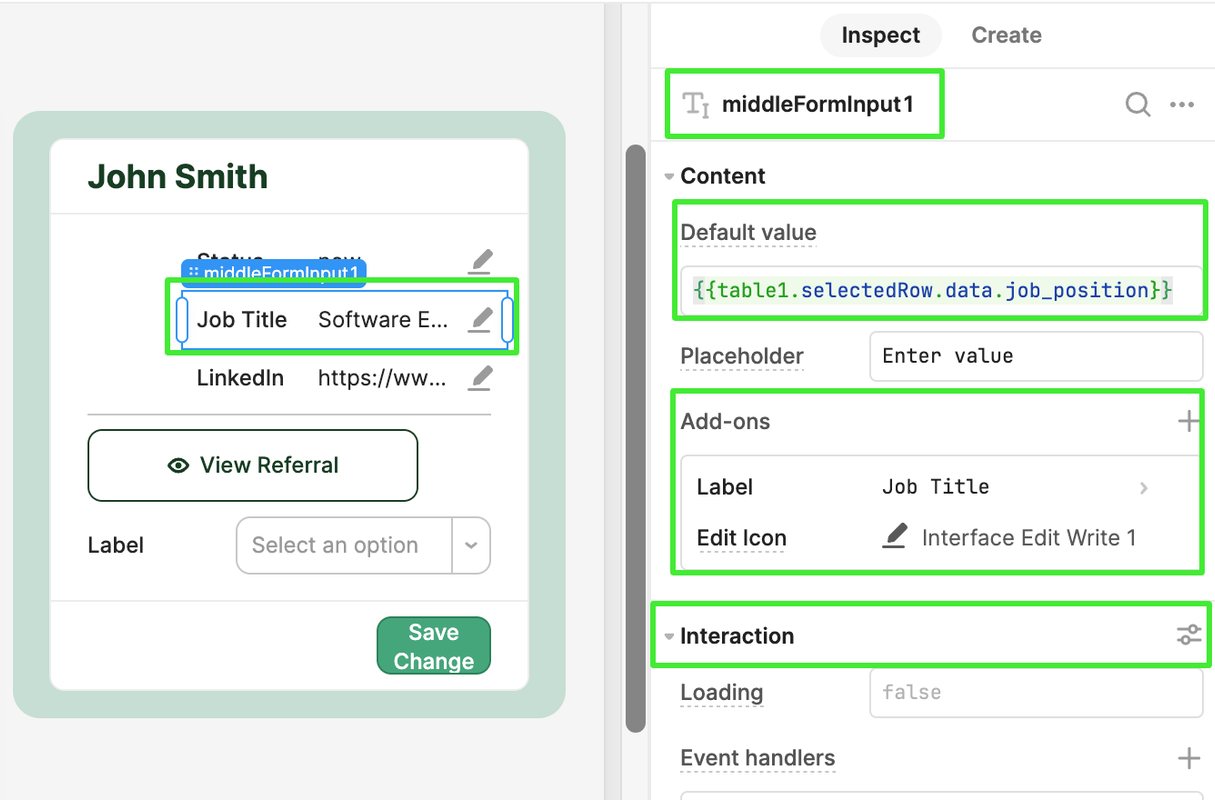
Change the Job Title Text Input to Years of ExperienceText Input.
- First, Click on the middleFormInput1 Element. In Inspect Panel, Change the following properties:
- Rename the element id as candidateYoe
- Default Value: {{candidateListTable.selectedRow.data.years_of_experiance}}
- Label: Replace to Years of Experience.
- Edit Icon: Remove it by clicking the x icon.
- Make the Read-only: True ( Go to Interaction Section, Click the setting icon button on the right, and write true )
-
Modify the properties of Linkedin Text Input.
- First, Click on the bottomFormInput1 Element. In Inspect Panel, Change the following properties:
-
Rename the element id as candidateLinkedIn
-
Default Value: {{candidateListTable.selectedRow.data.linkedin_url}}
-
Edit Icon: Remove it by clicking the x icon.
-
Make the Read-only: True ( Go to Interaction Section, Click the setting icon button on the
right, and write true ).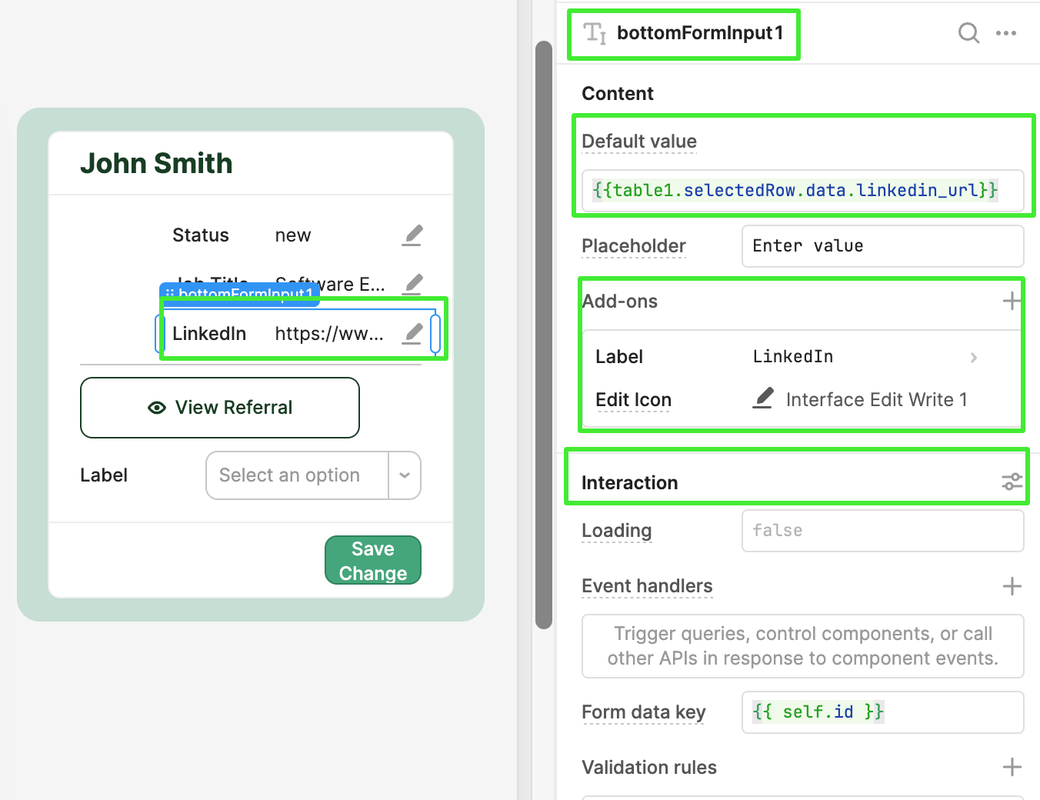
-
- First, Click on the bottomFormInput1 Element. In Inspect Panel, Change the following properties:
-
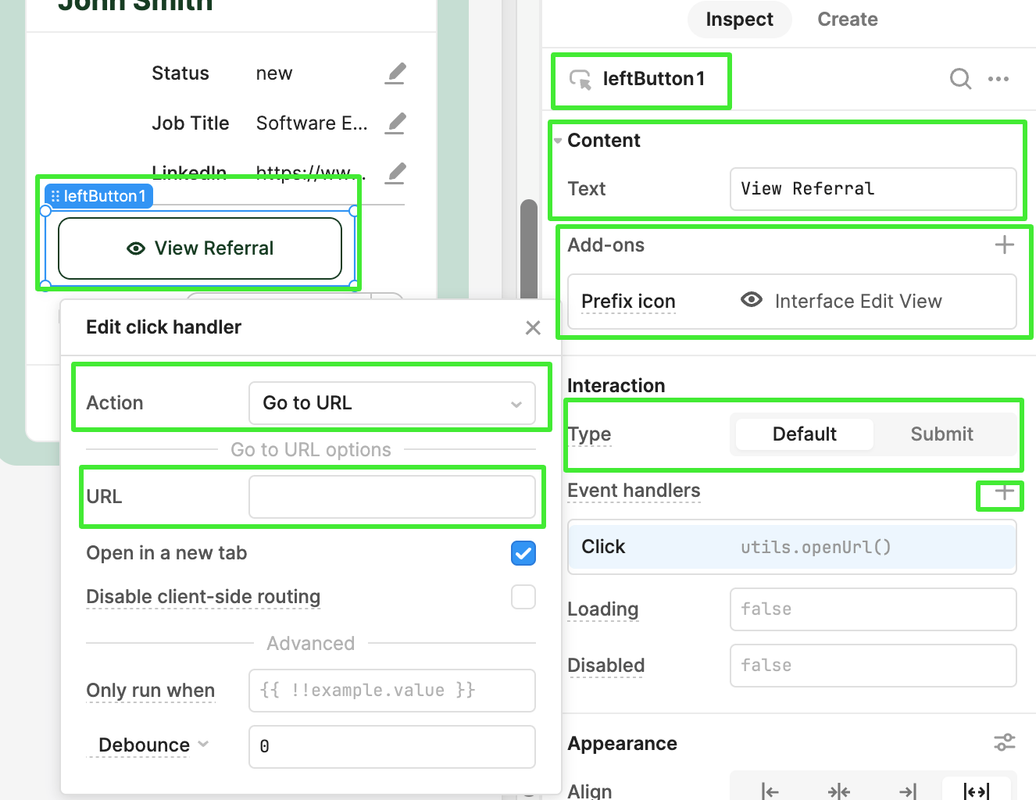
Modify the properties of the View Referral Button.
- First, Click on the bottomFormInput1 button ****Element. In Inspect Panel, Change the following properties:
- Rename the element id as candidateResumeDownload
- Text: Download Resume
- Prefix Icon: Interface Edit View
- Type: Default
- Click on the + button right to Event handler Property. Add these conditions:
- Action: Go to URL
- URL: {{candidateListTable.selectedRow.data.resume}}
- Mark Tick to Open in New Tab Checkbox.
- First, Click on the bottomFormInput1 button ****Element. In Inspect Panel, Change the following properties:
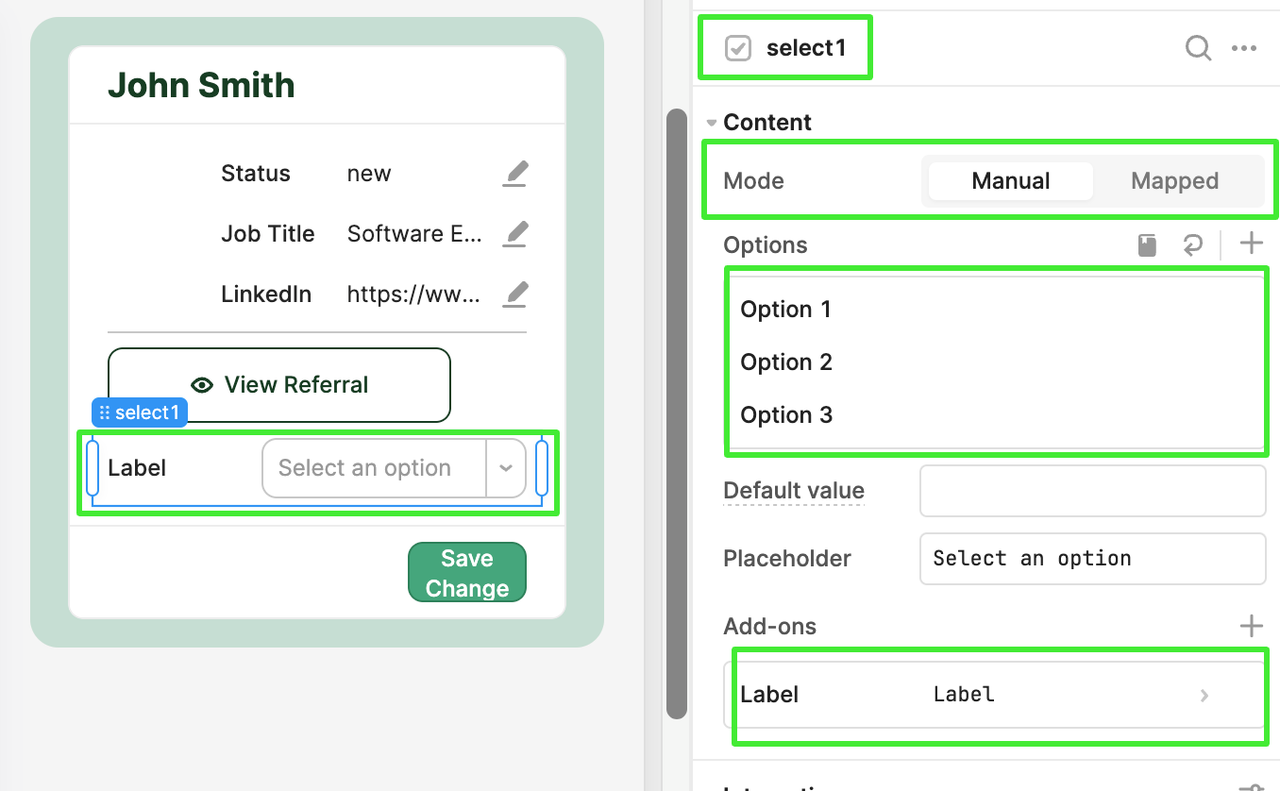
- We need one Single Select Dropdown Input field to change the status of candidate applications. For that, In Inspect Panel to the right, Drag Select Input Field and drop below to the Download Resume button.
- Click on the input and Change the following properties:
- Rename the element id as statusInput
- Mode: Manual
- In Options
- Click on Option 1 and change the Value Property as SELECTED
- Click on Option 2 and change the Value Property as REJECTED
- Click on Option 3 and change the Value Property as INTERVIEWED
- Add one more option by clicking + Button and change the Value Property as *HIRED.
- Label:** Status**
- Click on the input and Change the following properties:
-
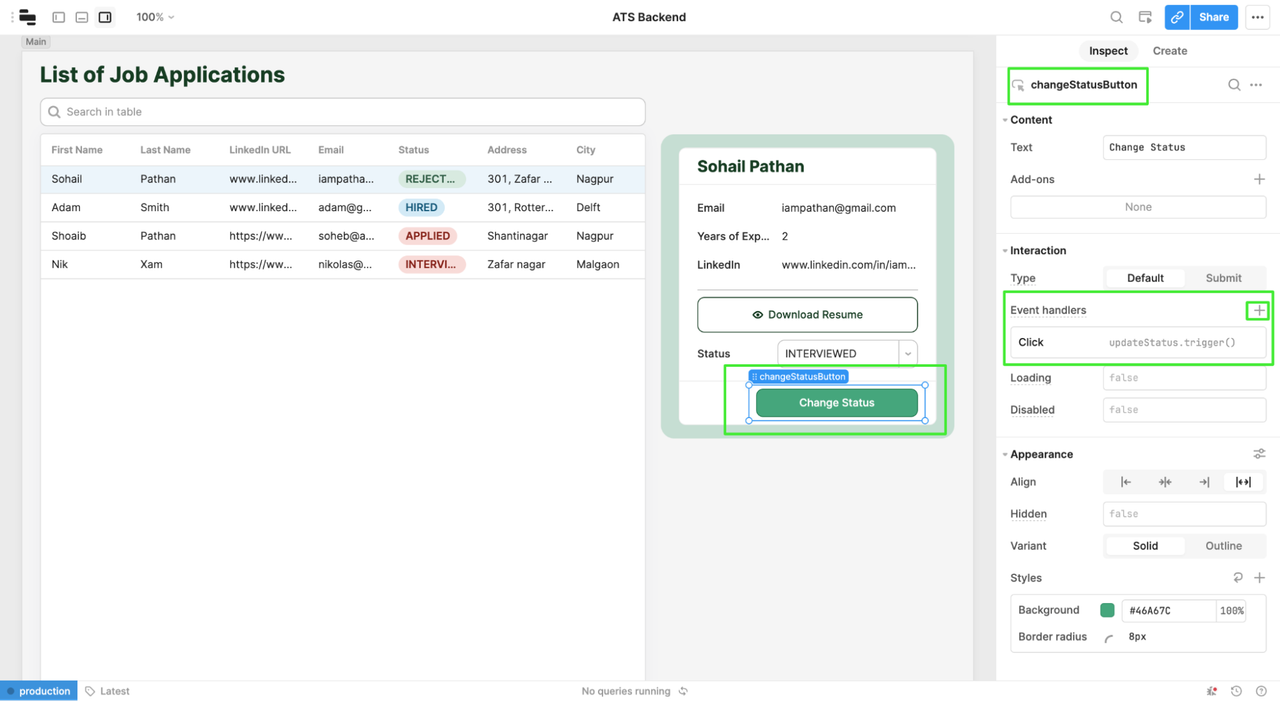
Modify the properties of the Save Changes Button. In Inspect Panel, Change the following properties:
- Rename the element id as changeStatusButton
- Text: Change Status
- Type: Default
- Click: Note: We will add this property later when we create the updateStatus Microservice.

Step 6 : Now, we will create the functionality to get the data of all the job applications that has been received.
You can find the ![]() symbol in the Code Section in the bottom left. Click on it and Select Resource Query and choose the following values.
symbol in the Code Section in the bottom left. Click on it and Select Resource Query and choose the following values.
- Resource: Retool Database.
- Switch to SQL Mode: Run Query Only when manually Triggered.
- Write the Query: select * from candidates where first_name ilike {{'%' + textInput1.value + '%'}}
Click on Save and assign the name to the resource query as getCandidateDetails.

Once Saved, Click on Preview to test the resource query. We can see the response of all the candidate's details from the candidate table.
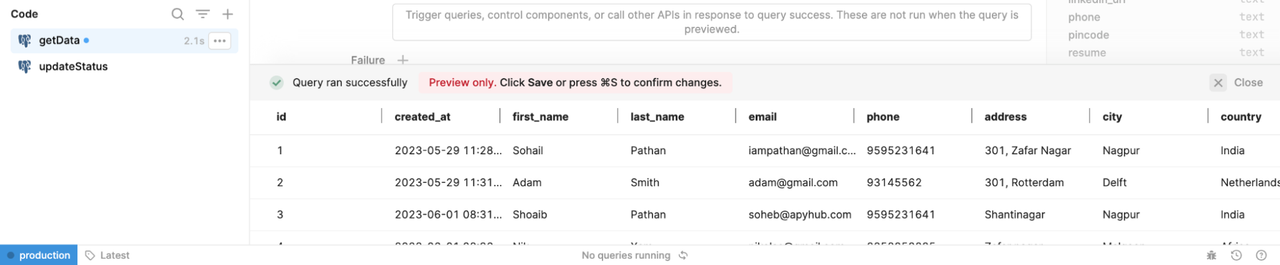
That’s nice, right? Well, now it’s time to show these details in our User Interface.
Select the candidateListTable element and Click on Inspect in the right panel. Change the existing database reference to {{getCandidateDetails.data}}
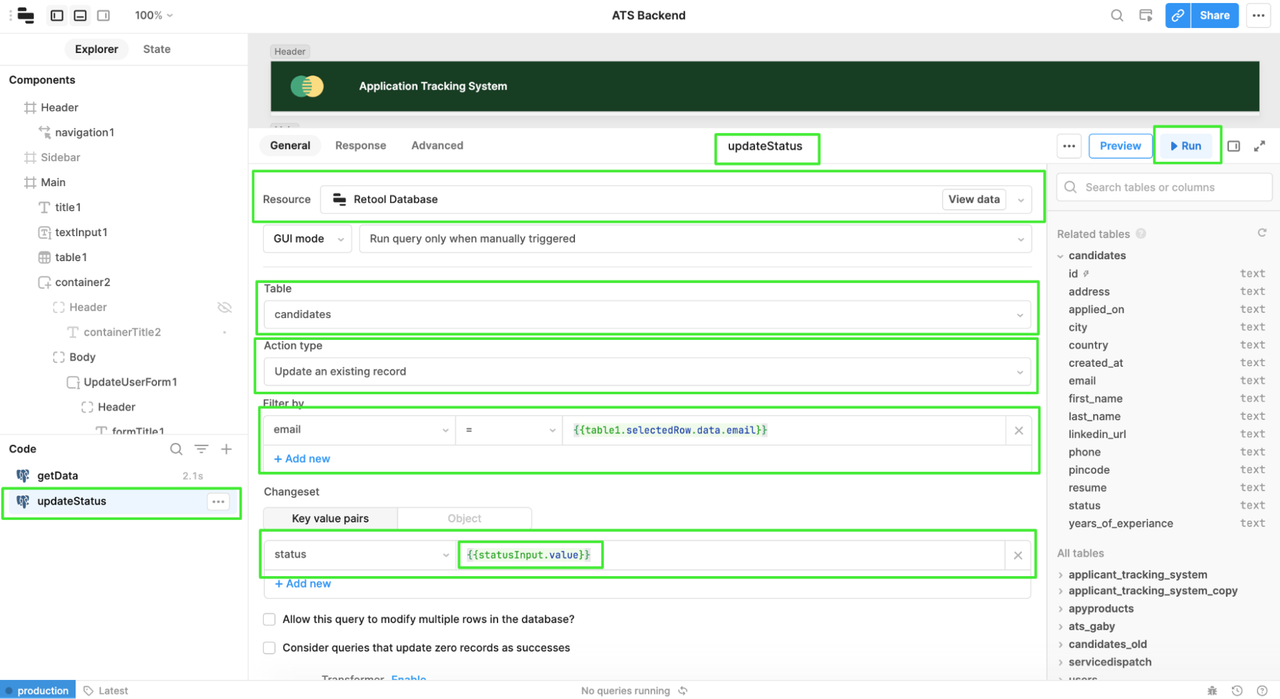
Step 7 : Now we will add the functionality for the HR where they can change the status of the application. Again, we will create a resource query for this as well.
Click on ![]() and Select Resource Query and choose the following values..
and Select Resource Query and choose the following values..
- Resource: Retool Database.
- GUI Mode: Run Query Only when manually Triggered.
- Table: candidates
- Action type: Update an existing record
-
Filter by: Email
- email = {candidateListTable.selectedRow.data.email}}
- Changeset:
- status: {{statusInput.value}}
Click on Save and Rename the resource to updateStatus.
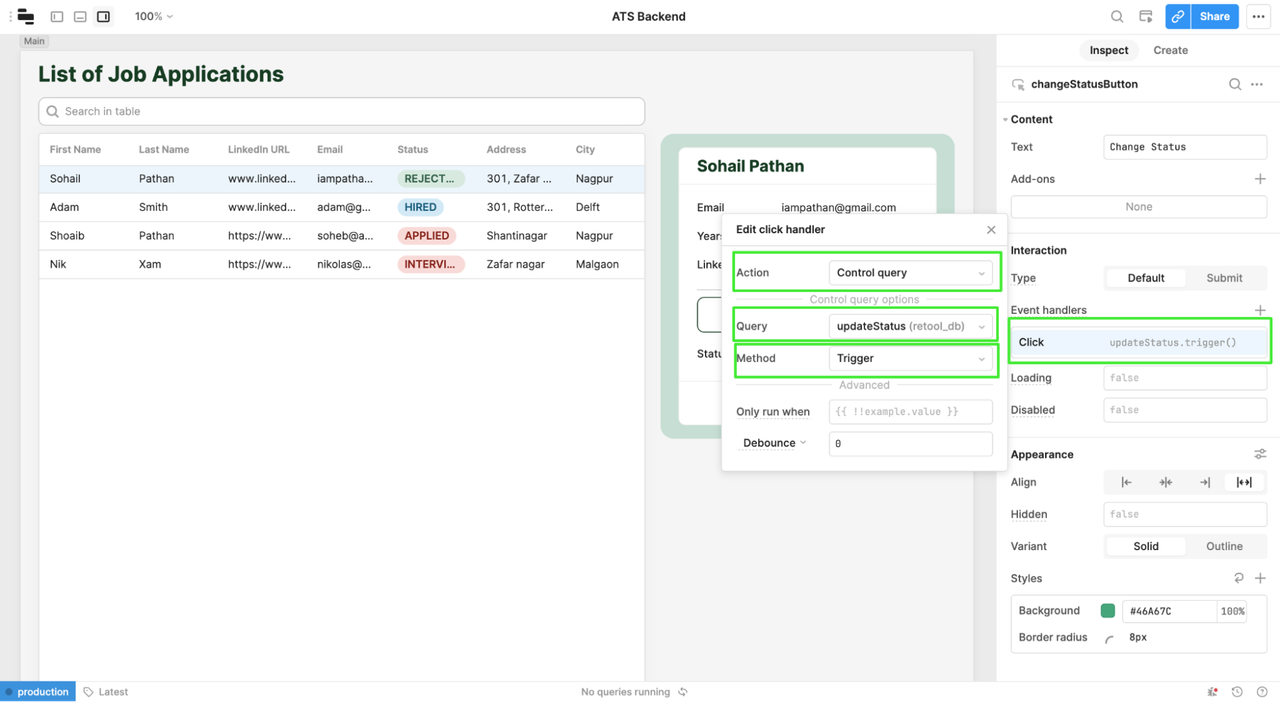
Finally, We will add click property to our the changeStatusButton element. Click on button element Inspect in the right panel. In the Event handler, Click on the + button to create an event handler for Change Status Button.
Click on the + Button and add the Submit handler with the following conditions.
- Action: Control Query
- Query: updateStatus (retool_db)
- Method: Trigger
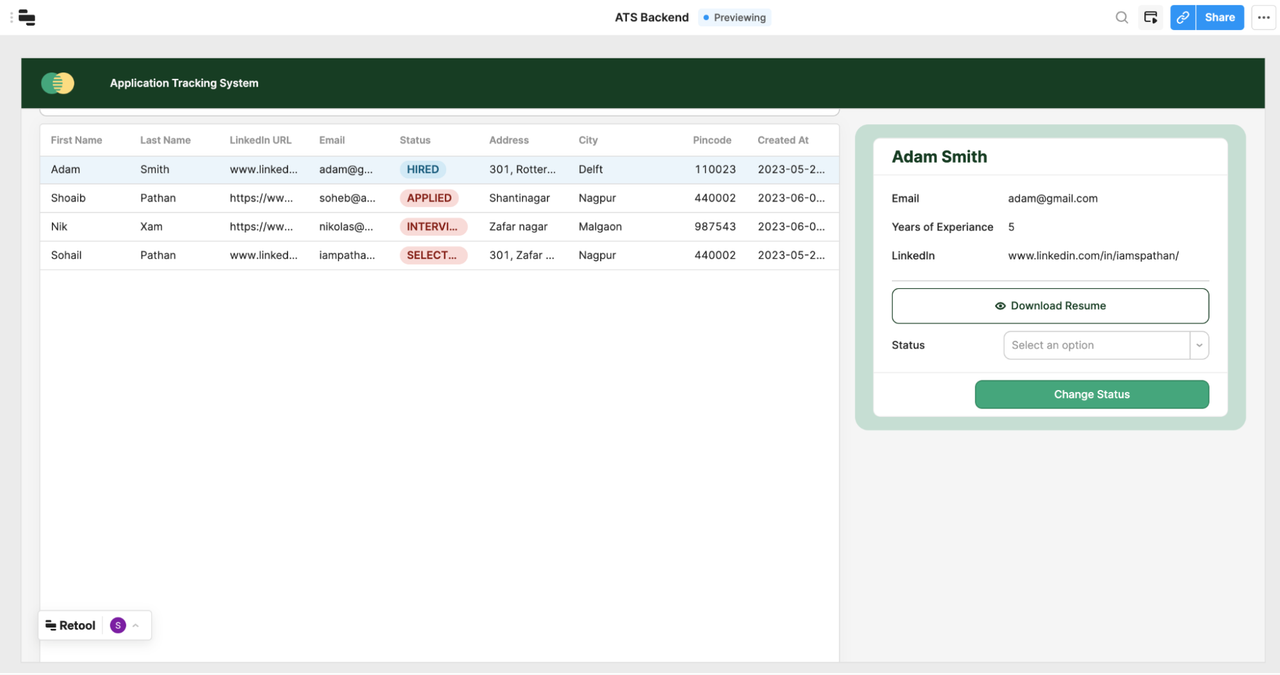
That’s it. We have made all the changes to our UI and it’s time to run the App. Click on Toggle Preview Mode to Run.
Conclusion:
Congratulations! You have successfully built an Application Tracking System using Retool and ApyHub. By leveraging the power of Retool's visual development environment and ApyHub's API capabilities, you have created a flexible and customizable ATS tailored to your organization's needs.