Building your first complex app in Retool
Purpose of this tutorial
We’ll build on our 4-minute “Getting Started” tutorial by walking through how Retool’s core abstractions — queries, components, and resources — fit together in a production-ready app. By the end, you’ll be able to design complex Retool apps, use Retool’s {{ }} syntax to write custom JS, and combine data from multiple sources.
Use case
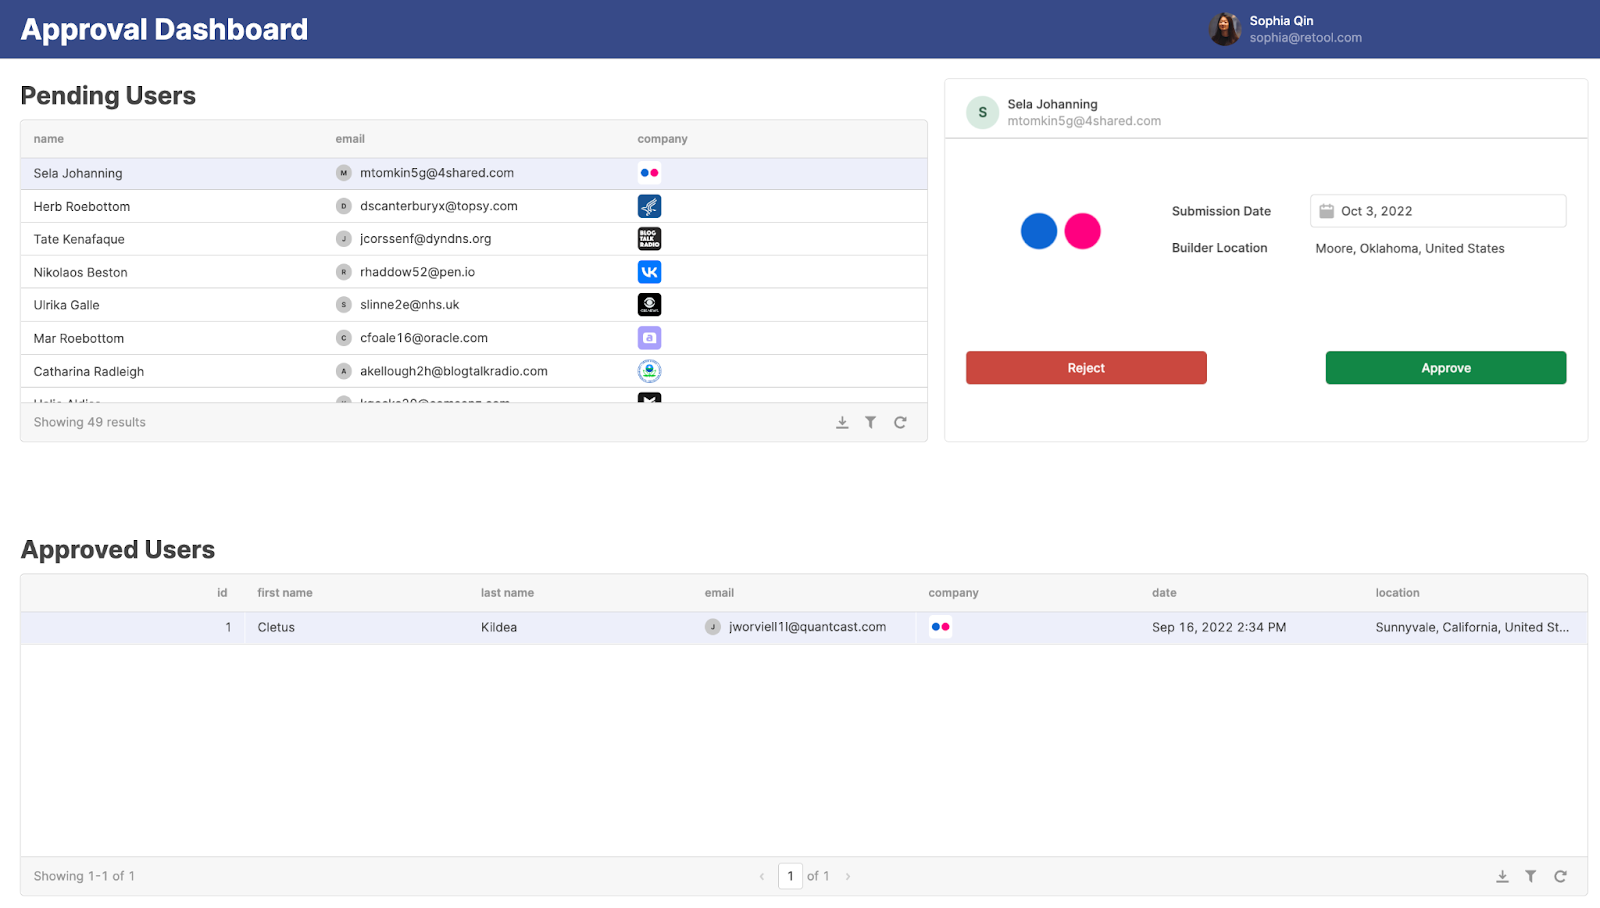
Let’s say that we work for a consulting company and need to review potential contractors. In order to do so, we’ll build an approval dashboard in Retool for our support team to review and process a list of pending contractor applications.
In this guide, we’ll build an app that:
- Joins data from multiple data sources (2 REST APIs)
- Chains queries together
- Customizes the UI by leveraging Retool’s design options
Technical considerations
In this tutorial, we’ll work with several data sources, components and Retool concepts:
- Data sources: APIs from our REST API Generator
- Components: Tables, Buttons, Containers, Images, Text
- Concepts: Resources, Queries, JS in Retool, Joining data, Writing to data sources
1. Create resources by connecting to data sources
To start, create the 2 data sources that will power your dashboard. First, use the REST API generator to create data for your potential contractors. The generator allows you to customize the schema of your REST API by automatically creating random values for different data types. We’ll use the generator in the following section.
For your approval dashboard, model your approval API by titling the API as pending_approvals and adding the following columns:
first_namelast_nameemailcompanydatelocation
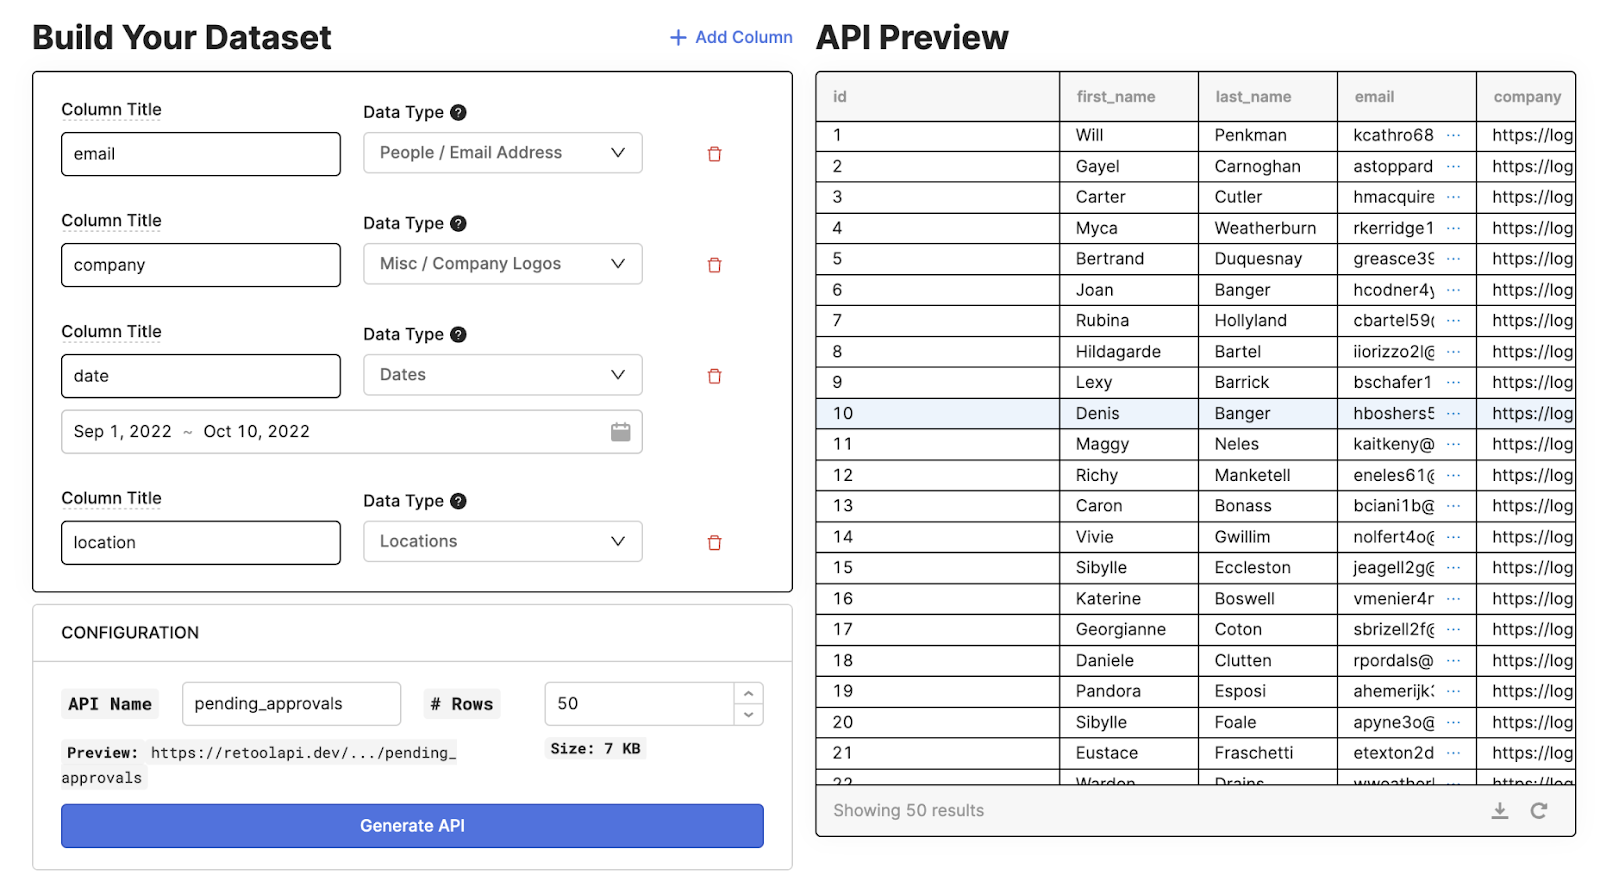
Once you click on Generate API an endpoint URL link will be populated that navigates you to the freshly created REST API. Your schema should look similar to the below.
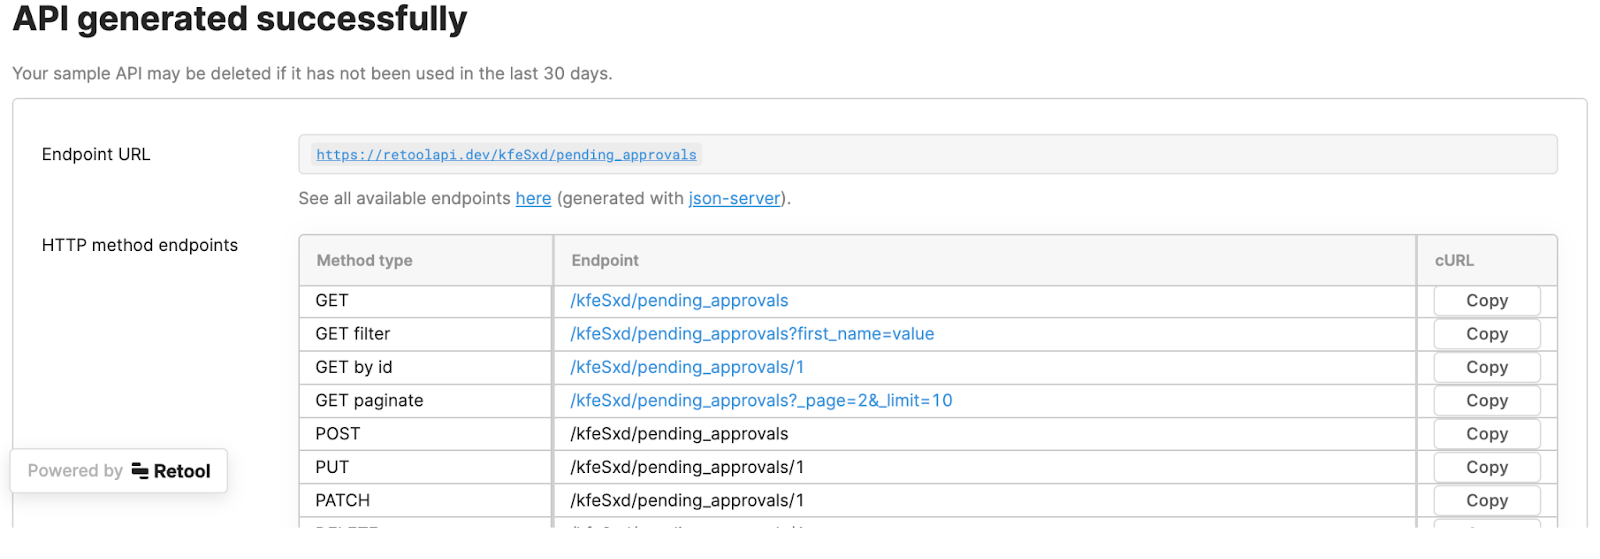
Here’s an example endpoint URL for pending_approvals: https://retoolapi.dev/ue1cWL/pending_approvals
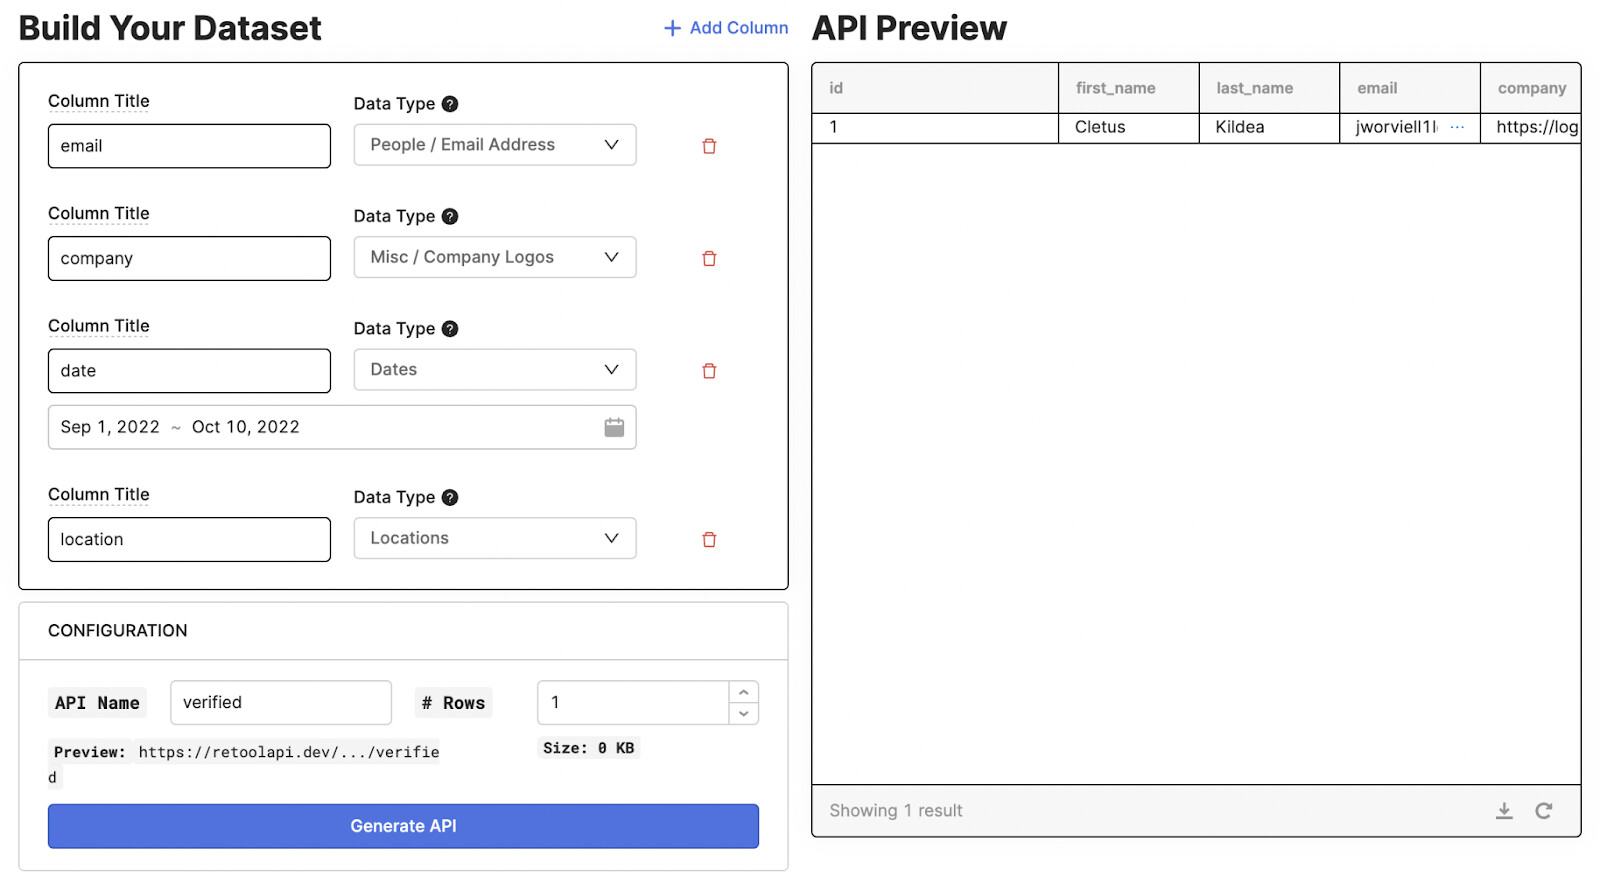
Next, configure a second REST API resource titled verified using the API generator with the same schema as above (but with only 1 row) that will represent your destination resource for approved contractors.
Here’s an example endpoint URL for verified: https://retoolapi.dev/4JbFBf/verified
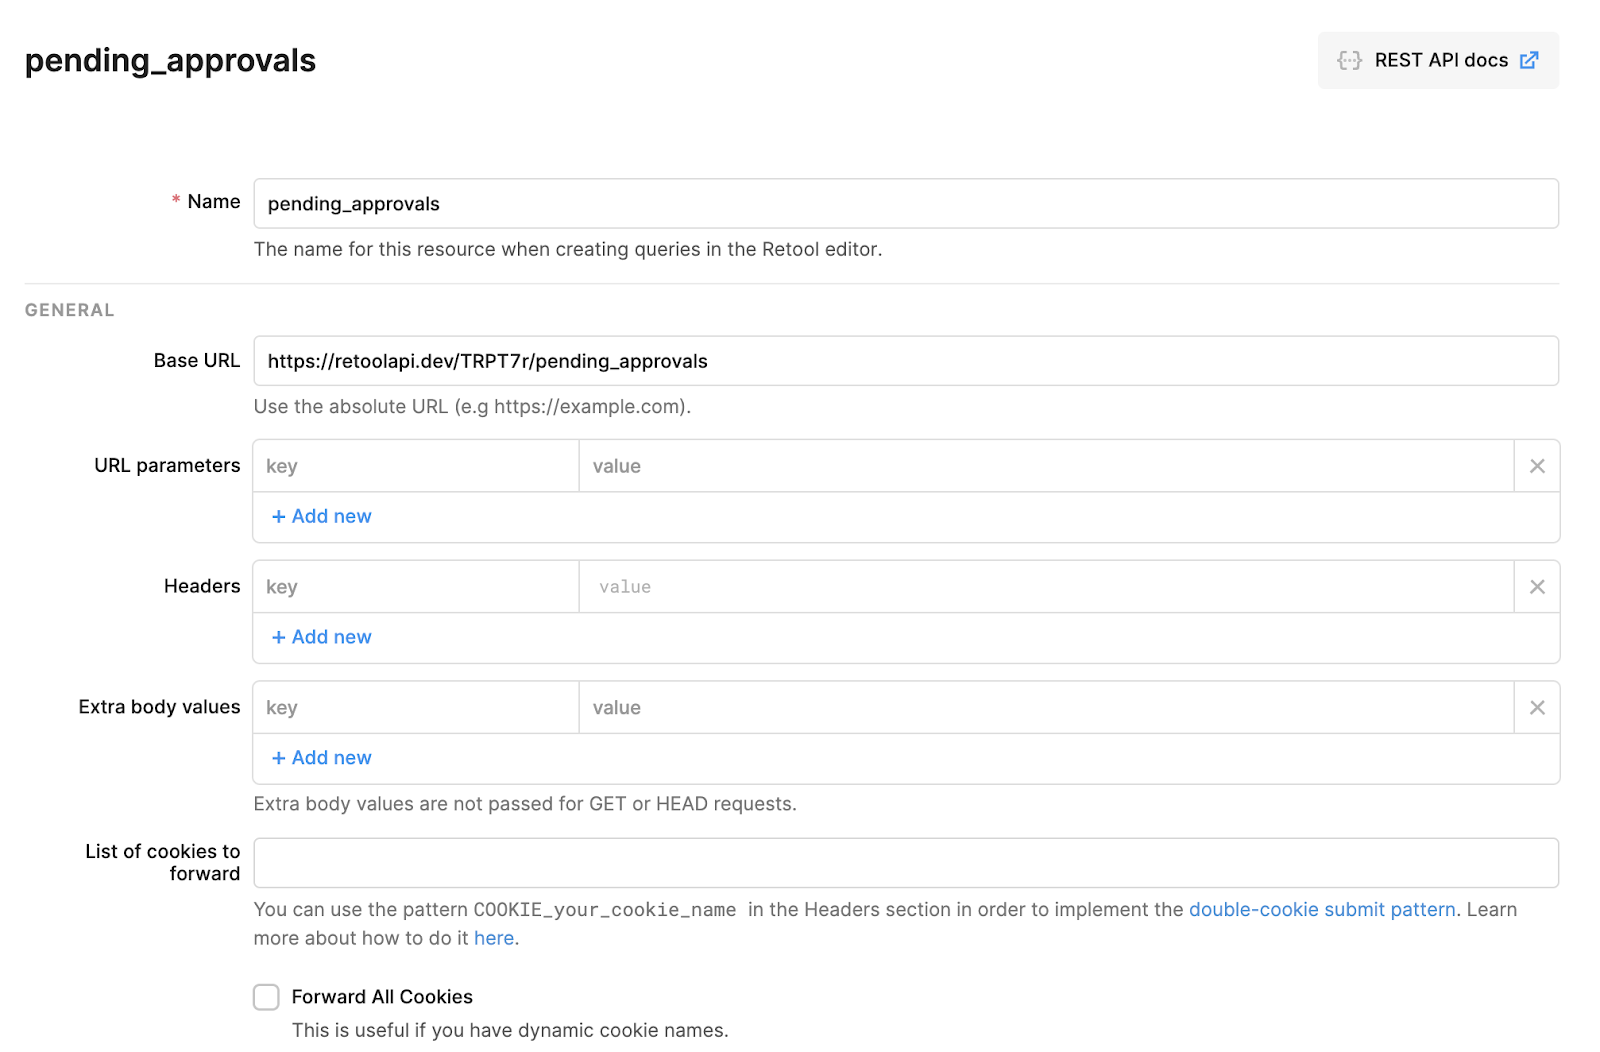
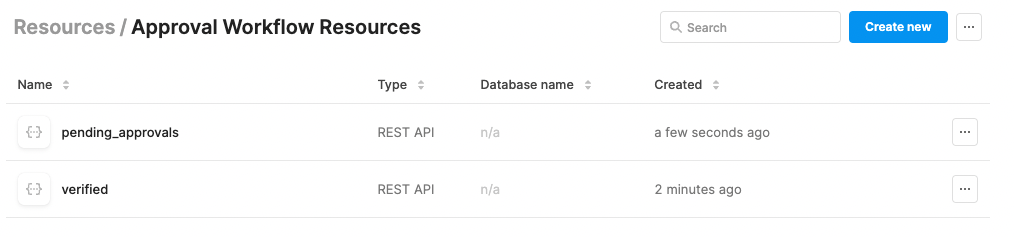
Once you’ve set up your 2 data sources, navigate to your Retool instance, select the Resources tab in the navigation bar, then click Create new folder. Let’s call your new folder, Approval Workflow Resources.

Next, create 2 new resources: one REST API resource to store the list of pending applications and another for the second REST API resource that contains the data of verified contractors.
2. Design the UI layer
Now that we’ve set up your two resources, we can now begin designing the application. From the homepage, select the Apps tab in the navigation bar, and click Create new.
To learn more about the different pieces of your application editor, feel free to browse the App editor documentation.
Let’s begin assembling the dashboard by dragging the Image, Date, Editable Text, Text, Tables, Containers, Avatars, and Button components onto the canvas. Rename the pending approvals table component to pending_table and the verified table to approved_table.
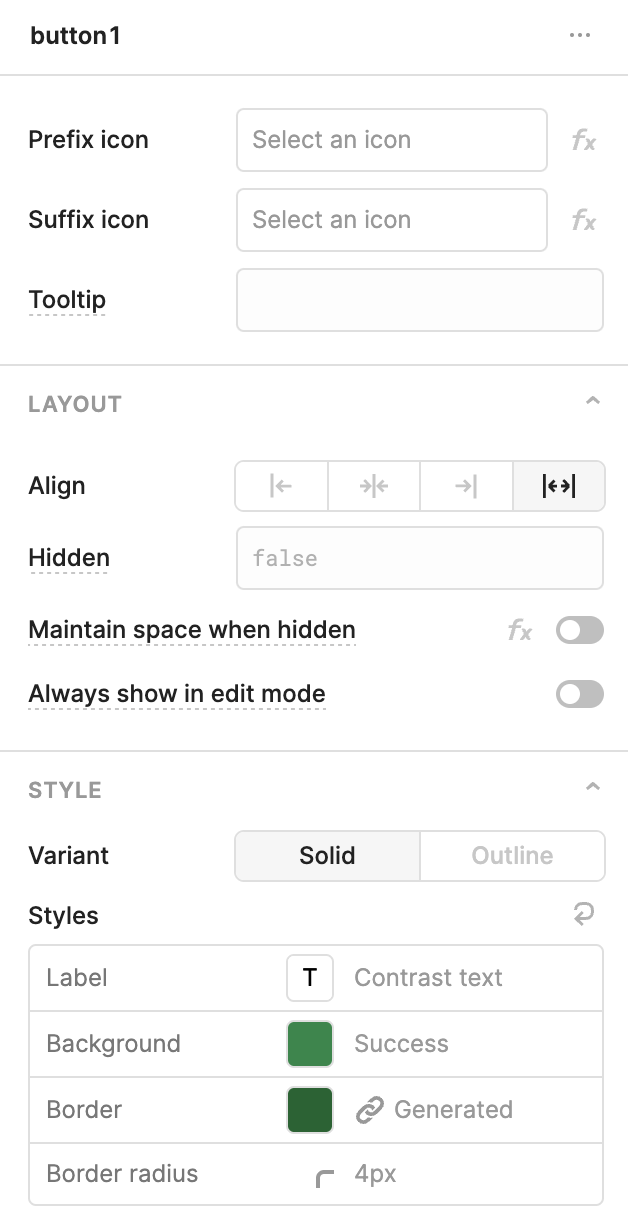
We can customize each component's appearance visually by navigating to the Style section within the Inspect tab on the right panel. For instance, let's select the Approve button and change its color to green:
We’ll also use Markdown to customize the text appearance:
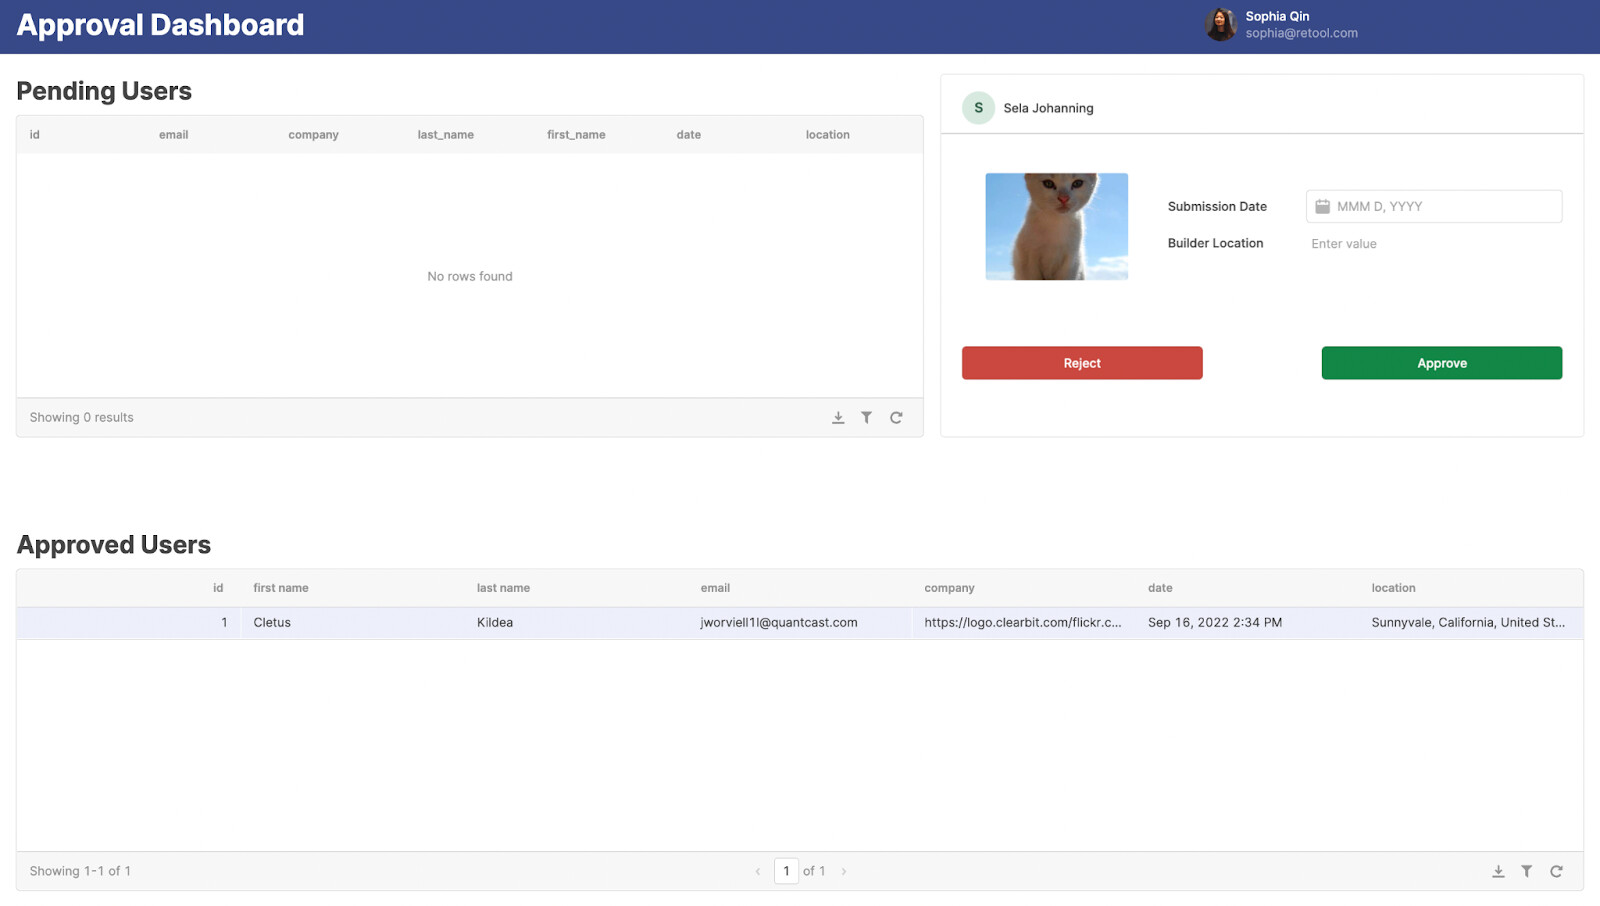
To extend the design, customize the Header portion of the editor canvas. Inspect the Header, choose a background color of your liking, drag on an avatar to the top right, and a text component titled Approval Dashboard. Your UI should look something like:
We have several other options for designing apps in Retool, which you can take a deeper look into within the Design and Usability documentation.
You can iterate on the design of the UI by toggling between Preview and Editor mode to see what end-users will see.
3. Write queries to bring in data
Let’s build 2 queries to connect to your data sources.
Write the pending_users query, which is a GET request from the pending_approvals resource.
Similarly, let’s write the approved_users query, which is another GET request from the verified resource. This will track all of the approved requests.

4. Connect queries to components
Now that we’ve successfully built out the design of our dashboard and written our queries, let’s start connecting our data with the UI. In this section, we’ll use {{ }} syntax, one of the key patterns that makes Retool so powerful. Everything inside {{ }} evaluates to Javascript, so you can write JS logic, and more importantly, reference app component values and query responses nearly anywhere in your app. This section shows you how to leverage this syntax! To begin, connect the pending_users query to the pending_table inside the data field of the table component.
Once we populate the pending_table with the result of your pending_users query, we’ll create additional references to this table within the container component. In the left panel, under the State tab, inspect the pending_table. Retool tables contain a selectedRow property that displays the selected row’s information (see docs on component properties here).
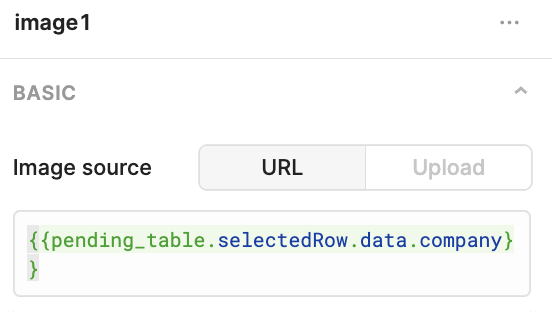
We’ll leverage the selectedRow property in all the components inside the container (ex. Avatar component, Image component) to display the selected applicant’s name, email, submission date, location, and corresponding company image.

To take the customization one step further, inspect the pending_table and configure the following options on the right panel:
- Hide irrelevant columns by clicking on the eye icon (id, last_name, first_name, date, location)
- Add style to the remaining columns by switching the email column to be of the type
User Emailand the company column to be of the typeImage URL. - Create a custom column called
nameby combining 2 columns: first_name and last_name using the JS snippet below
{{ currentRow.first_name + “ “ + currentRow.last_name }}
Next, let’s populate and customize the verified table. First, let’s connect the approved_users query to the approved_table. After we populate the table, let’s customize this table in a similar manner to the pending_table
5. Extend queries
Let’s extend our functionality of writing queries and connecting them to components by writing 2 additional queries to approve and reject pending requests.
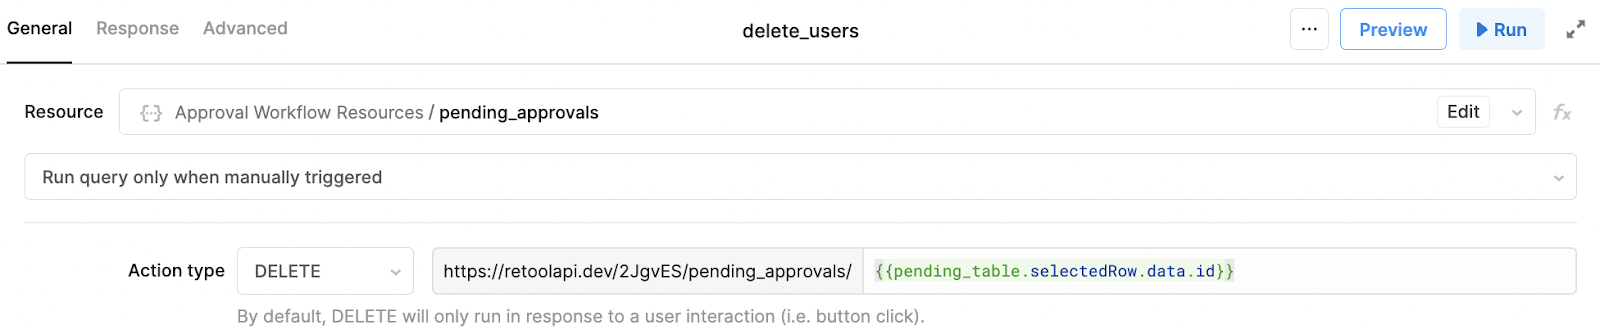
Let’s begin by writing the delete_users query, which will programmatically delete a request from the pending_approvals API by selecting the action type DELETE We’ll also leverage the selectedRow property to specify the exact request we want to delete.
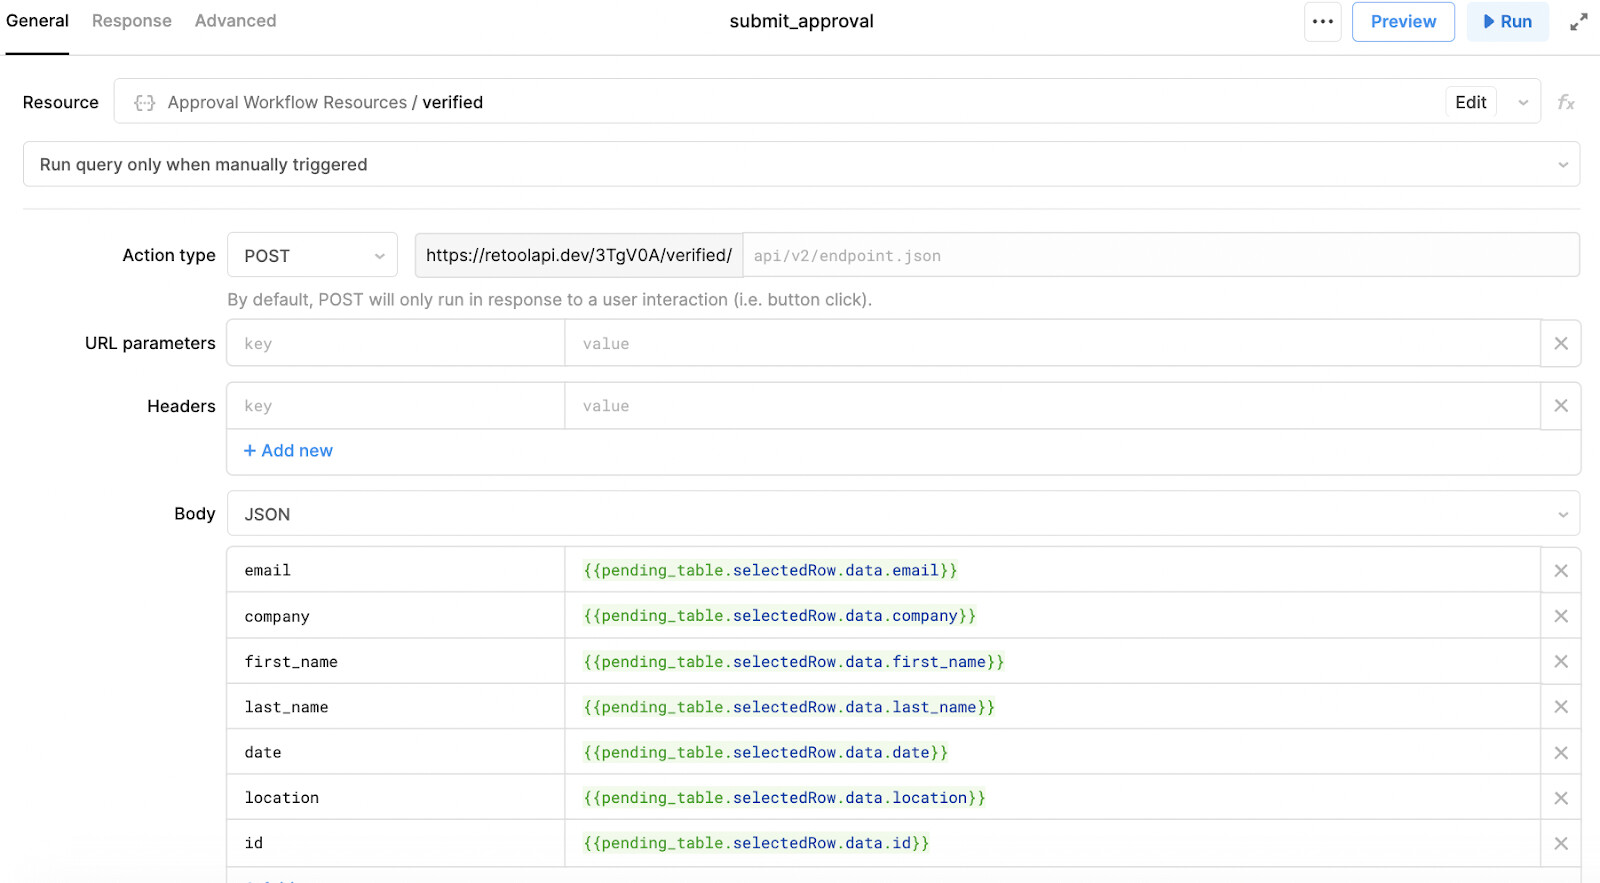
Next, let’s write the submit_approval query, which will add a new record to your verified contractors API endpoint. We’ll connect to the verified API endpoint and to add a new request, select the action type POST. Additionally, we’ll leverage JSON and the selectedRow property to specify the exact details to add.
Finally, let’s trigger queries on success of other queries. When we reject or delete a request, in addition to removing it from your API endpoint, we’ll want to remove that request from the pending approvals table. Let’s rerun pending_users on success of the delete_users query in order to automatically refresh the pending_table without the deleted applicant.
When we approve a request, similar to the delete request above, we’ll also want to remove the request from both the requests API endpoint and the pending approval table. In order to do so, let’s rerun approved_users and delete_users on success of the submit_approval query.
Lastly, create event handlers on each of the buttons to enable rejecting and approving applications. Certain components, like buttons, give you the option to add an event handler to have an event, like a button click, to trigger an action, like running a query. For these button’s Click event handlers, select triggering the delete_users and submit_approval queries respectively.
From here, you can toggle from Edit to Preview mode by clicking the button in the top right corner to see what your app looks like to end users!
Congratulations on building your approval dashboard in Retool!