UI Tricks for Buttons: Dynamic Buttons & Actions

Two tips from our UI session focusing on buttons, which gives some tips, tricks and best practises for using the button component in Retool - read more on our site.

Tip 1: Keep Actions Dynamic Using Ternaries

The beauty of Retool’s dynamic features means it isn’t actually necessary to have an individual button for every action in your app. If you have multiple button actions which depend on the data you have selected (e.g. a selected row in a table), you can make use of ternaries to keep your button’s action dynamic, automatically adjusting to the needs of the data in front of you.

Here’s an example:

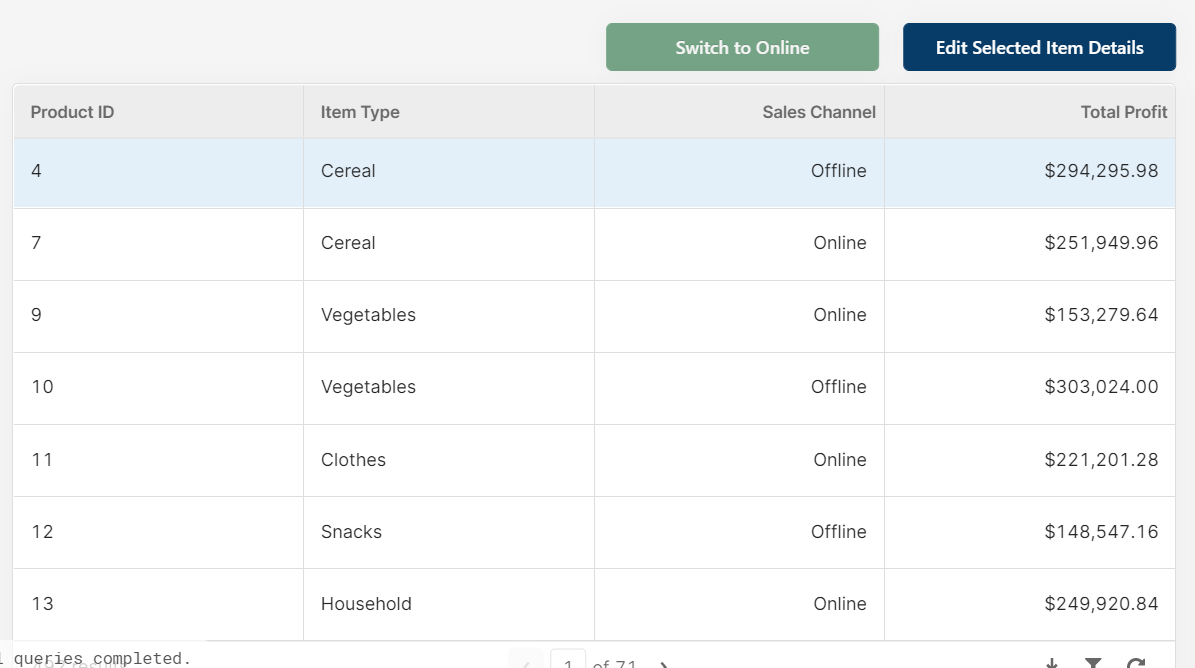
In the image below, you can see that our sales data has products that are either ‘online’ or ‘offline’, which is a key piece of data that we need to change from within the app. Instead of having two separate buttons to perform this action, our button automatically switches its action and text according to the row selected. This is how it looks in practice; note the ‘Switch to Online/Offline’ button above the table and how it changes depending on the row:

A gif showing a table component switching selected rows, each time the row changes the button changes color and the button text changes from 'online' to 'offline'

This is a very simple process that reads the data and changes the text, button color and query accordingly by using a ternary. The changing button color also improves the UI, making the action more obvious to the user to avoid mistakes.

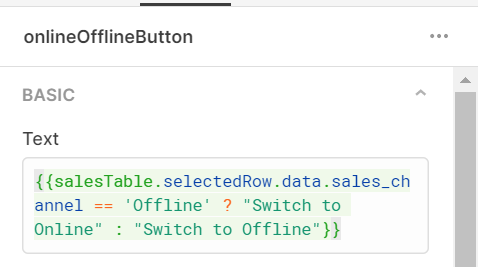
Let’s have a look at how this works. This is what the button text looks like:

text value for the online/offline button showing a ternary which switches based on backend data

And the button color:

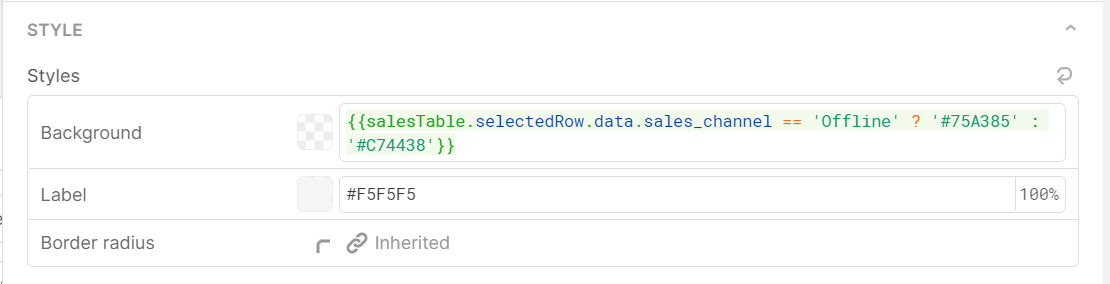
If you are unfamiliar with ternaries, they work just like ‘if/else’ statements: so these ternaries are checking if the first statement is true (the selected row = ‘offline’) and if so, performing the action after the question mark (changing the text or color). If the statement is false (i.e. the selected row = ‘online’), it performs the action after the colon. Ternaries are super useful for dynamic elements in your Retool apps, so if you aren’t already using them, they are definitely something worth trying to get your head around!

You would also need to apply the same principle in whichever query this button carries out, such as our query below. This query is triggered by an event handler ‘on click’ of the switch button we made above.

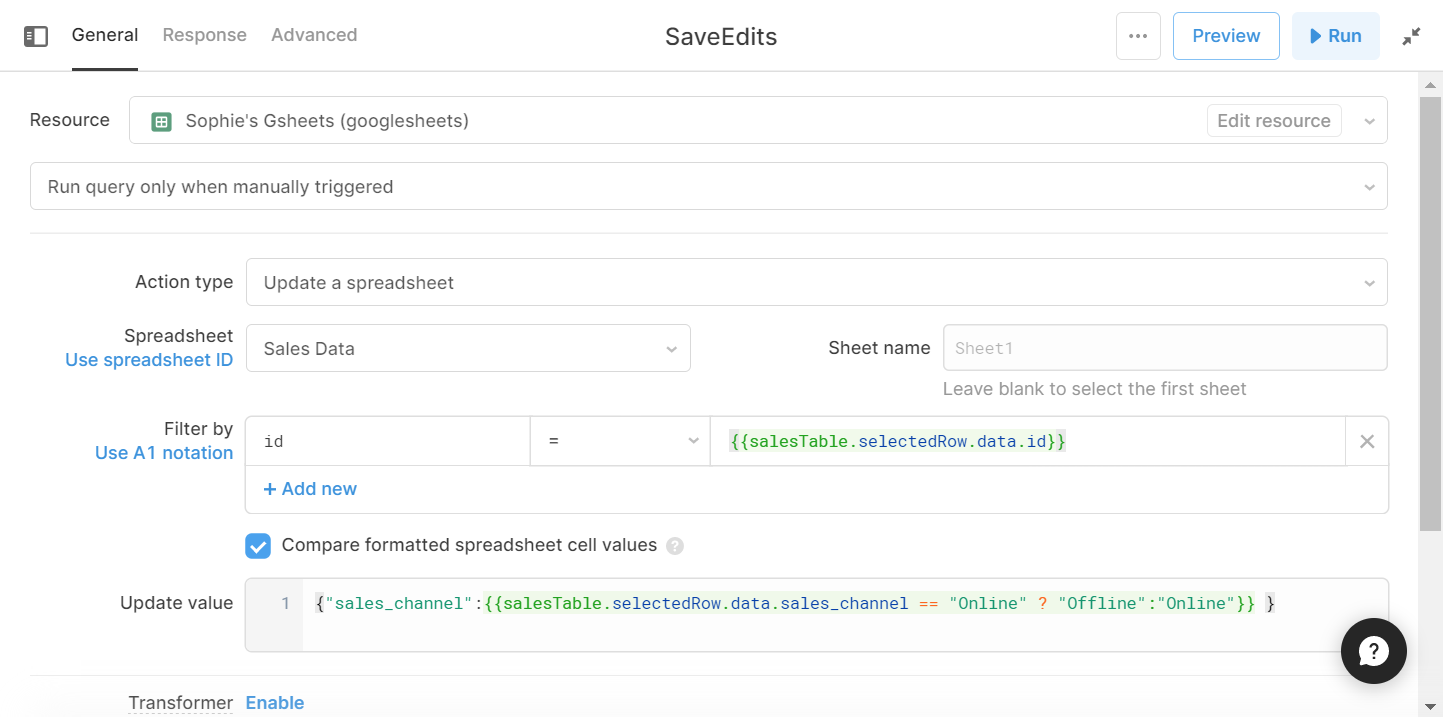
This dynamic action button is particularly useful for opposing actions or any kind of action that changes depending on the data itself.

Note: if you’re managing more than two states for a button via a ternary, the syntax can get hairy pretty quickly. In that case, it may make sense to encapsulate a switch statement in a Transformer for cleaner routing.

Tip 2. Avoid unnecessary repetition in table components

While action buttons within tables make for a very simple UI, if each button performs the same action it means lots of wasted space within your app and a generally cluttered appearance. Take this same table for example:

Since every button performs the same action, the repetition of the button doesn’t serve a useful function. Instead, you can use a single button that performs the action according to the selected row for a more streamlined interface, such as our ‘Edit Selected Item Details’ modal button as below:

In our case, this opens an edit modal, which responds to the data of the selected row in the table, filling in the details accordingly (see default value box).

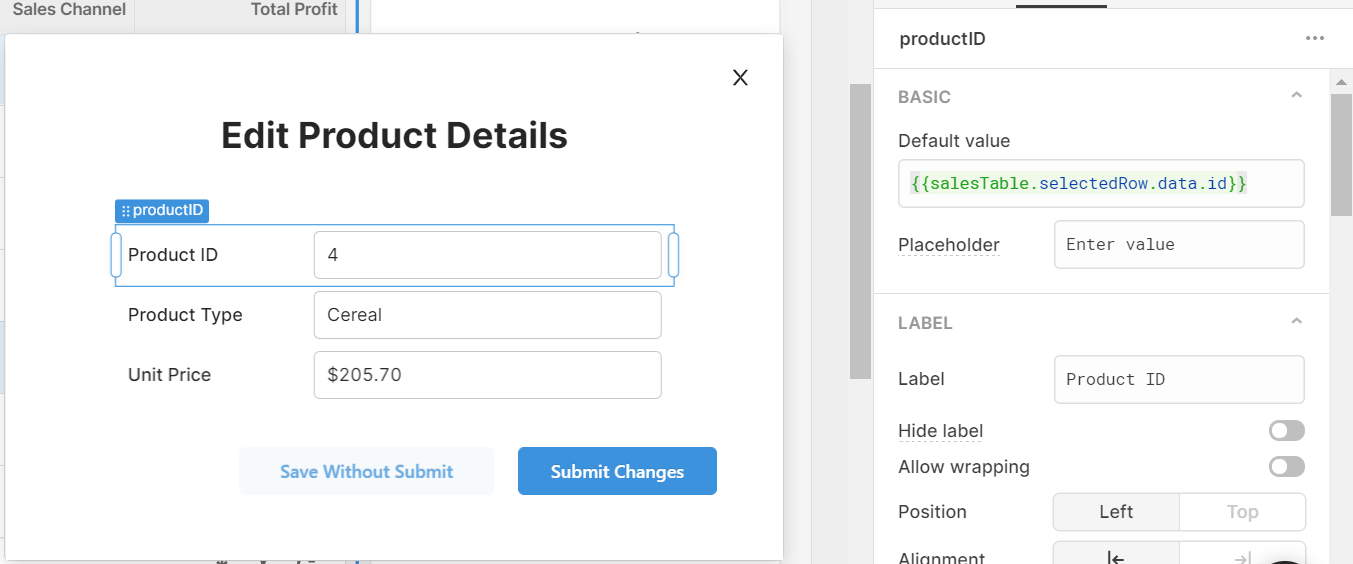
Note: the ‘Submit Changes’ button also needs to connect to a query that only updates the selected row.

A better way to make use of Custom Columns and action buttons in table components is by using our tip in Step 1 to create dynamic buttons. For this, you would use a similar idea to the code in Step 1, this time using ‘currentRow’ instead of ‘selectedRow’, as in this example:

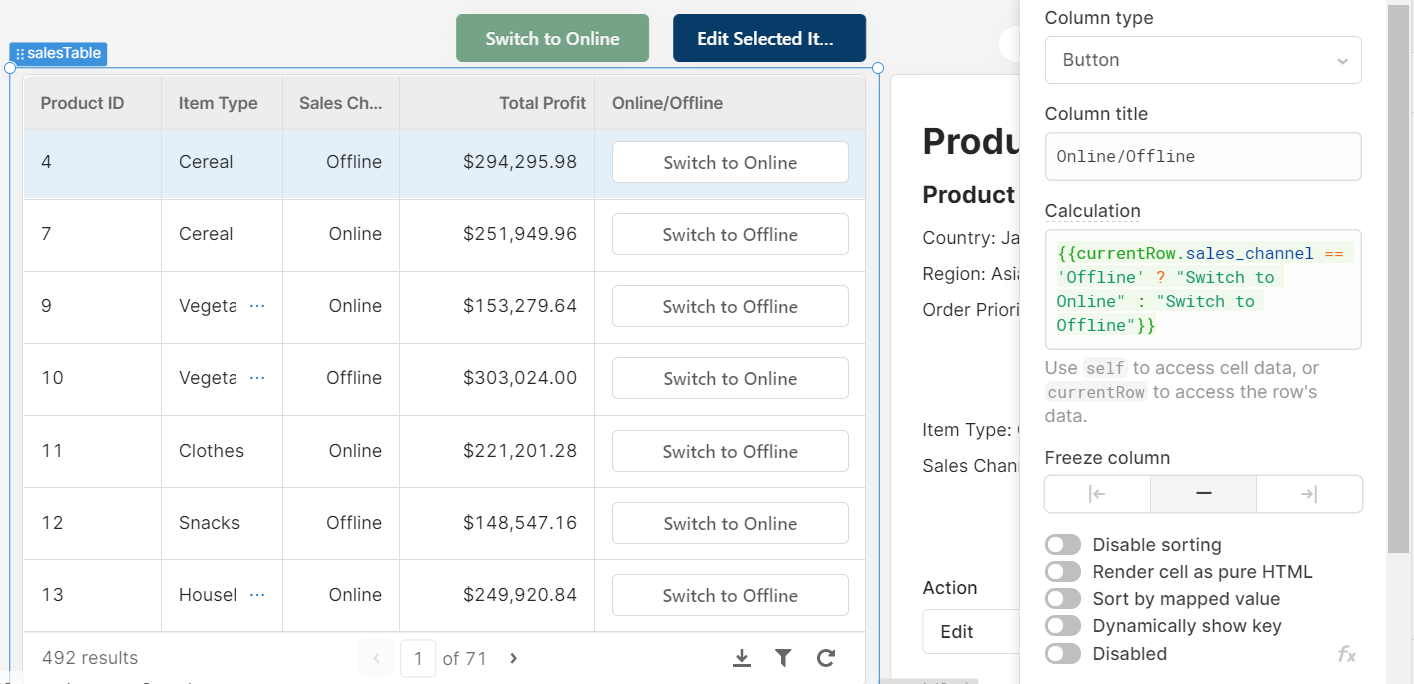
Just as in step 1, your action ‘on click’ would also need to connect to a dynamic query.

5 Likes

Excellent article @sophie.

I would like to take a little issue with the recommendation to not have an action button on each row. With a good UI (and Retool's current UI implementation is a bit clunky) action buttons for each row is quite nice:

  1. It is very intuitive for the user.
  2. It requires one less mouse click
  3. It requires one less "mental" click where you need to make sure the right row is selected before clicking the master action button.
  4. You can customize the actions based on the row context which your last example demonstrates beautifully.

If Retool had a context menu where you could select from a range of actions on each row I would use that a lot.

4 Likes

I am still confused on how to apply this information to my use-case for some kind of custom logic, ideally where I can "pass in" the value of the button/event clicked and then action off of that ButtonClicked event.

My initial approach was to use a transformer, something like this:

// check if the table1.selectedRow is undefined (eg, I'm assuming an empty/unloaded table would have nothing there aka 'undefined'!)
if (typeof {{table1.selectedRow}} ==="undefined") {
  // if undefined, default to returning the value in the textInput2 field
  return {{textInput2.value}}
// otherwise, if the selectedRow is not undefined (eg, *selected*) return the selectedRow's first index of data.sampleVideo value 
 } else {
   return {{table1.selectedRow[0].data.samplevideo}}
}

Which btw, doesn't work because you have to use retool specific methods, in this case, {{table1.emptyMessage}} and not trying to do a typeof line.

However, even with this code "compiling", the code logic itself is still not behaving as intended, and really needs to be dependent directly on which button click fired the event.

From what I gather from this post, it does seem possible to handle and action off the event itself, but how?

Edit per my post below, I actually realized subsequent to publishing this that the emptyMessage is in fact more like a getter for a specific table property (emptyMessage "statement") and does not actually evaluate the state of the table (whether it is empty or not)

Hey @andymac

Could you write something like: {{ table1.selectedRow[0].index== undefined ? textInput2.value : table1.selectedRow[0].data.samplevideo}}

something like this should work!

1 Like

thanks @JoeyKarczewski , I didnt mean to distract with my thought process. In this case, I think that whole approach to the transformer is DOA, because:

either way, I'm writing a layer of indirection trying to beat around the bush instead of just:
if (this kind of button was clicked) {
// do this }
else {
// do this
}

Fwiw, I did try your approach as well as a sanity check, and while it did not resolve the issue I actually realized:

  1. the emptyMessage method seems to just be a 'getter' for the string value property of the table as opposed to a method checking the state of the table
  2. I really need a way to read in the event itself :\

As an intellectual exercise, Ive tried a few permutations of this including:

if({{table1.selectedRow.index}}== undefined){
  return {{textInput2.value}}
} else {
  return {{table1.selectedRow.data.samplevideo}}
}

tried hardcoding the first index in:

if({{table1.selectedRow.index}}== undefined){
  return {{textInput2.value}}
} else {
  return {{table1.selectedRow[0].data.samplevideo}}
}

And the transformer function is still returning either 'undefined' or 'null'

Edit: ok, I did a little additional debugging (just return selectedRow to see what that was outputting and confirmed it was outputting a selectedRow obj to begin with) and after confirming the obj schema was expected, I tried again simply writing:

if({{table1.selectedRow.index}}== undefined){
  return {{textInput2.value}}
} else {
  return {{table1.selectedRow.data.samplevideo}}
}

which is one of the permutations I had attempted earlier that had been returning null or defined. so I am not really sure why that was the case, but it seems to be working now?

That being said, I would still like to figure out a more direct approach with the eventHandlers but that may just be a separate thing at this point

Hey @andymac,

try this:

if (table1.selectedRow.data == undefined) {
  return textInput1.value
} else {
  return table1.selectedRow.data.name
}

In a transformer it would look like this:

if ({{table1.selectedRow.data == undefined}}) {
  return {{textInput1.value}}
} else {
  return {{table1.selectedRow.data.name}}
}
2 Likes

Thank you for the great article. I googled this article because I want to know how to make the conditional variant appearance for a button (Solid, Outline etc). I tried to put any kind of formula there like {{ active ? "Solid" : "Outline" }}, but unfortunately it doesn't work.

In your article I found you made with conditional background (there formula works fine). Thanks for sharing this way!
I'd also like to share the solution I ended up for myself, because I still need Variant, not only background. Of course, I could do with conditional background, text color, border, or alternatively I made it different way - just made two buttons with the same text and different Variant, and then made conditional hidden - so that one and only one of two buttons is always visible.
Also sometimes this approach might simplify someone's logic - so that you can separate triggering On an Off methods by assigning them to two different buttons (while only one of them will be visible).
So for user visually it looks like button just "changes" - while in reality one button hides and another appears on the same place.
Especially useful doing that in ButtonGroup, so that it realign buttons automatically.

1 Like