Hi,
I was able to make it work
html
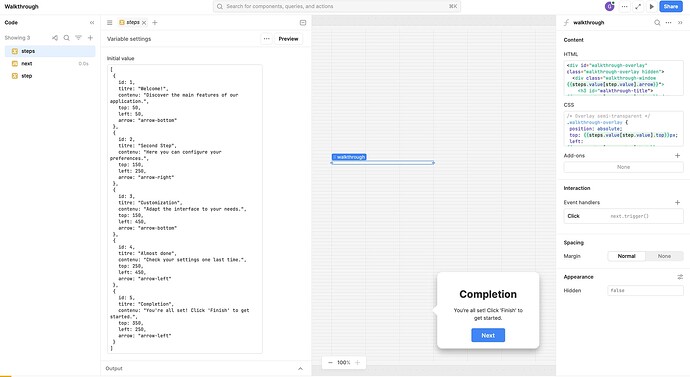
<div id="walkthrough-overlay" class="walkthrough-overlay hidden">
  <div class="walkthrough-window {{steps.value[step.value].arrow}}">
    <h3 id="walkthrough-title">{{steps.value[step.value].titre}}</h3>
    <p id="walkthrough-content">{{steps.value[step.value].contenu}}</p>
    <div class="walkthrough-controls">
      <button class="next" data-click-target="moveEvent">Next</button>
    </div>
  </div>
</div>
CSS
/* Overlay semi-transparent */
.walkthrough-overlay {
 position: absolute;
 top: {{steps.value[step.value].top}}px;
 left: {{steps.value[step.value].left}}px;
 width: 100%;
 height: 100%;
 background-color: rgba(0, 0, 0, 0.6);
 z-index: 9999;
 display: flex;
 justify-content: center;
 align-items: center;
}

/* Fenêtre du walkthrough avec coins arrondis */
.walkthrough-window {
 position: relative;
 background-color: #fff;
 color: #333;
 padding: 15px 30px;
 width: 400px;
 border-radius: 12px;
 box-shadow: 0px 8px 15px rgba(0, 0, 0, 0.3);
 text-align: center;
 line-height: 1.5;
}

/* Espacement uniforme entre les éléments */
.walkthrough-window h3,
.walkthrough-window p,
.progress-container,
.walkthrough-footer {
 margin-bottom: 15px;
}

/* Bouton Next */
.next {
 background-color: #4285f4;
 color: white;
 border: none;
 padding: 8px 24px;
 border-radius: 4px;
 font-size: 14px;
 font-weight: 500;
 cursor: pointer;
 transition: background-color 0.2s ease;
 letter-spacing: 0.25px;
 font-family: -apple-system, BlinkMacSystemFont, "Segoe UI", Roboto, Arial, sans-serif;
}

.next:hover {
 background-color: #3b78e7;
}

.next:active {
 background-color: #3367d6;
}

/* Centrage des boutons dans le footer */
.walkthrough-footer {
 text-align: center;
}

/* Flèches du walkthrough */
.walkthrough-window::after {
 content: '';
 position: absolute;
 border: 12px solid transparent;
}

/* Flèche vers le haut */
.walkthrough-window.arrow-top::after {
 bottom: 100%;
 left: 50%;
 transform: translateX(-50%);
 border-bottom-color: #fff;
}

/* Flèche vers le bas */
.walkthrough-window.arrow-bottom::after {
 top: 100%;
 left: 50%;
 transform: translateX(-50%);
 border-top-color: #fff;
}

/* Flèche vers la gauche */
.walkthrough-window.arrow-left::after {
 right: 100%;
 top: 50%;
 transform: translateY(-50%);
 border-right-color: #fff;
}

/* Flèche vers la droite */
.walkthrough-window.arrow-right::after {
 left: 100%;
 top: 50%;
 transform: translateY(-50%);
 border-left-color: #fff;
}
steps
[
 {
   id: 1,
   titre: "Welcome!",
   contenu: "Discover the main features of our application.",
   top: 50,
   left: 50,
   arrow: "arrow-bottom"
 },
 {
   id: 2,
   titre: "Second Step",
   contenu: "Here you can configure your preferences.",
   top: 150,
   left: 250,
   arrow: "arrow-right"
 },
 {
   id: 3,
   titre: "Customization",
   contenu: "Adapt the interface to your needs.",
   top: 150,
   left: 450,
   arrow: "arrow-bottom"
 },
 {
   id: 4,
   titre: "Almost done",
   contenu: "Check your settings one last time.",
   top: 250,
   left: 450,
   arrow: "arrow-left"
 },
 {
   id: 5,
   titre: "Completion",
   contenu: "You're all set! Click 'Finish' to get started.",
   top: 350,
   left: 250,
   arrow: "arrow-left"
 }
]
next query
step.setValue(step.value+1)
step variable (inital state)
1


