The HTML component is a great tool for when you want full control over rendered content and styling. In this post I’ll share how I’m using it within a ListView to render conversations. There are two examples I will walk through:
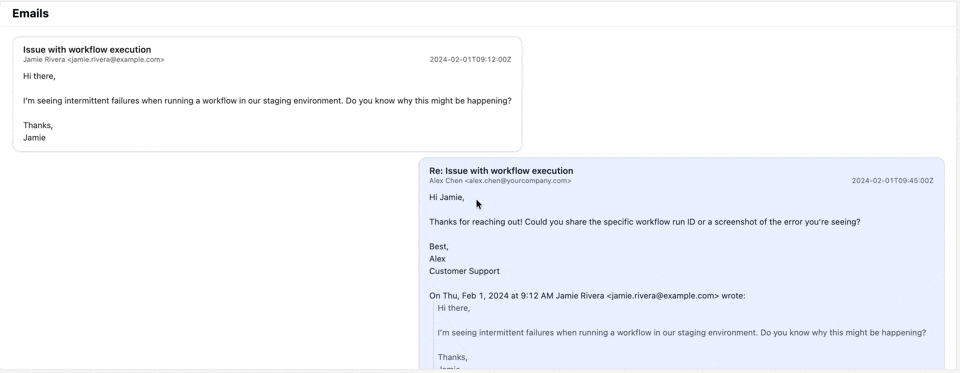
- A Gmail-style email thread
- A Slack-style support conversation
Both examples follow the same pattern:
-
Fetch conversation data from an API
-
Use Transform results to turn each item into an HTML string and attach CSS classes.
-
Display these conversations in my HTML components
Example 1 – Email thread from an API
For the demo, I’m posting dummy email JSON to https://httpbin.org/anything in a query called getEmails.
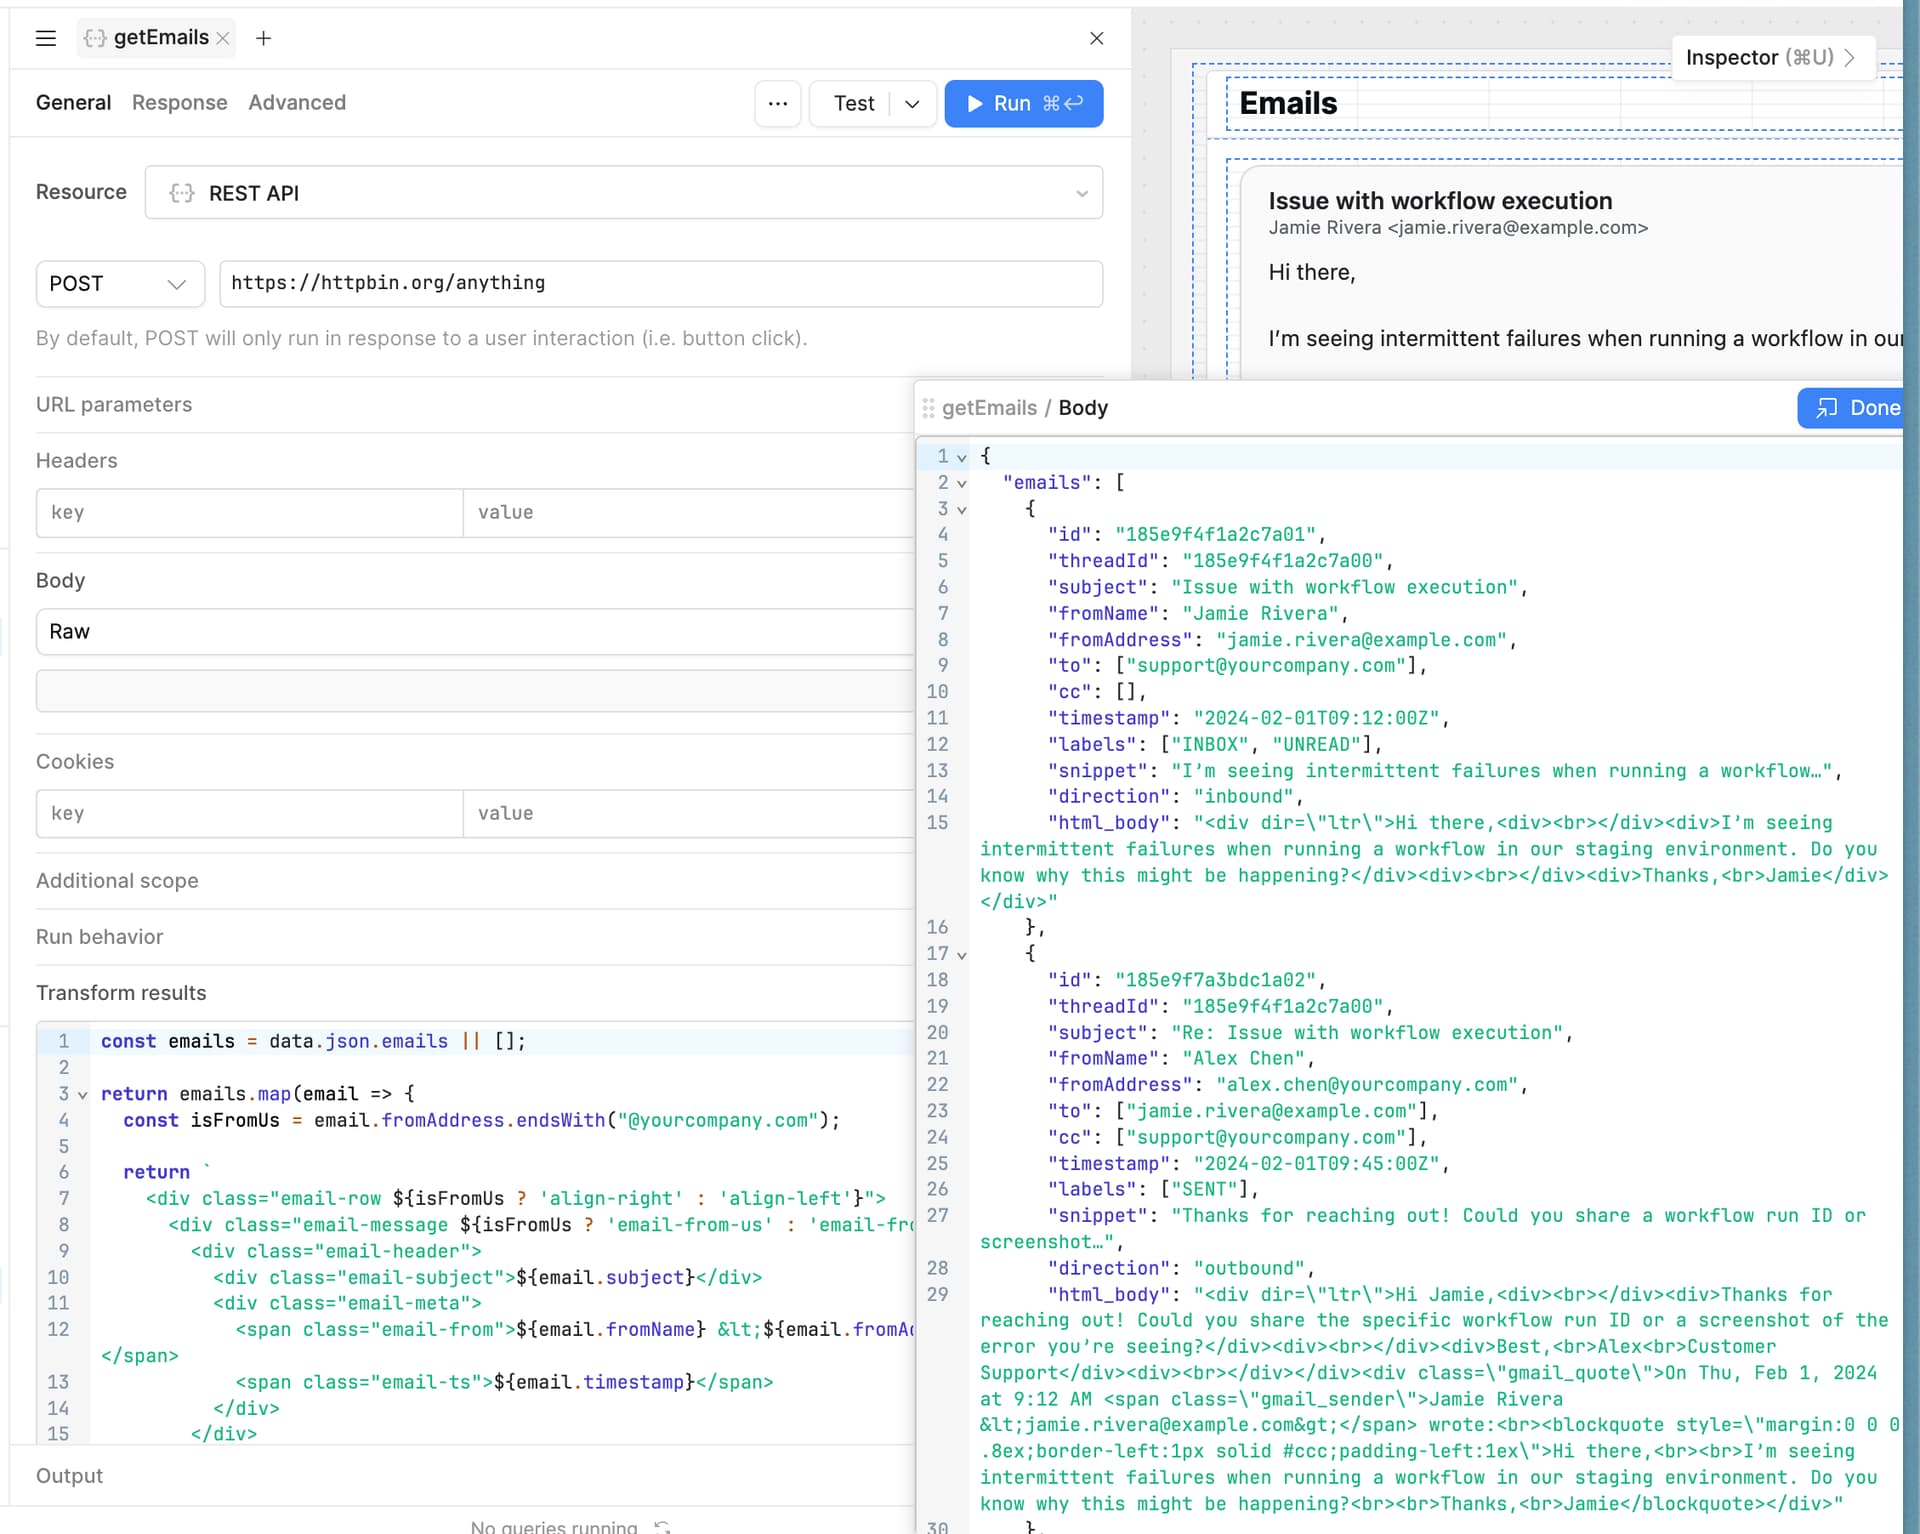
In getEmails → Transform results:
const emails = data.json.emails || [];
return emails.map(email => {
const isFromUs = email.fromAddress.endsWith("@yourcompany.com");
return `
<div class="email-row ${isFromUs ? 'align-right' : 'align-left'}">
<div class="email-message ${isFromUs ? 'email-from-us' : 'email-from-customer'}">
<div class="email-header">
<div class="email-subject">${email.subject}</div>
<div class="email-meta">
<span class="email-from">${email.fromName} <${email.fromAddress}></span>
<span class="email-ts">${email.timestamp}</span>
</div>
</div>
<div class="email-body">
${email.html_body}
</div>
</div>
</div>
`;
});
Why transform?
-
To flatten the shape returned by the API into the markup the HTML component needs.
-
To inject CSS classes (email-from-us, email-from-customer, etc) for our styling.
-
To do any additional formatting work here (formatting timestamps, truncating previews)
In my ListView, I set the data source directly to the getEmails query.
Inside the ListView row, the HTML component simply renders the transformed HTML for the current item:
{{ getEmails.data[i] }}
Then in the HTML component’s CSS tab, I style those classes. A few of the things I want to accomplish here are:
-
Customer messages on the left and Support replies on the right
-
Formatted email headers
-
Quoted history indented
.email-row {
  display: flex;
  width: 100%;
  margin-bottom: 10px;
}

.email-row.align-left {
  justify-content: flex-start;
}

.email-row.align-right {
  justify-content: flex-end;
}

.email-message {
  max-width: 85%;
  width: fit-content;
  padding: 12px 16px;
  border-radius: 12px;
  border: 1px solid #dadce0;
  background: #fff;
  font-family: system-ui, sans-serif;
  box-shadow: 0 1px 2px rgba(0,0,0,0.08);
}

.email-from-us {
  background: #e8f0fe;
  border-color: #c6dafc;
}

.email-from-customer {
  background: #fafafa;
}

.email-subject {
  font-weight: 600;
  margin-bottom: 4px;
}

.email-meta {
  font-size: 11px;
  color: #666;
  margin-bottom: 8px;
}

.email-body {
  font-size: 13px;
  line-height: 1.5;
}

.email-body img {
  margin-top: 8px;
  max-width: 100%;
  border-radius: 6px;
}
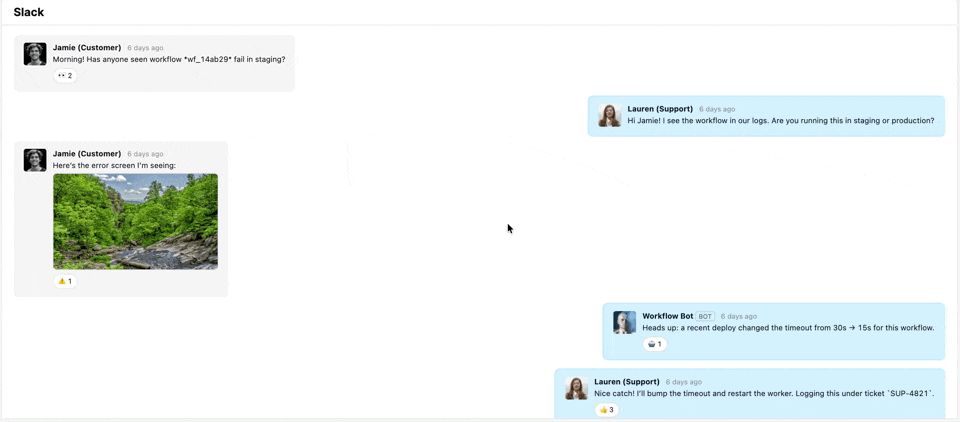
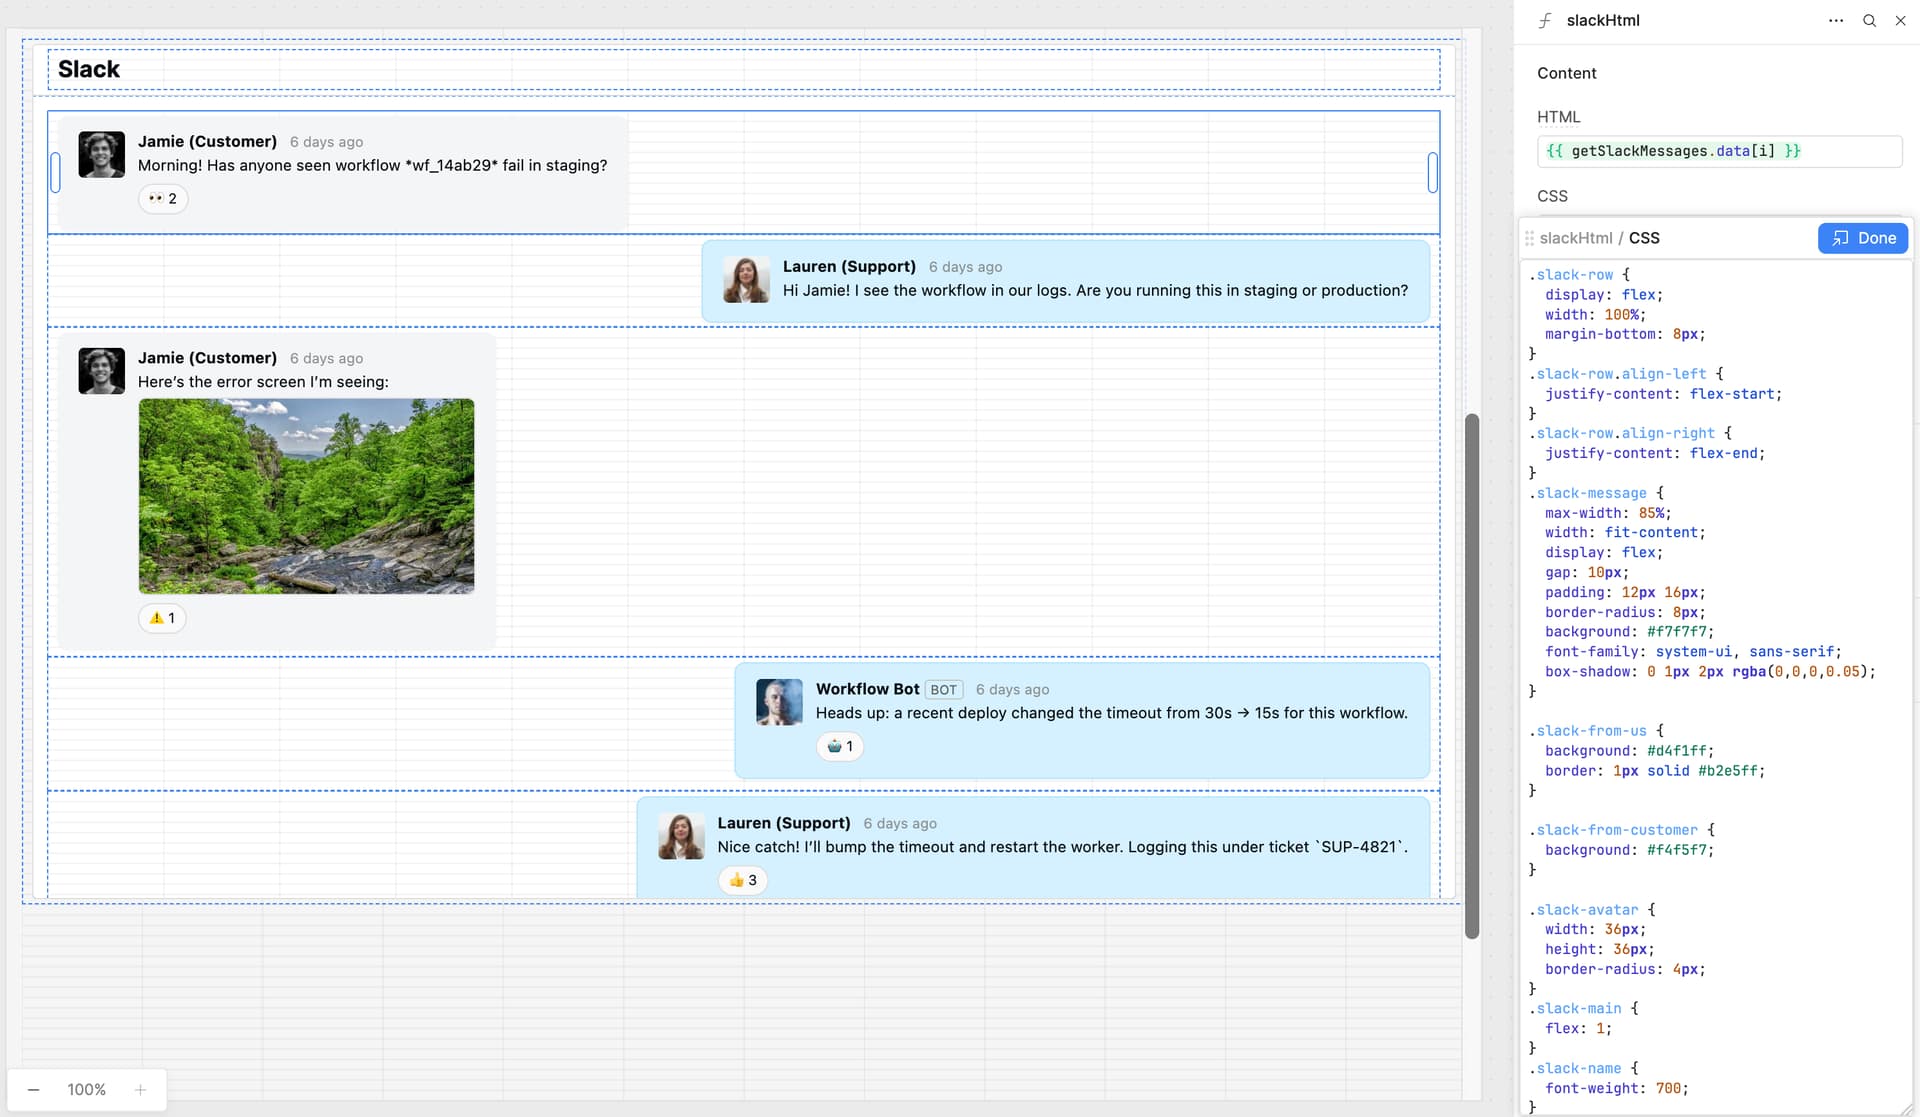
Example 2 – Slack-style conversation
For Slack, I’m doing exactly the same thing, just with different content and CSS. Again, I post dummy Slack JSON to https://httpbin.org/anything in a query called getSlackMessages.

In getSlackMessages → Transform results:
const msgs = data.json.slackMessages || [];

const EMOJI_MAP = {
  eyes: "👀",
  warning: "⚠️",
  robot_face: "🤖",
  thumbsup: "👍"
};

function timeAgo(iso) {
  const d = new Date(iso);
  const now = new Date();
  const diff = (now - d) / 1000;

  if (diff < 60) return "just now";
  const m = Math.floor(diff / 60);
  if (m < 60) return `${m} mins ago`;
  const h = Math.floor(m / 60);
  if (h < 24) return `${h} hours ago`;
  const days = Math.floor(h / 24);
  return `${days} days ago`;
}

return msgs.map(msg => {
  const isFromUs = msg.userId === "U01SUPPORT" || msg.userId === "U01BOT";

  const reactionsHtml = (msg.reactions || [])
    .map(r => {
      const emoji = EMOJI_MAP[r.name] || `:${r.name}:`;
      return `<span class="slack-reaction-pill">${emoji} ${r.count}</span>`;
    })
    .join("");

  return `
    <div class="slack-row ${isFromUs ? "align-right" : "align-left"}">
      <div class="slack-message ${isFromUs ? "slack-from-us" : "slack-from-customer"}">
        <img class="slack-avatar" src="${msg.avatarUrl}" />
        <div class="slack-main">
          <div class="slack-header">
            <span class="slack-name">${msg.displayName}</span>
            ${msg.isBot ? '<span class="slack-badge">BOT</span>' : ""}
            <span class="slack-ts">${timeAgo(msg.ts)}</span>
          </div>
          <div class="slack-text">
            ${msg.text}
          </div>
          ${
            msg.file
              ? `<div class="slack-file">
                   <img src="${msg.file.url}" alt="${msg.file.name}" />
                 </div>`
              : ""
          }
          ${
            reactionsHtml
              ? `<div class="slack-reactions">${reactionsHtml}</div>`
              : ""
          }
        </div>
      </div>
    </div>
  `;
});
I then populate the ListView and HTML components like I did for the email view. Then in the HTML component’s CSS tab, I style these classes. A few of the things I want to accomplish in this view are:
-
Customer messages on the left and Support + Bot on the right
-
Screenshots inline
-
Emoji reactions rendered as small pills
-
Relative timestamps (6 days ago for example)
.slack-row {
  display: flex;
  width: 100%;
  margin-bottom: 8px;
}
.slack-row.align-left {
  justify-content: flex-start;
}
.slack-row.align-right {
  justify-content: flex-end;
}
.slack-message {
  max-width: 85%;
  width: fit-content;
  display: flex;
  gap: 10px;
  padding: 12px 16px;
  border-radius: 8px;
  background: #f7f7f7;
  font-family: system-ui, sans-serif;
  box-shadow: 0 1px 2px rgba(0,0,0,0.05);
}

.slack-from-us {
  background: #d4f1ff;
  border: 1px solid #b2e5ff;
}

.slack-from-customer {
  background: #f4f5f7;
}

.slack-avatar {
  width: 36px;
  height: 36px;
  border-radius: 4px;
}
.slack-main {
  flex: 1;
}
.slack-name {
  font-weight: 700;
}
.slack-badge {
  font-size: 10px;
  text-transform: uppercase;
  padding: 1px 4px;
  border-radius: 3px;
  border: 1px solid #c5c5c5;
  color: #616061;
}
.slack-reactions {
  margin-top: 6px;
  display: flex;
  gap: 6px;
  flex-wrap: wrap;
}
.slack-reaction-pill {
  font-size: 11px;
  padding: 3px 8px;
  border-radius: 999px;
  background: #fafafa;
  border: 1px solid #ddd;
}
.slack-header {
  margin-bottom: 2px;
}
.slack-text {
  margin-top: 0;
  margin-bottom: 4px;
}
.slack-file {
  margin-top: 0;
  margin-left: 0;
}
.slack-file img {
  display: block;
  max-width: 260px;
  border-radius: 6px;
  border: 1px solid #ddd;
}
.slack-ts {
  font-size: 11px;
  color: #7c7c7c;
  margin-left: 6px;
  opacity: 0.8;
}
And there you have it! I’ve attached the example app here as well so you can play around with it and make it your own ![]()
HTML Component Messages.json (32.9 KB)