The following post comes courtesy of Amit Jotwani ![]()
If it's interesting to you there's much more to check out over at the Retool Blog!
Building a Custom Amazon EC2 Instance Admin Panel for DevOps with Retool
Custom scripts and tools are a common way for DevOps professionals to manage resources within their infrastructure.
These scripts, however can become challenging to run, share, scale, and maintain, particularly as the complexity of the infrastructure grows and the team size expands.
In this blog post, we'll explore how you can use Retool to build custom easy to use admin panels that can simplify your common DevOps processes.
We will use an example of managing Amazon EC2 virtual servers to demonstrate how Retool can help you build a custom tool that simplifies common tasks, such as launching new instances, starting and stopping instances, and checking instance status.
By the end of this post, you'll understand how you can use Retool’s drag-and-drop UI components and built-in integrations to quickly convert common DevOps processes into flexible software accessible to your entire team.
For the impatient - feel free to simply download the JSON definition of this Retool app, which you can import into your own free Retool instance.
Let’s get started!
Connect Retool with Amazon EC2 API
Log in to Retool and create a new Resource for Amazon EC2 API using Retool's built-in REST API integration. We will be using Retool’s built-in AWS v4 authentication, so we wouldn’t need to worry about writing complex authentication code. Retool will handle that for us in a secure way.
- Name ->
Amazon EC2 - Base URL ->
https://ec2.amazonaws.com - Headers ->
Accept: application/json - Authentication ->
AWS v4 - AWS Region ->
<YOUR AWS REGION> - AWS Access Key ID ->
<YOUR AWS Access Key ID> - AWS Secret Key ID ->
<YOUR AWS Secret Key ID>
![]()
Note: You would need an AWS Access Key ID and AWS Secret Key ID for the IAM role or user with the AmazonEC2FullAccess policy attached for this step.
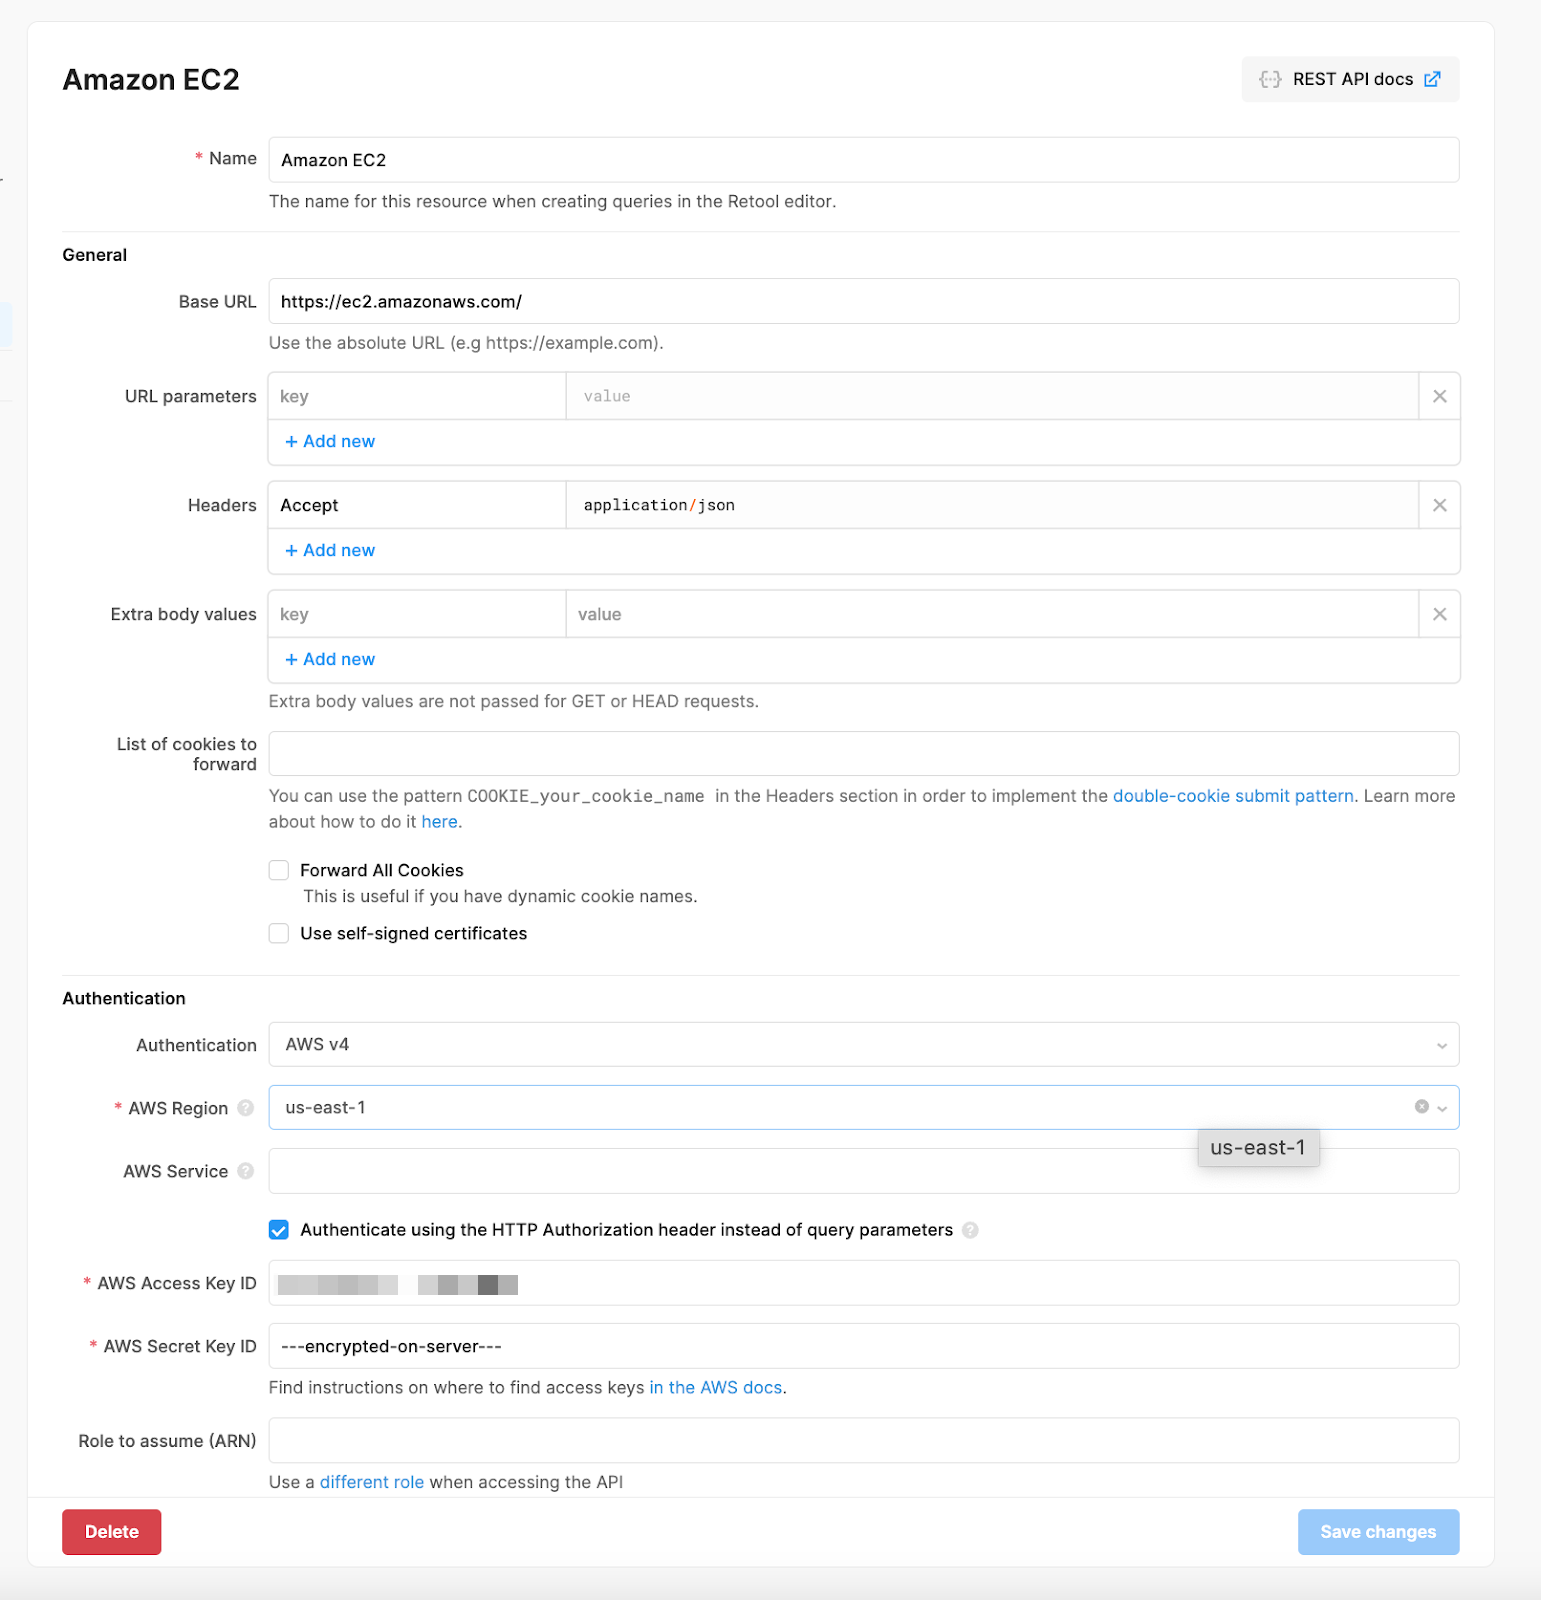
Setting up the Resource for Amazon EC2 API in the "Resources" tab
Create a new Retool app
Now that we have connected Retool with Amazon EC2 API, we are ready to build the actual user interface to display it. But before we add UI components to our canvas, let's look at the data we would need to build out the functionality for our EC2 Instance Manager, and how we will get it.
- List of EC2 Instances - Send GET request to EC2 API's DescribeInstances Action.
- Launch a new EC2 Instance - Send POST request to EC2 API's RunInstances Action
- Stop an Instance by Instance ID - Send POST request to EC2 API's StopInstances Action, along with the Instance ID.
- Start an Instance by Instant ID - Send POST request to EC2 API's StartInstances Action, along with the Instance ID.
Part 1: Displaying the list of EC2 Instances in a table
We will create a new GET Resource Query for the EC2 API’s DescribeInstances action.

Setting up the getAllEC2Instances Resource Query
Let’s name it getAllEC2Instances. We will choose the resource we created earlier for Amazon EC2 API as the Resource. Choose the Action Type as GET. The base URL for the Resource Query will automatically be set to ec2.amazonaws.com. Add this as URL params -
?Action=DescribeInstances&Filter.1.Name=instance-type&Filter.1.Value.1=t2.micro&Filter.2.Name=architecture&Filter.2.Value.1=x86_64&Version=2016-11-15
In this request, we are using two filters to search for instances with specific attributes -
- instance-type: Instance type refers to an EC2 template that specifies the amount of resources (such as CPUs and memory) that a virtual machine will have. In this case, the value for the instance-type filter is "t2.micro", which are instances that have 1 vCPU and 1GB of memory.
- architecture: Architecture refers to the type of processor used by the instance. In this case, the value for the architecture filter is "x86_64", which refers to a 64-bit processor architecture commonly used in personal computers.
Let’s try out this query by hitting the Preview button. You will see the Response of the query in the panel under the query.
Parsing the XML returned by Amazon EC2 API
The Amazon EC2 API returns results in XML format. Luckily, Retool parses that XML automatically for us, and presents that in a JSON format. You can view this data by clicking on the State tab in the left sidebar. The instance data we are looking for is nested under data -> parsedXML -> DescribeInstanceResponses -> reservationSet -> 0 -> item
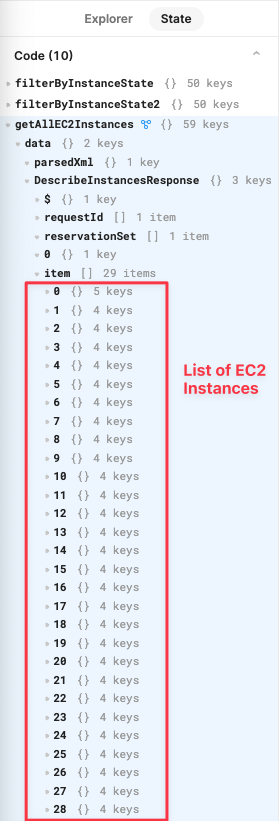
Viewing the result of the EC2 API in the State tab
Transforming the data to make it easy to navigate
The XML data returned by the EC2 API is deeply nested, making it difficult to extract the relevant information for each instance. So, we will write a bit of custom JavaScript code to “transform” the data into an easily readable array of objects using a JavaScript Transformer.
The fields we want to display in our table are - Architecture, DNS Name, Instant State, Image ID, Reservation ID, IP Address, Instance Name, Launch Time, Instance ID, Group Name, and Region.
So, let’s add a new Transformer with this JavaScript code to simplify the data into an array of objects that contain only the relevant information we need for each instance, making it much easier to read and work with. We will then use the output of this function to power other parts of our app, starting with the Table.
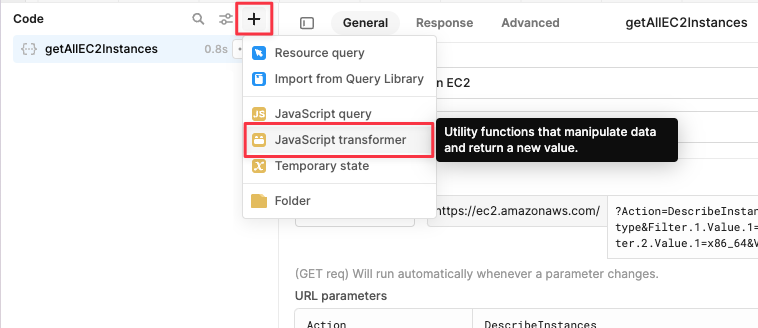
Add a new Transformer to "transform" aka restructure the data returned by the EC2 API
// Store data from the EC2 API in the variable data
const data = {{getAllEC2Instances.data.parsedXml.DescribeInstancesResponse.reservationSet['0'].item}};

// Initialize an empty array to hold final data
let finalData = [];

// Function to capitalize the first letter of a string
function capitalizeFirstLetter(string) {
  return string.charAt(0).toUpperCase() + string.slice(1);
}

// Loop through each key in the data object
Object.keys(data).forEach(key => {

  // Retrieve specific data points for each instance and assign to variables
  let architecture = data[key].instancesSet[0].item[0].architecture[0];
  let dnsName = data[key].instancesSet[0].item[0].dnsName[0];
  let instanceState = capitalizeFirstLetter(data[key].instancesSet[0].item[0].instanceState[0].name[0]);
  let imageId = data[key].instancesSet[0].item[0].imageId[0];
  let reservationId = data[key].reservationId[0];
  let ipAddress = typeof(data[key].instancesSet[0].item[0].ipAddress) !== 'undefined' ? data[key].instancesSet[0].item[0].ipAddress[0] : 'N/A';
  let instanceName = typeof(data[key].instancesSet[0].item[0].tagSet) !== 'undefined' ? data[key].instancesSet[0].item[0].tagSet[0].item[0].value[0] : 'N/A';
  let launchTime = data[key].instancesSet[0].item[0].launchTime[0];
  let instanceId = data[key].instancesSet[0].item[0].instanceId[0];
  let groupName = data[key].instancesSet[0].item[0].groupSet[0].item[0].groupName[0];
  let region = data[key].instancesSet[0].item[0].placement[0].availabilityZone[0];

  // Create a new object containing all relevant data points
  let newObj = {
    'architecture': architecture,
    'dnsName': dnsName,
    'instanceState': instanceState,
    'imageId': imageId,
    'reservationId': reservationId,
    'ipAddress': ipAddress,
    'instanceName': instanceName,
    'launchTime': launchTime,
    'instanceId': instanceId,
    'groupName': groupName,
    'region': region
  };

  // Add new object to the finalData array
  finalData.push(newObj);
});

// Log finalData to the console and return it
console.log(finalData);
return finalData;
Click on Preview to see the results of this transformer. As you can see, it’s much cleaner and easier to read and navigate.
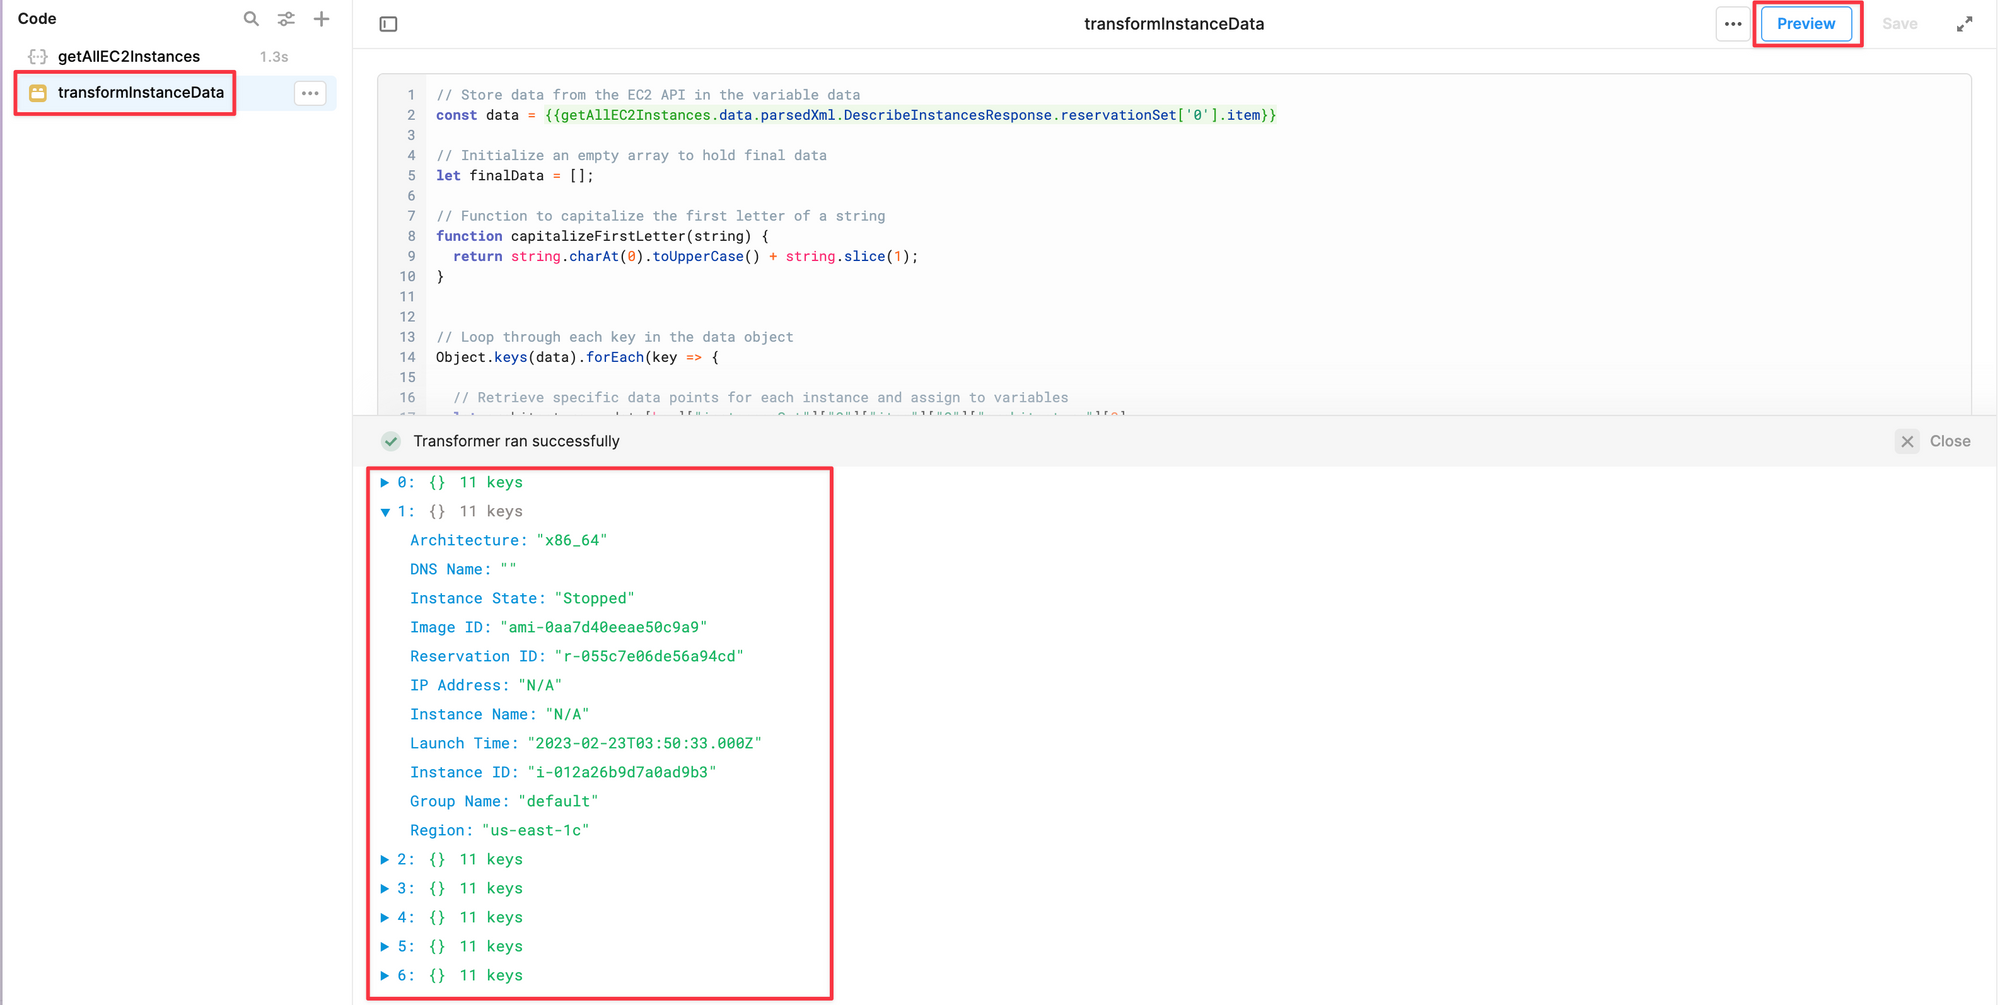
Click on Preview to see the results of this transformer as a JSON object
Displaying the data in the table
Drag the Table Component on to the canvas, and change the Data property to reference our formatted EC2 instance data using Retool's double curly brace data binding to {{transformInstanceData.value}} .
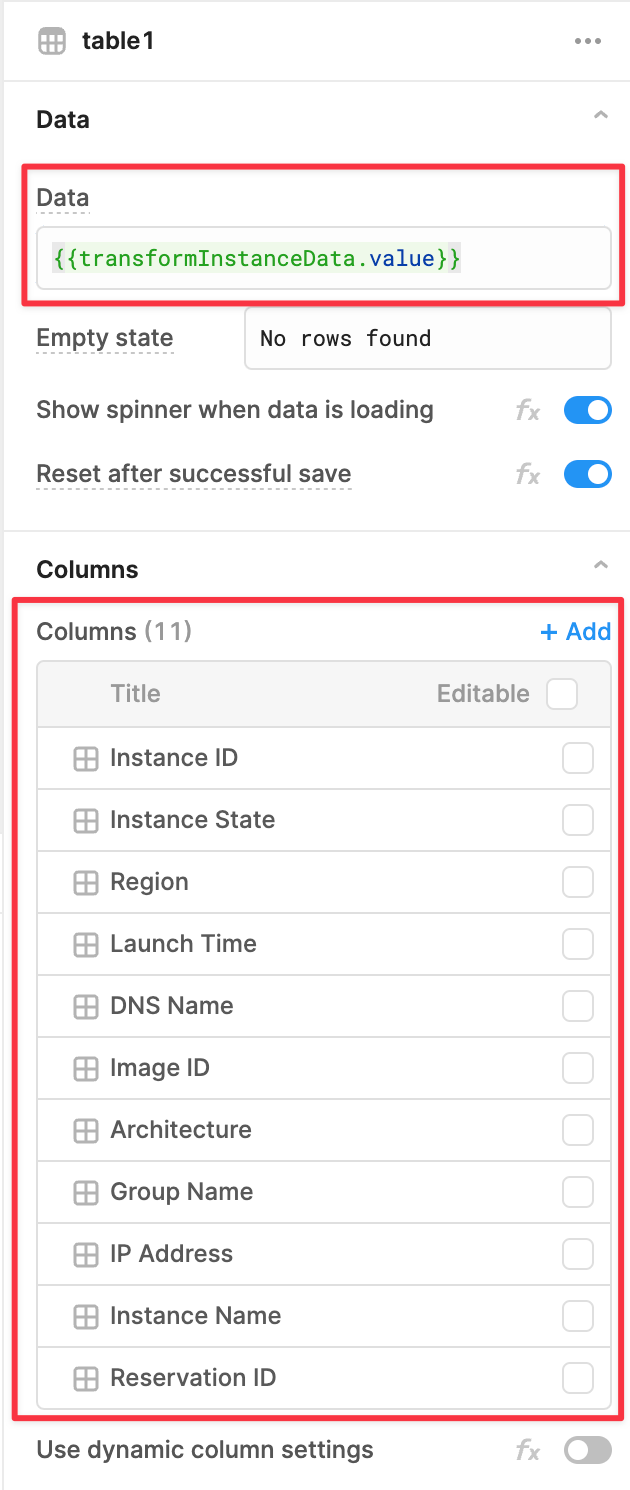
Changing the data property of the table to refer to the results of the JavaScript Transformer
The table will be populated with the data for your EC2 instances. Nice, we are on our way now with the list of EC2 instances being listed. But, it's a bit hard to know the status of these instances at a quick glance. Let's fix that.
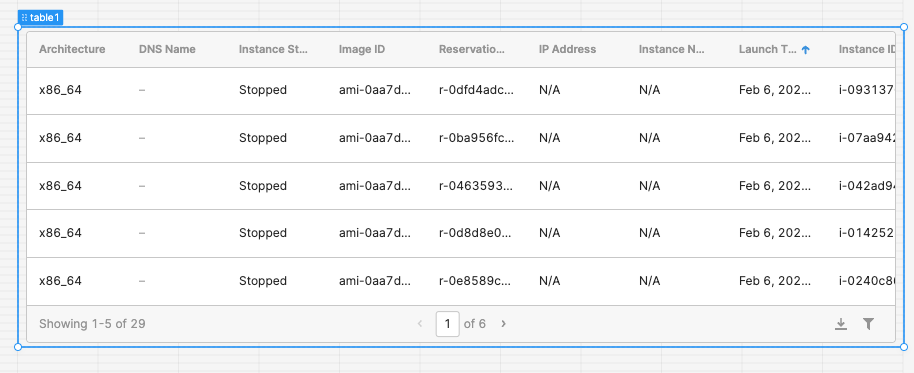
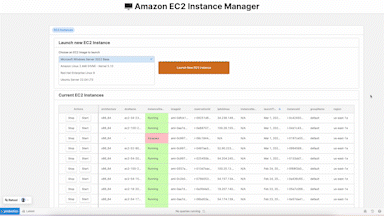
Populate table data with the list of EC2 Instances
Add background colors for “running”, and “stopped” instances
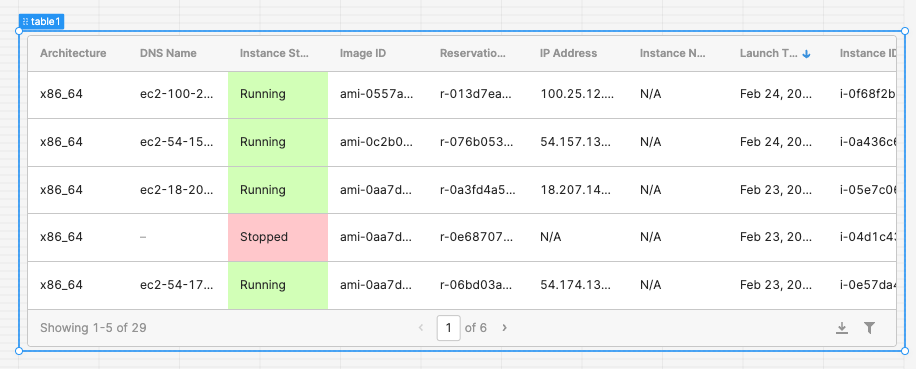
To make it easier to see the state of the instances, let’s add a background color to the Instance State column of our table. Change the Background property of the Instance State column to this conditional -
{{self.toLowerCase() === "running" ? 'rgba(165, 255, 110, 0.5)':self.toLowerCase() === "stopped" ? 'rgba(255, 141, 150, 0.5)':'rgba(255, 188, 99, 0.5)'}}
Add background colors for “running”, and “stopped” instances
If the state is “running”, then the color code rgba(165, 255, 110, 0.5) is returned, representing a light green color with a 50% transparency.
If the state is “stopped”, then the color code rgba(255, 188, 99, 0.5) is returned, representing a light red color with a 50% transparency.
Add background colors for “running”, and “stopped” instances
Part 2: Launching a new EC2 Instance (POST RunInstances)
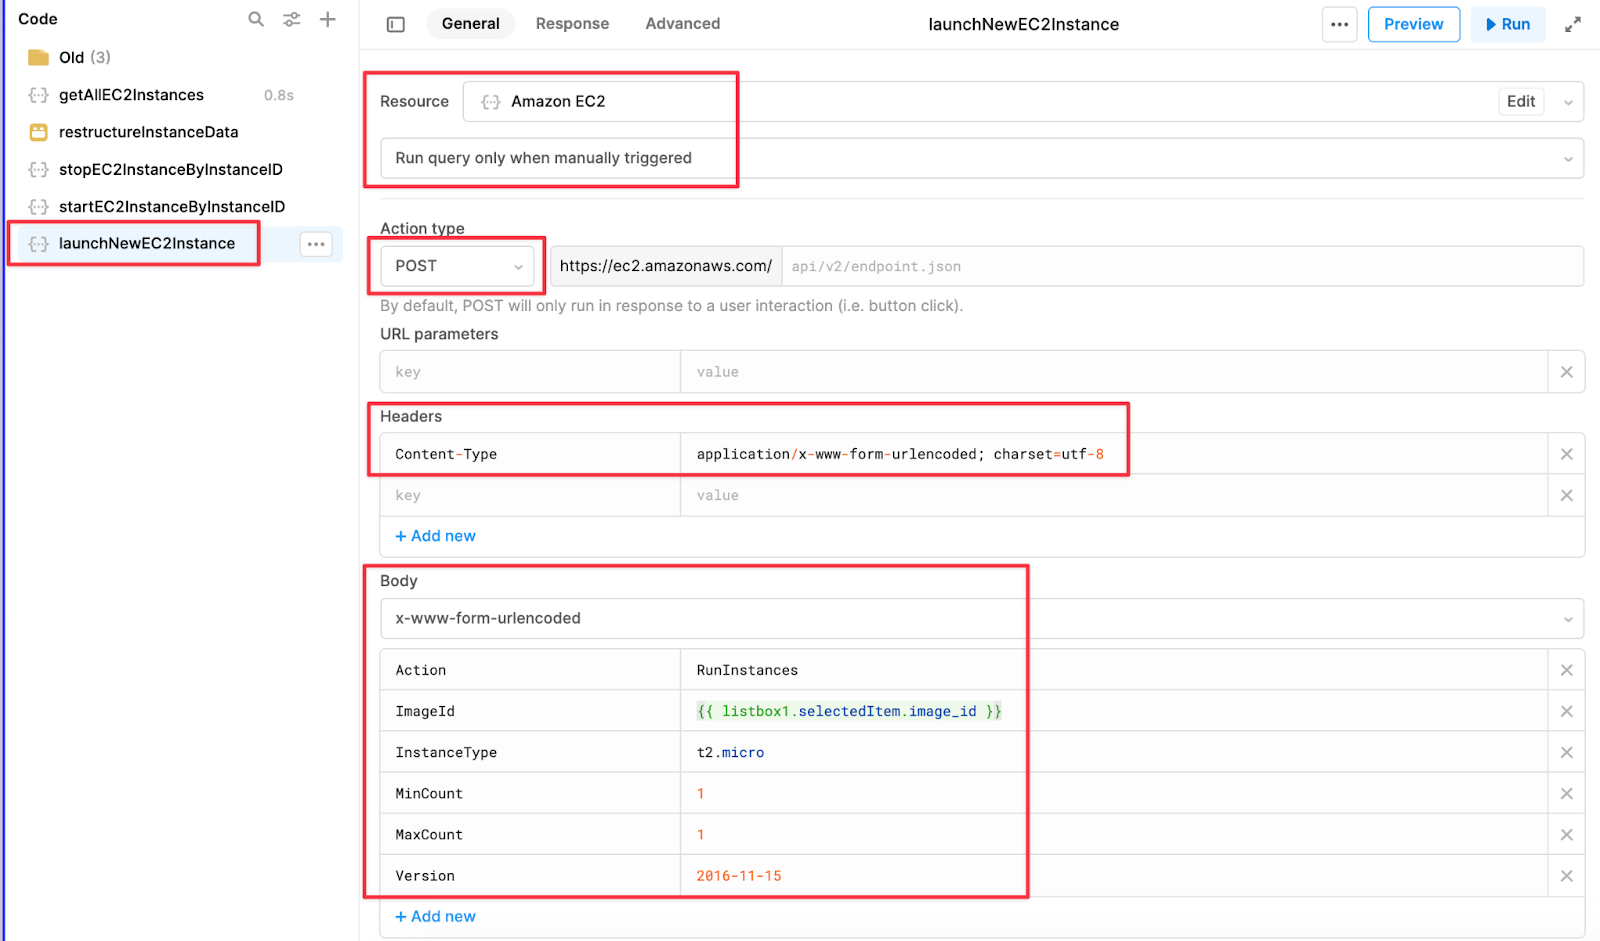
Create a new POST Resource Query for the EC2 API’s RunInstances action.
We will eventually add a Listbox component to select the image type, but for now, let's hardcode the image ID to ami-0dfcb1ef8550277af, which is a Linux image provided by Amazon in the AWS Free Tier called Amazon Linux 2 AMI (HVM) - Kernel 5.10.
launchNewEC2Instance
- Action Type ->
POST - Headers ->
application/x-www-form-urlencoded; charset=utf-8 - Body ->
x-www-form-urlencoded - Body Params:
- Action ->
RunInstances - ImageId ->
ami-0dfcb1ef8550277af - InstanceType ->
t2.micro - MinCount ->
1 - MaxCount ->
1 - Version ->
2016-11-15
Setting up the launchNewEC2Instance Resource Query
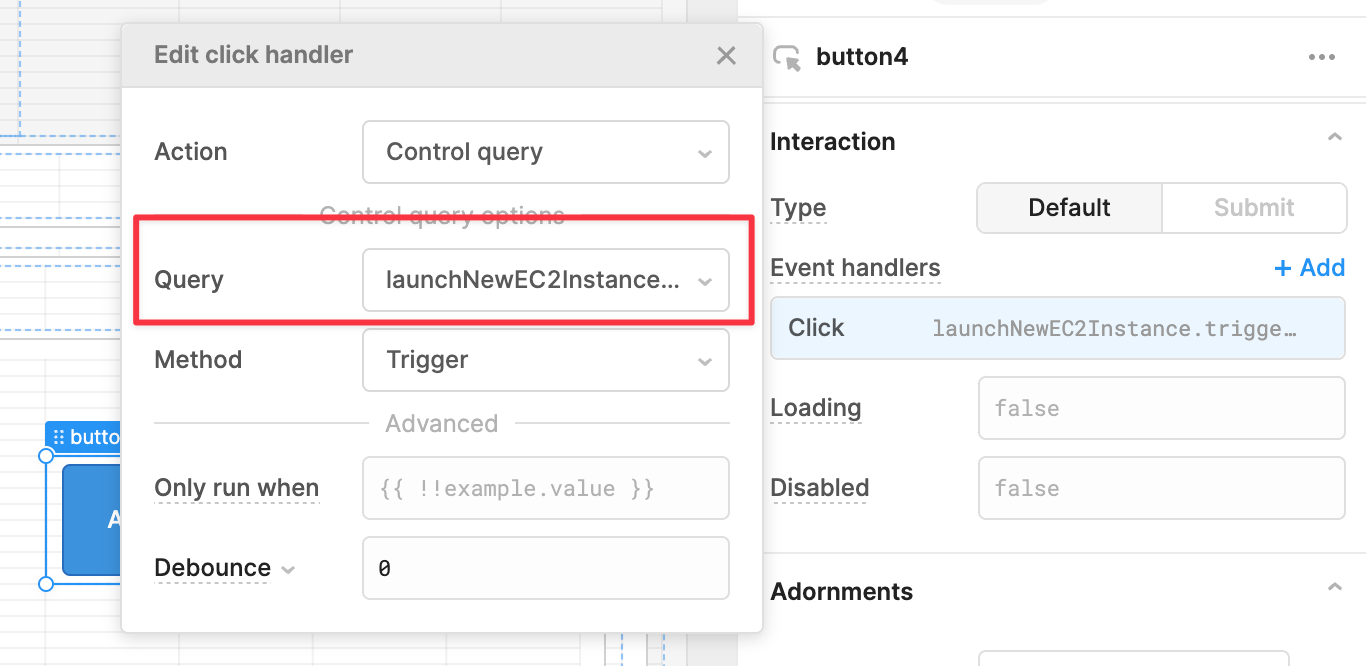
Now that we have the query for launching a new instance, we can drag a button component to the canvas, and connect this query to it by creating an event handler for the button, and setting its Click event to fire off the launchNewEC2Instance query.

Connect the button's "Click" event handler to the query
Refresh the table after launching a new instance
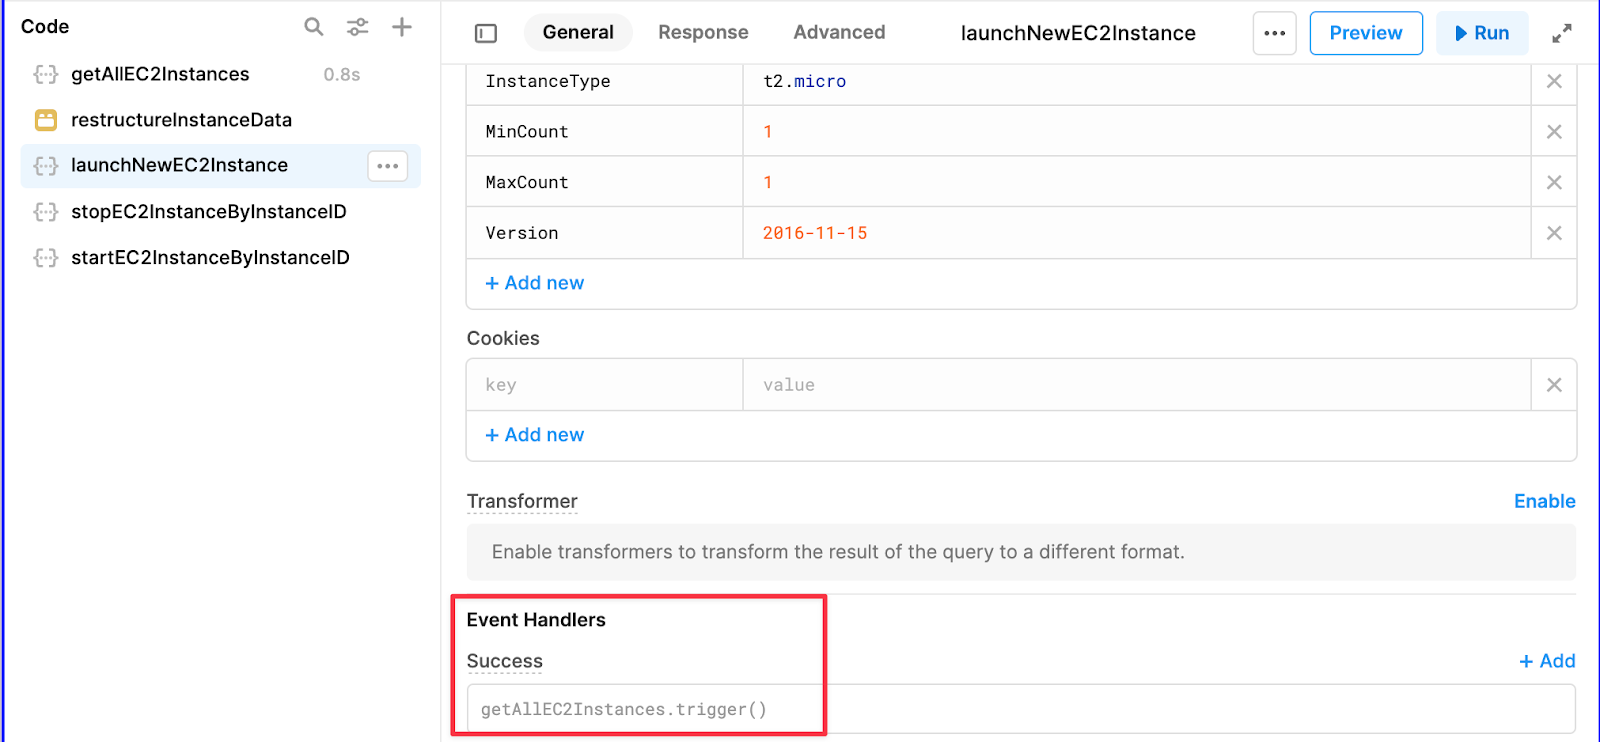
To ensure that the table automatically displays the newly launched instance, we will add getAllEC2Instances query to the Success section of the launchNewEC2Instance query, so it’s fired off automatically when a new instance is created successfully.
Get the list of EC2 Instances when a new instance is launched successfully
That's it. Let's test it. Clicking the Launch new EC2 Instance button should launch a new T2.Micro EC2 instance using the image ID - ami-0dfcb1ef8550277af, and the table should automatically be updated with the status of the new instance set to "Pending" (it can take a few seconds for the new EC2 instance to complete spinning up, at which point the status will automatically change to "Running")
Part 3: Stop and Start an EC2 instance
To stop and restart our existing instances, we will add two new Resource Queries, which will use EC2 API's StopInstances and StartInstances actions. We will then connect these queries to two actions buttons in the table.ru
Stopping an EC2 Instance
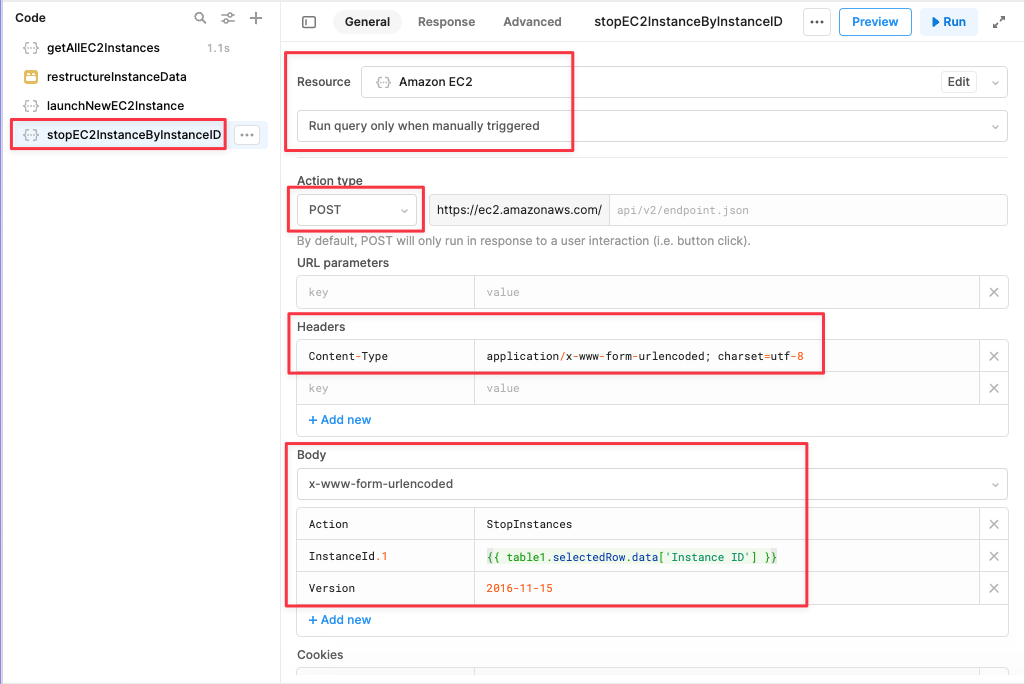
Let's create a query called stopEC2InstanceByInstanceID, using the configuration below:
- Action Type ->
POST - Headers ->
application/x-www-form-urlencoded; charset=utf-8 - Body ->
x-www-form-urlencoded - Body Params:
- Action ->
StopInstances - InstanceId.1 ->
{{ table1.selectedRow.data['Instance ID'] }} - Version ->
2016-11-15
Setting up the stopEC2InstanceByInstanceID Resource Query
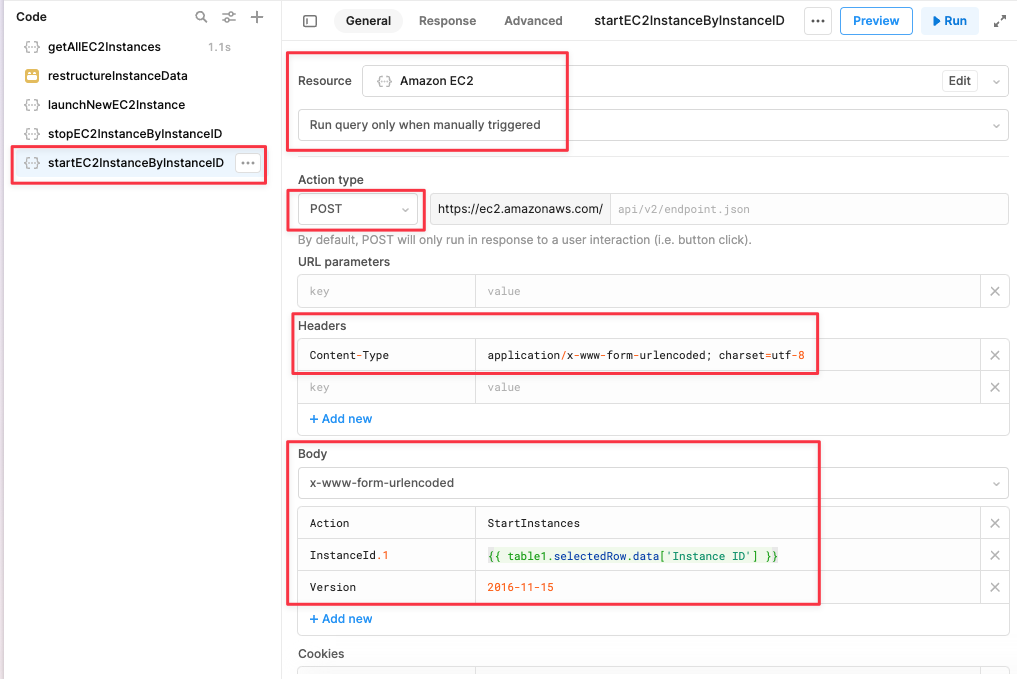
(re)Starting an EC2 Instance
Next, create a query called startEC2InstanceByInstanceID, using the same configuration as above, except the Action, which should be StartInstances
Setting up the startEC2InstanceByInstanceID Resource Query
Adding Buttons to the table to stop/start instance
In the Table’s inspector, navigate to the Actions section, and add two buttons for Start, and Stop.
Adding Action Buttons for each row of the table for "Starting" and "Stopping" Instances
Then, set the Action query property for these buttons to their respective queries we created earlier - Stop button (stopEC2InstanceByInstanceID), Start button (startEC2InstanceByInstanceID).
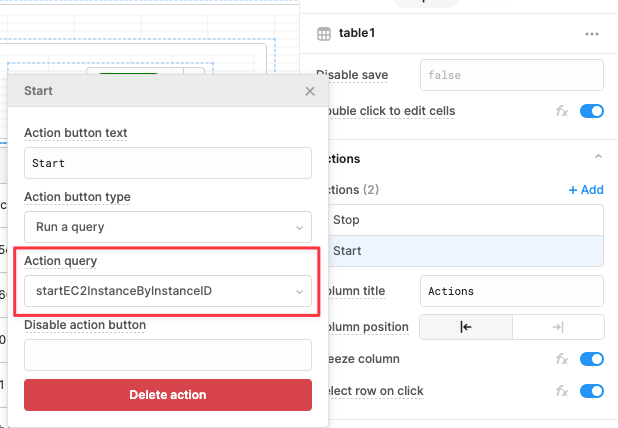
Set Action query property for “Start” action button to startEC2InstanceByInstanceID query
Refresh the table after starting or stopping an instance
To ensure the table automatically displays the updated status of the instance after stopping/starting an instance, we will add getAllEC2Instances query to the “Success” section of the startEC2InstanceByInstanceID and stopEC2InstanceByInstanceID queries, so it’s fired off automatically when an instance stops or starts successfully.
Part 4: Add a Listbox Component to choose the type of instance to launch
Finally, let’s add a Listbox component to the canvas, so we can choose the type of image we would like to launch.
Add a Listbox Component to allow choosing of instance type
Getting the Image Data for the Listbox
You can use Amazon EC2’s DescribeImages action to get details about the images. But since we only want to list the images available in the free tier, instead of calling an API, we will simply create a JSON object with the list of images we want to display.
Write a JavaScript Query that returns a simple JSON object for the images
Create a new JavaScript query called imageDataJSON and paste this code into it.
const imageData = [
  {
    "id": 1,
    "image_id": "ami-0c2b0d3fb02824d92",
    "image_title": "Microsoft Windows Server 2022 Base",
    "show_flag": true
  },
  {
    "id": 2,
    "image_id": "ami-0dfcb1ef8550277af",
    "image_title": "Amazon Linux 2 AMI (HVM) - Kernel 5.10",
    "show_flag": true
  },
  {
    "id": 3,
    "image_id": "ami-0c9978668f8d55984",
    "image_title": "Red Hat Enterprise Linux 9",
    "show_flag": true
  },
  {
    "id": 4,
    "image_id": "ami-0557a15b87f6559cf",
    "image_title": "Ubuntu Server 22.04 LTS",
    "show_flag": true
  }
];

return imageData;
Pre-load the Image data when the app launches
To ensure our Listbox is automatically populated when the app opens, we will check the box Run this query on page load? in the advanced tab for the imageDataJSON query.
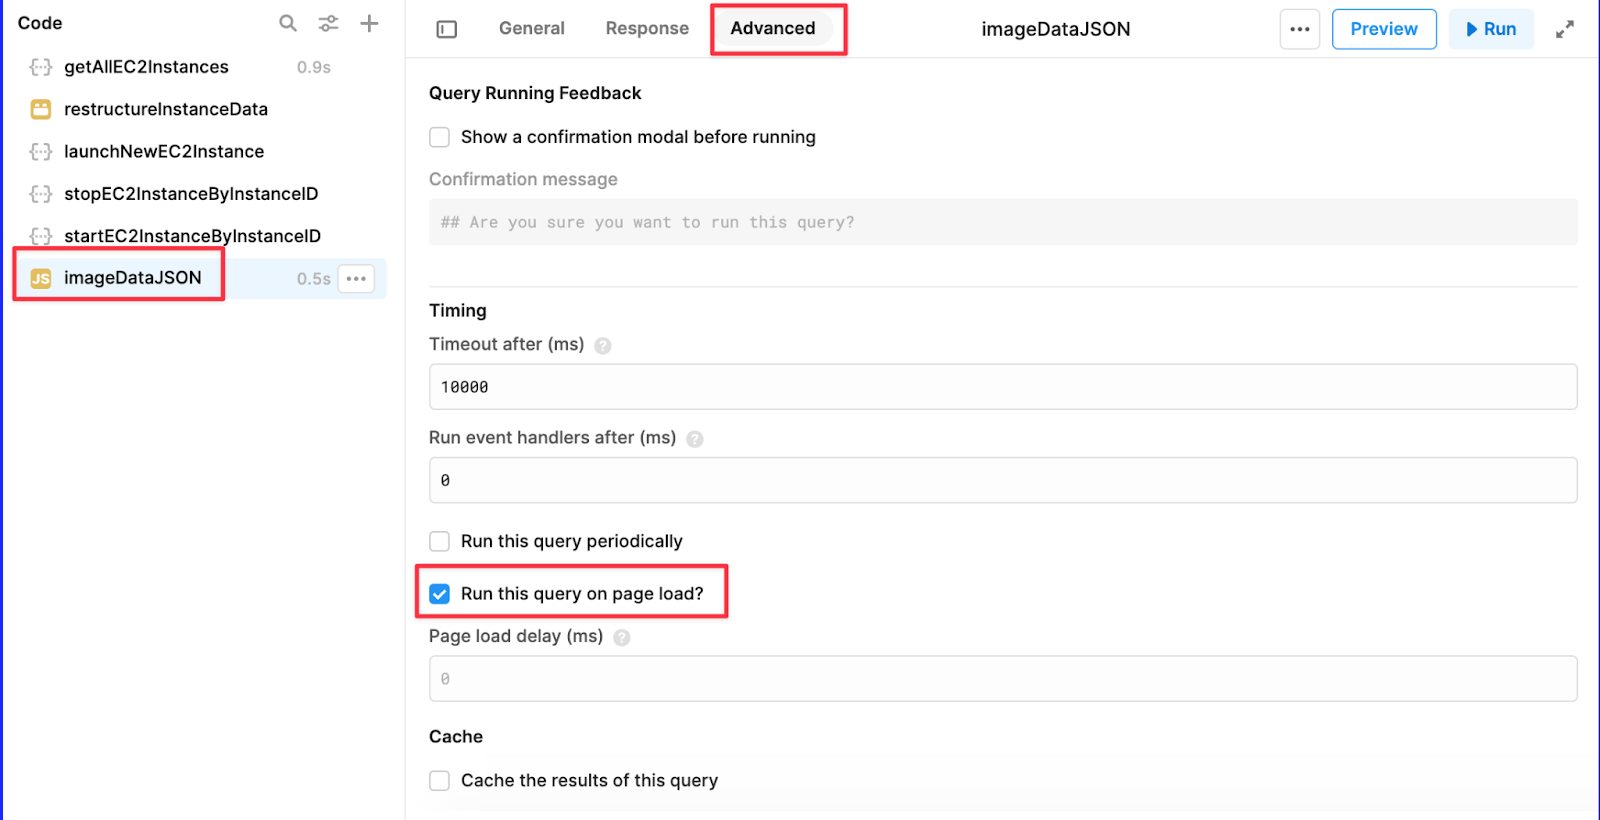
Enabling "Run this query on page load" ensure the data is available when the page loads
Add the Listbox Component to show the list of images available for launch
Now that we have the data ready for the EC2 images we want to be able to choose from, we are ready to build the UI for it.
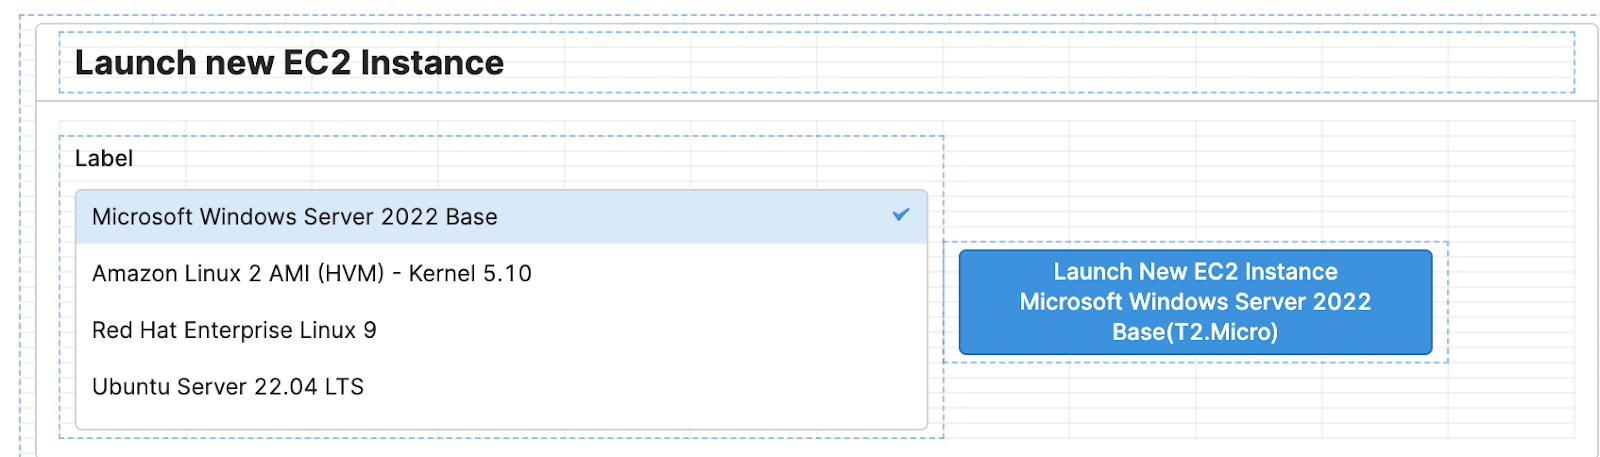
Drag a Listbox component to the canvas, and change the Data Source property to reference the data returned by the imageDataJSON JavaScript query we just created. Also, change the value and label properties of the listbox to item.image_id (value that should be passed when the item is selected) and item.image_title (label value that should be displayed in the Listbox) respectively.
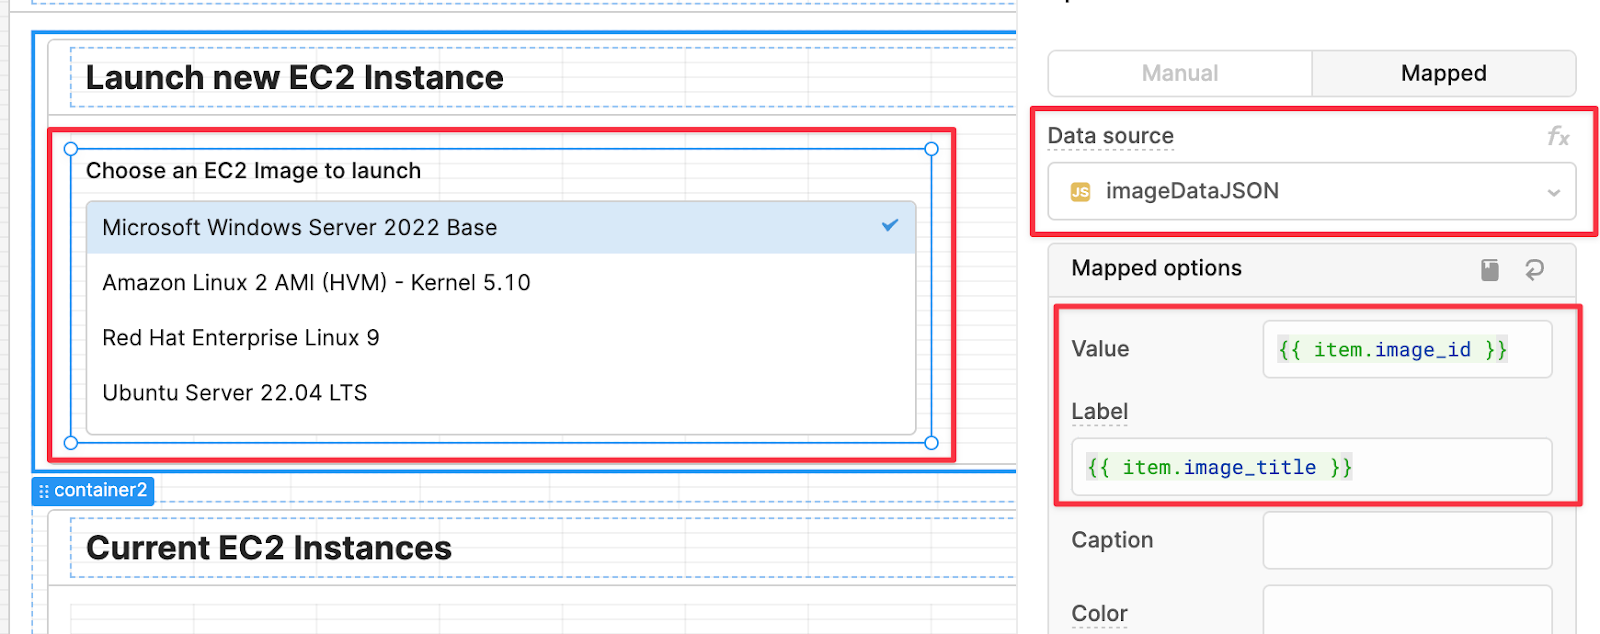
Setup the Listbox Component to display EC2 Image Data returned by imageDataJSON query
Update the launchNewEC2Instance query to reference the image selected in the Listbox Component
Finally, we will update our launchNewEC2Instance to reference the image selected in the Listbox Component by changing the ImageId URL parameter to {{ listbox1.selectedItem.image_id }}.
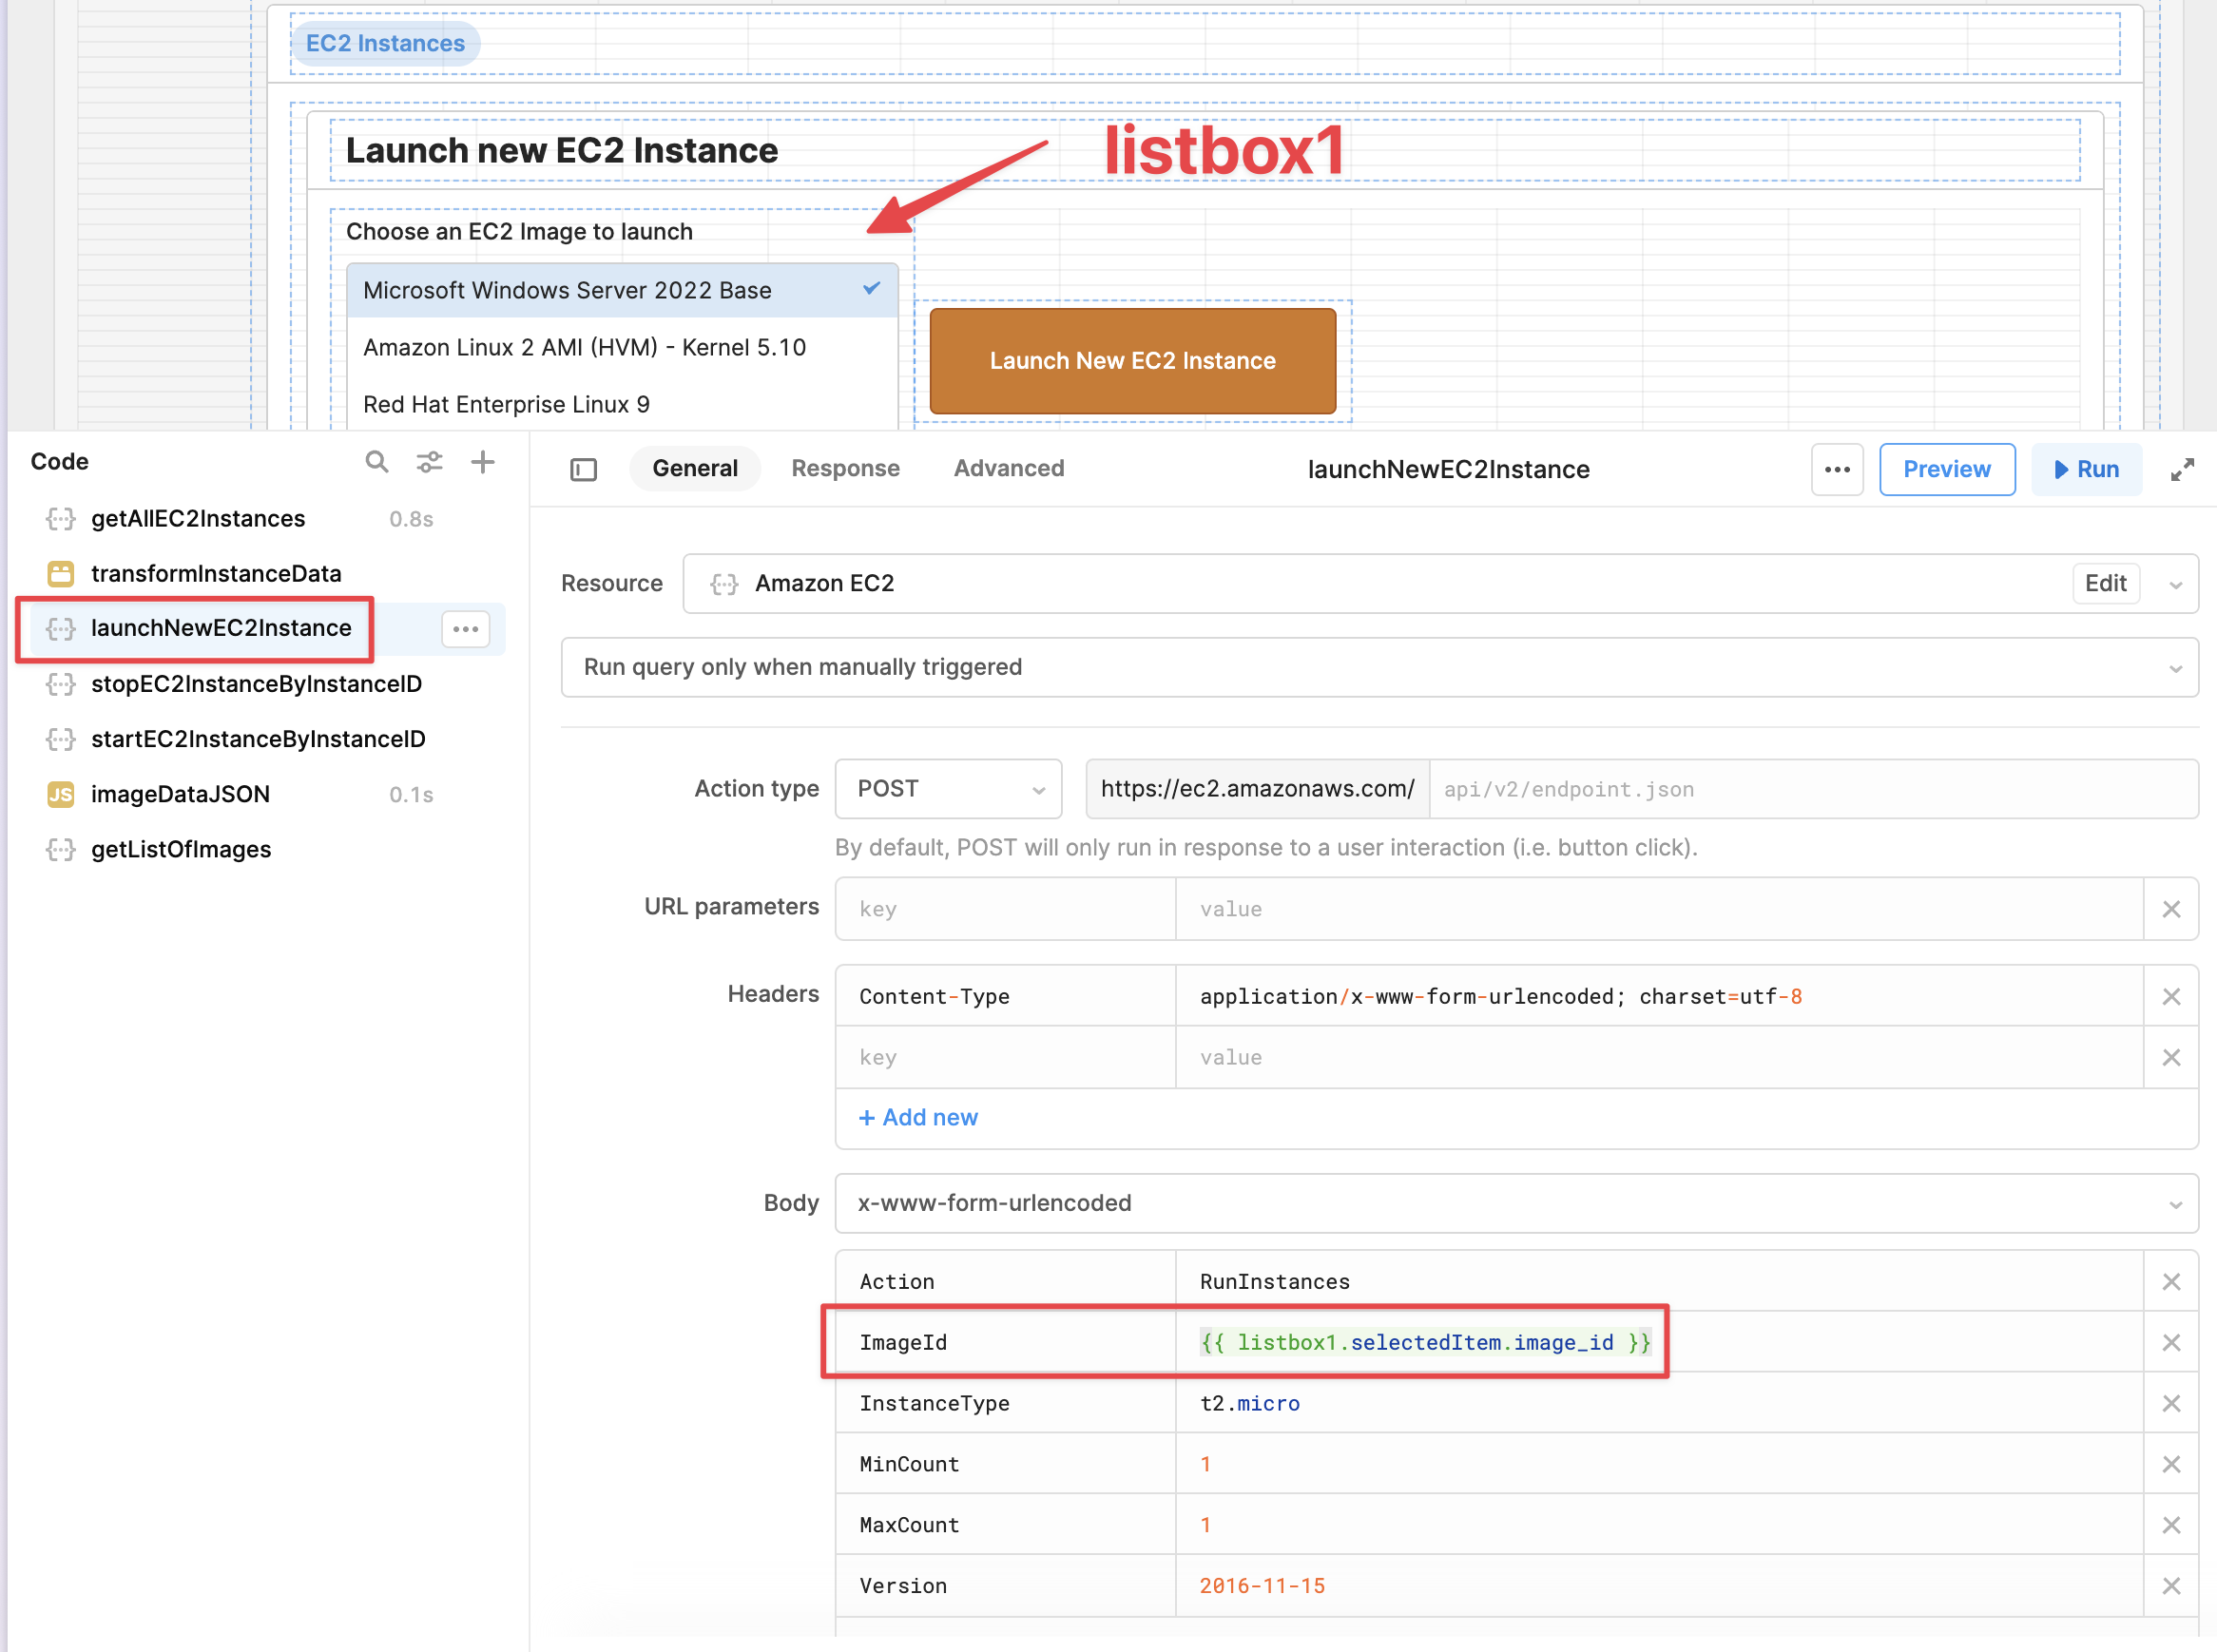
Reference the image selected in the Listbox to launch a new EC2 instance
Wrapping up
Congratulations! After this long journey, you now have your very own Amazon EC2 Instance Manager. With the power to stop, start, and launch instances, and choose from a variety of EC2 images, you've become a DevOps superhero.
To wrap up this post, we used the example of an EC2 Instance Manager to explore how Retool's drag-and-drop UI components and built-in integrations can help you quickly build custom admin panels that simplify common DevOps tasks.
We went through how to add a Resource for Amazon EC2 API, launch and manage EC2 instances, how to change the background color of columns to reflect the instance state data using RGBA CSS color codes, and how to keep the table refreshed by firing off the list EC2 instances query as a success query trigger.
I hope you enjoyed this post, and that it has inspired you to explore Retool further and use it to create your own custom admin panels for managing virtual servers, databases, or other infrastructure resources.
If you’d like to build a similar app, here’s the JSON you can import into your own free Retool instance. You can even build a DevOps dashboard.
Thanks for reading, and happy Retooling!